- ekkeuustalu
- 0 Comments
- 266 Views
Today we will focus on Hostinger domain redirects, showing you the step-by-step process of forwarding a domain on Hostinger.
Whether you’re a small business owner, a creative individual, or someone who just wants to know how domain redirects work on Hostinger, rest assured that today’s guide has you covered.
Let’s jump right in, shall we?
Understanding Domain Redirects
Domain redirect, often referred to as URL forwarding, is a unique website management technique that allows site owners to send visitors who visit a particular domain name to a different web page.
Simply put, it’s like setting up a signpost that guides anyone who lands on a specific website to another destination on the internet.
Imagine for a minute that you have two distinct domain names, let’s call them my-old-website.cloud and destination.my-old-website.cloud, you can configure it in such a way that visitors who visit my-old-website.cloud are automatically redirected to destination.my-old-website.cloud. Doing this is useful for a lot of purposes, including:
- Branding and consistency: If you own multiple domains, you can leverage domain redirects to consolidate them under a single domain. Doing this ensures that no matter which of your domain visitors type, they will end up at your main website. How cool can that be?
- Content organization: Using domain redirect is a brilliant way to help you redirect visitors to specific sections or pages of your website. For example, you can set up a redirect so that a visit to my-old-website.cloud/about, redirects visitors to the About Us page on destination.my-old-website.cloud.
- Website migration: When moving your website to a new domain, leveraging redirects ensures visitors who visit your old domain are redirected seamlessly to your new website without encountering dead links or confusion.
- Marketing campaigns: Redirects are incredibly amazing for marketing campaigns. You can set up a unique and easy-to-remember URL for a campaign. And once the campaign ends, you can redirect all that traffic back to your main website.
Domain redirects provide site owners with a reliable tool to manage online pathways and enhance user experience. They ensure that your visitors never miss the intended content.
Domain providers like Hostinger provide users with an intuitive and hassle-free way to set up redirects. By taking advantage of Hostinger domain redirects, you can easily steer your online traffic to where you want it to go.
If you want to learn more about how URL redirects work and what the best practices are, do check out our blog post on that topic.
Steps for implementing Domain Redirects using Hostinger
Now that we have provided some background on domain redirects in general, let’s teach you how to redirect a domain on Hostinger.
Redirecting a domain on Hostinger isn’t rocket science. As a matter of fact, the process is pretty straightforward, and even a novice can redirect a domain without much hassle. There might be some usage and security issues which we will get to a bit later on.
Step 1: Log in to your Hostinger account
To begin, log in to your Hostinger account. Once you have successfully logged in to your account, click on the menu item “Domains”.
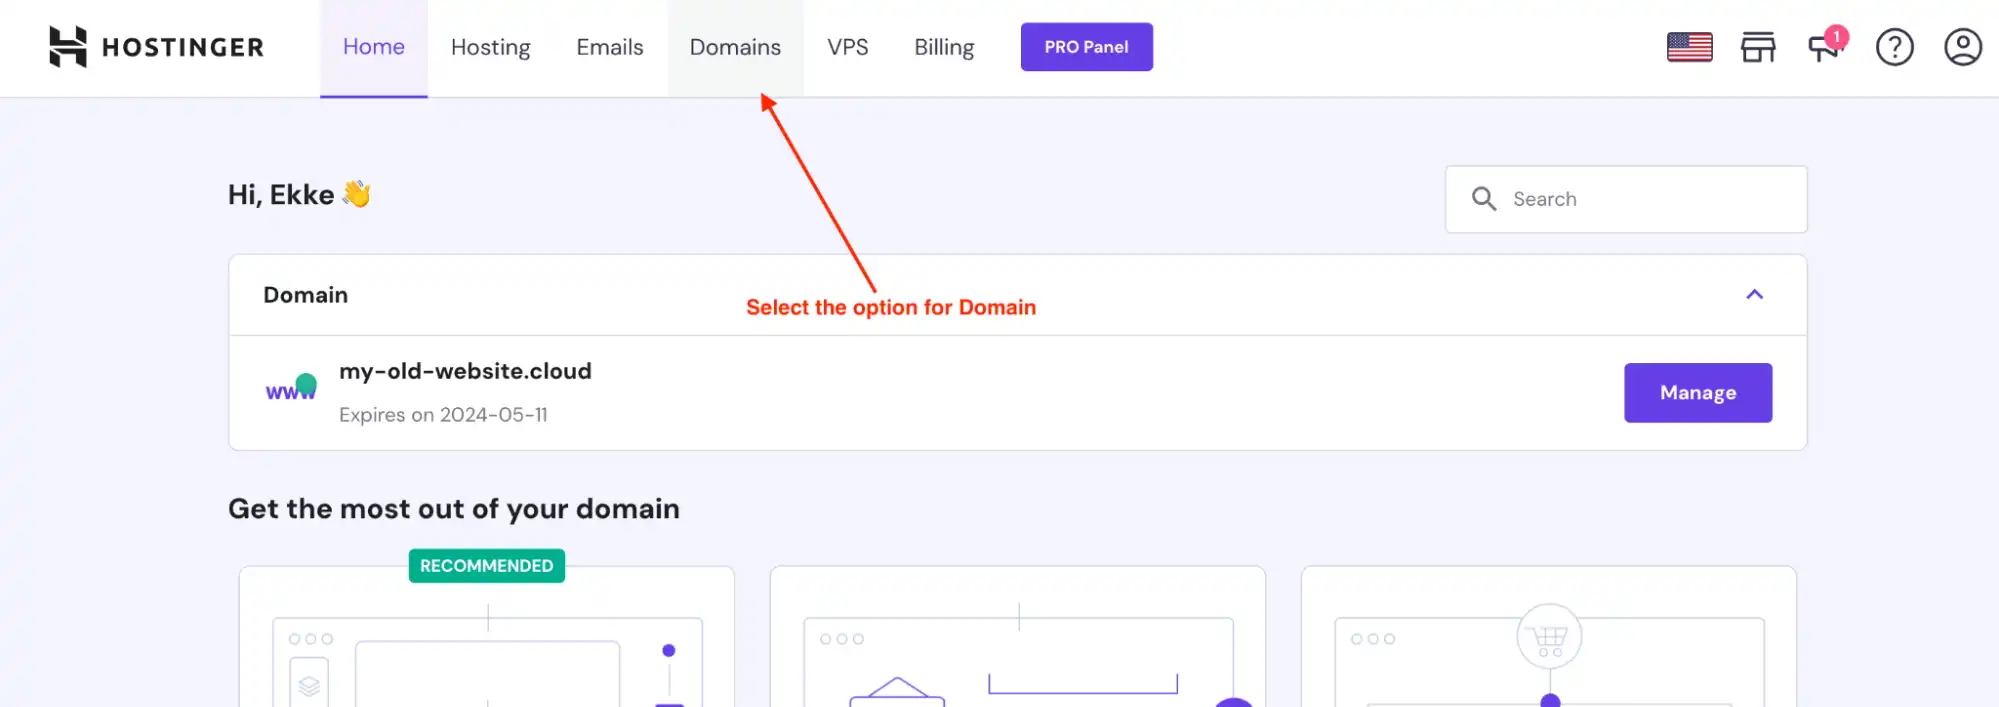
Step 2: Manage domains
On the next page, you’ll see a list of domains you have access to. Navigate all the way down, and select the option for Manage domains for the domain you want to change.
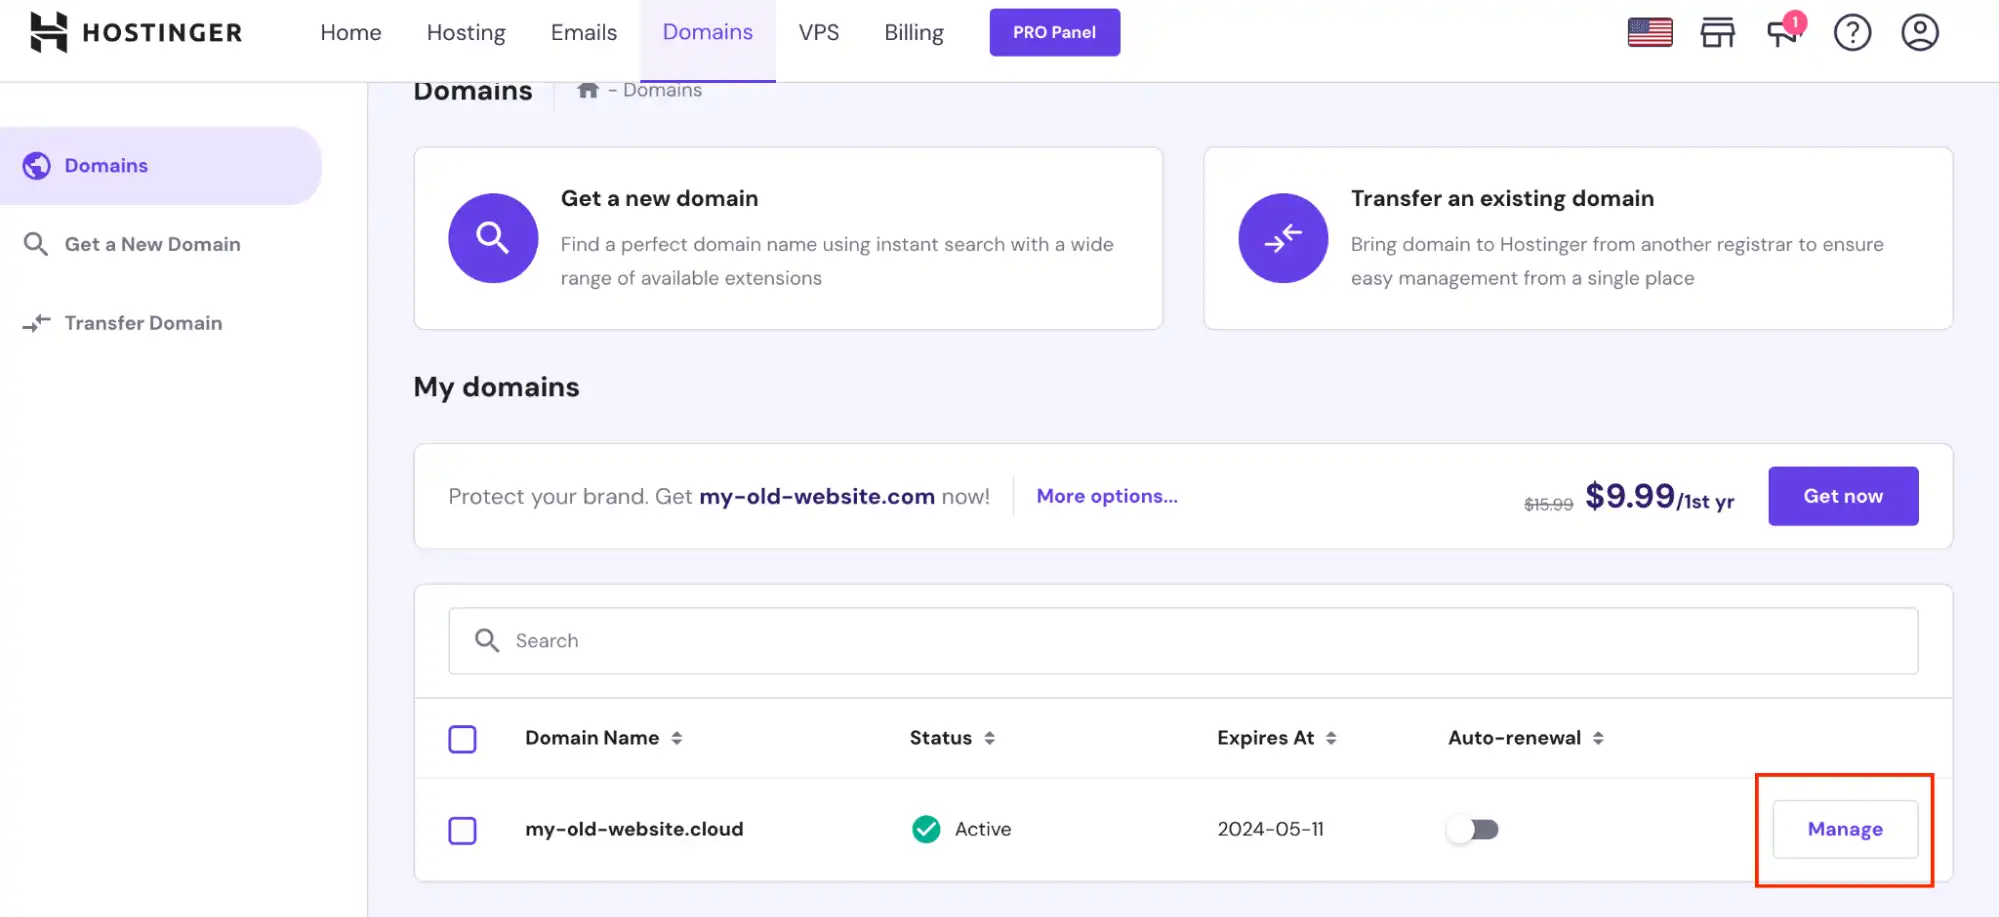
Step 3: Forward domain
Now that you have selected the option to Manage the domain, a new page should launch. Simply navigate all the way down and select the option for “Forward domain to an existing website.”
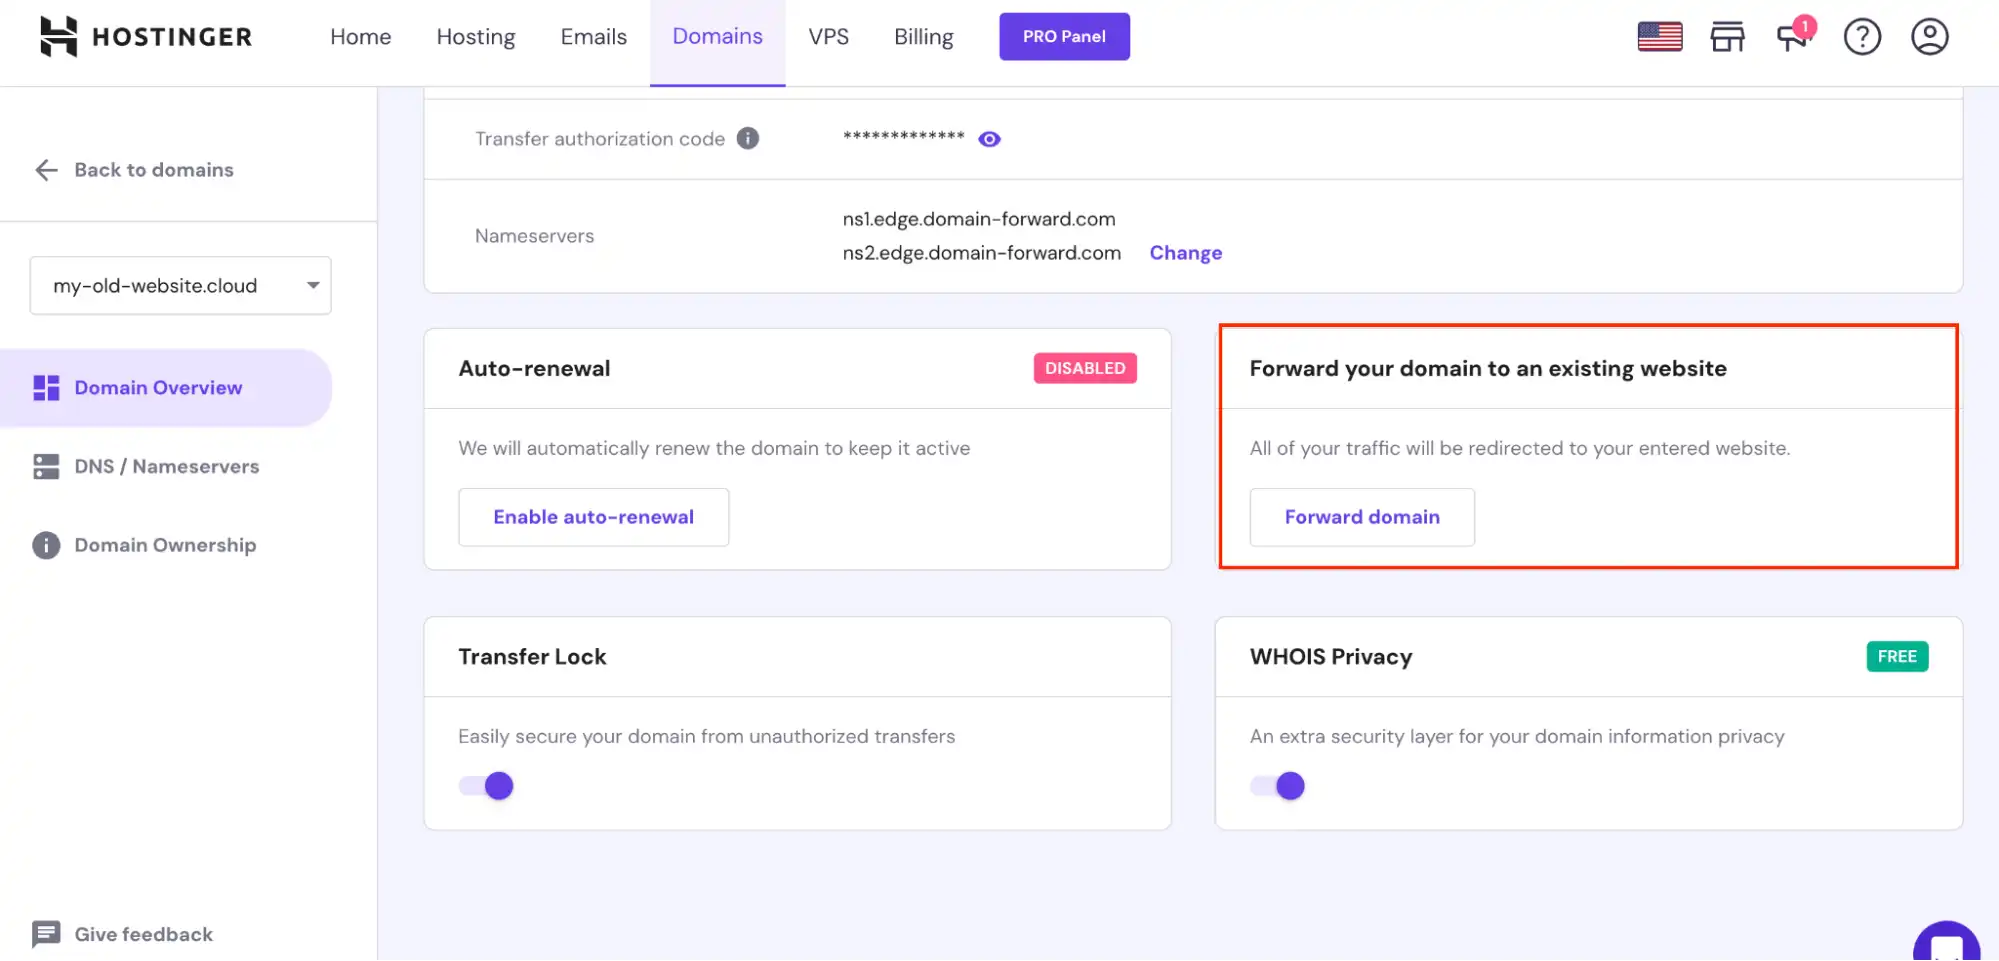
Step 4: Enter domain redirect information
With the option to “Forward domain to an existing website” selected, you only need to type in the domain URL you’d like to redirect to. For this example, we will use destination.my-old-website.cloud as the URL to which we would like to redirect our original domain.
After entering your domain information, simply hit the Create button, and you’re all set.
If you followed the steps as we showed you, you should have something like this shown on the “Domain forwarding” page:

The screenshot above shows that we have successfully configured our original domain address to redirect to a new one (https://destination.my-old-website.cloud). Next, let’s test if the redirect actually works as expected.
Step 5: Testing the redirect using HTTP
Now we want to check if the redirect works properly. After giving it some time for the DNS records to propagate, we can use a “redirect checker tool”. Using a tool like this we can see how the redirects are currently working for actual users visiting the original URL.
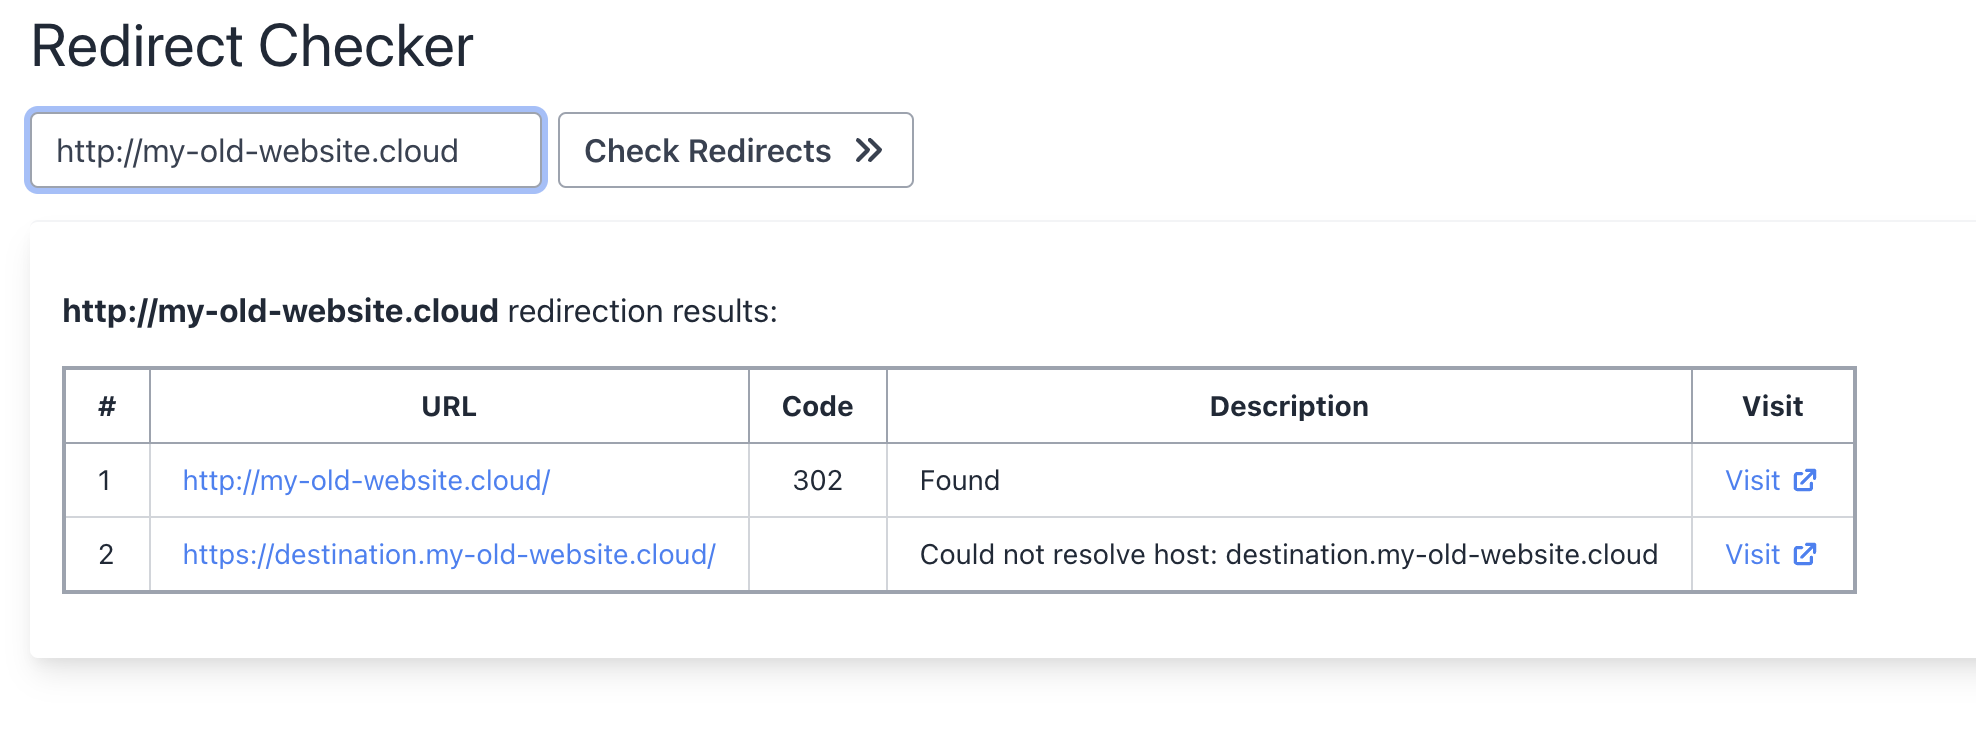
Looks like the HTTP redirects are working correctly. You can ignore the destination.my-old-website.cloud error. We haven’t set up an actual site on that address and that’s why the error “could not resolve host” is being shown.
Step 6: Testing if HTTPS redirection works
When we use HTTPS, we already get an error on the original domain itself. In the picture below you can see a technical description about the SSL certificate causing errors.
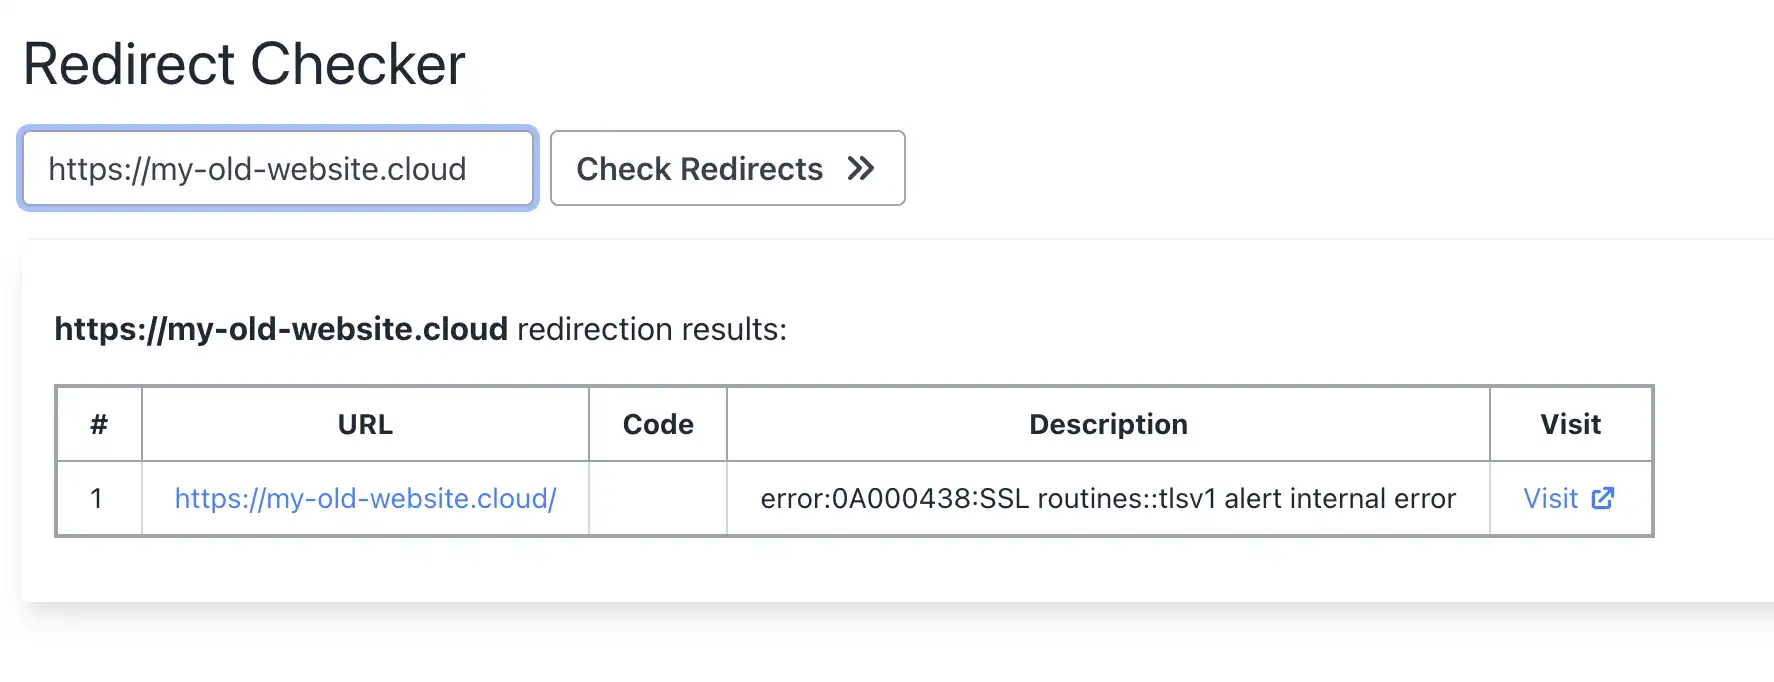
The issue here is that Hostinger domain forwarding does not configure an SSL certificate for the domain, which means that HTTPS (the secure protocol for websites) is not enabled. This is a significant downside as it can potentially impact the security and SEO ranking of your site. Visitors may also receive a warning that the connection is not secure, which may deter them from proceeding to your site.
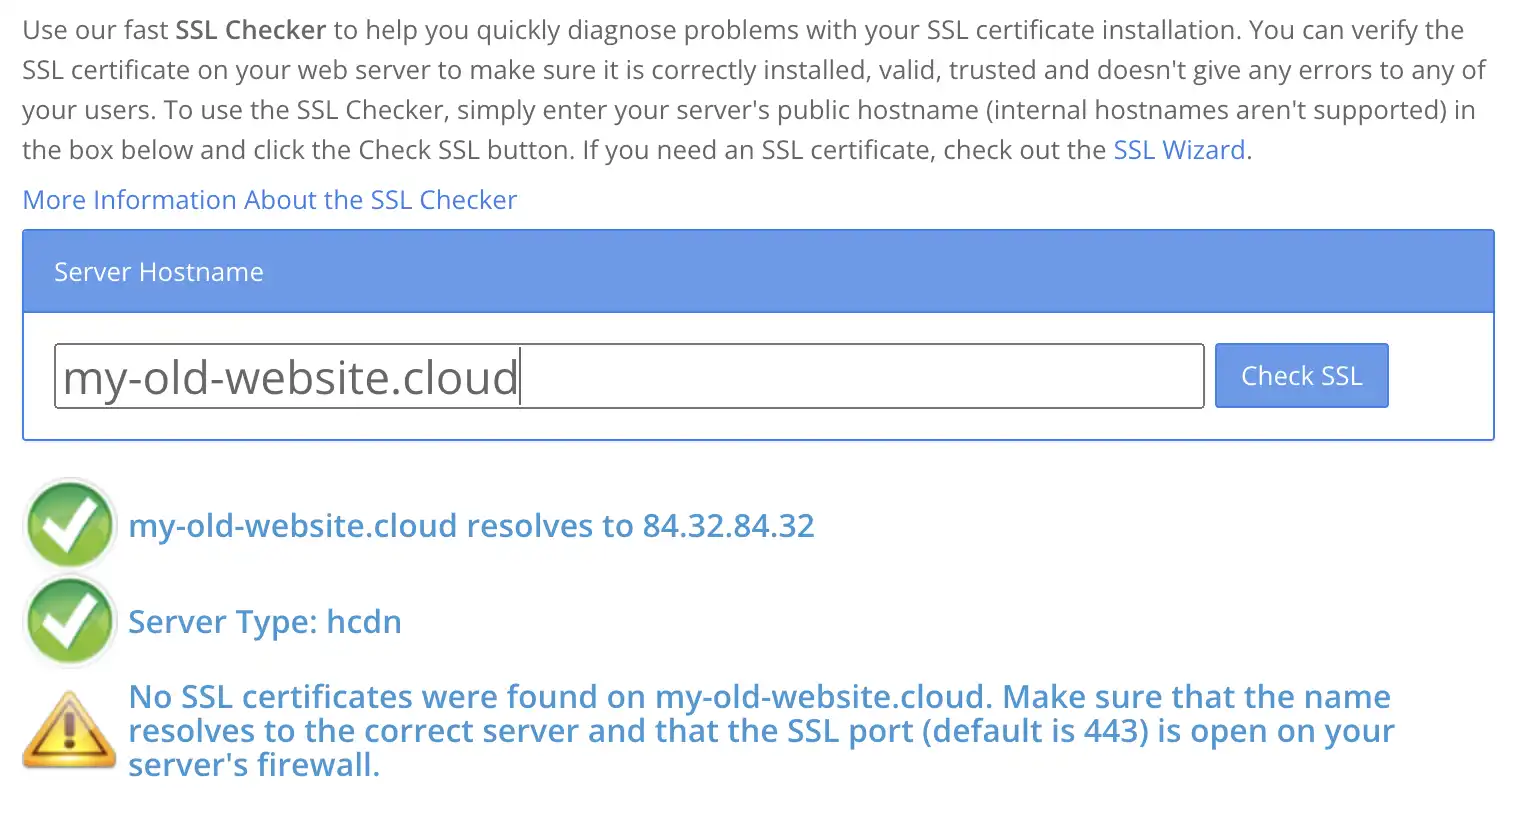
As we can see from the picture below, when we use an “SSL checker” to validate whether the website is secure, no certificate is found for the domain. Let’s fix that.
Domain-forward.com: The Ultimate Solution to All Domain Redirect Issues
Using Domain-forward.com, you enjoy access to built-in HTTPS support and analytics, so you’re able to get a first-hand experience of how the redirects are used.
When using Domain-forward.com to redirect your domain, you only need to create an account, set up your source and destination addresses, and configure your DNS provider. Trust us when we say it doesn’t get easier than this.
Ready to bypass all of the roadblocks you are facing with your primary provider? Let’s show you how to use this incredible platform to redirect your domain.
Step 1: Create an Account
First things first, you need to create an account, which is pretty straightforward.
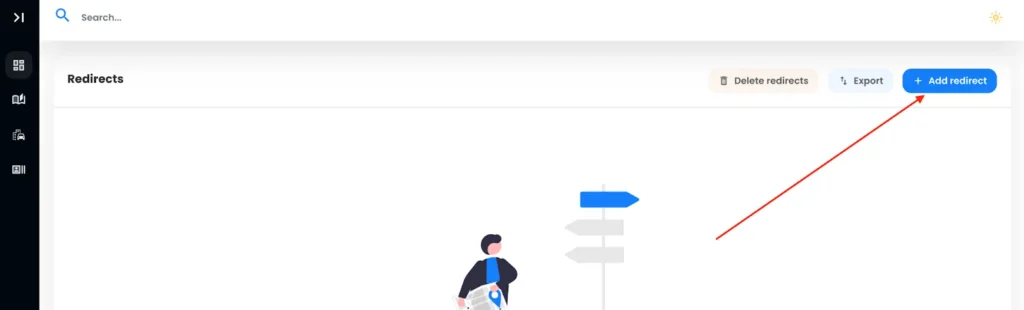
Step 2: Add your domain to Domain-forward.com
After successfully creating an account, it’s time to add the domain you’d like to redirect. To do that, click on the option to Add Redirect.
Since we already have a domain with Hostinger, “my-old-web.site,” we will add the domain to the Source URL field. For a hassle-free experience, we recommend adding www and the apex (non-www).
Also, we need to set the Destination URL, i.e., where we want to forward to.
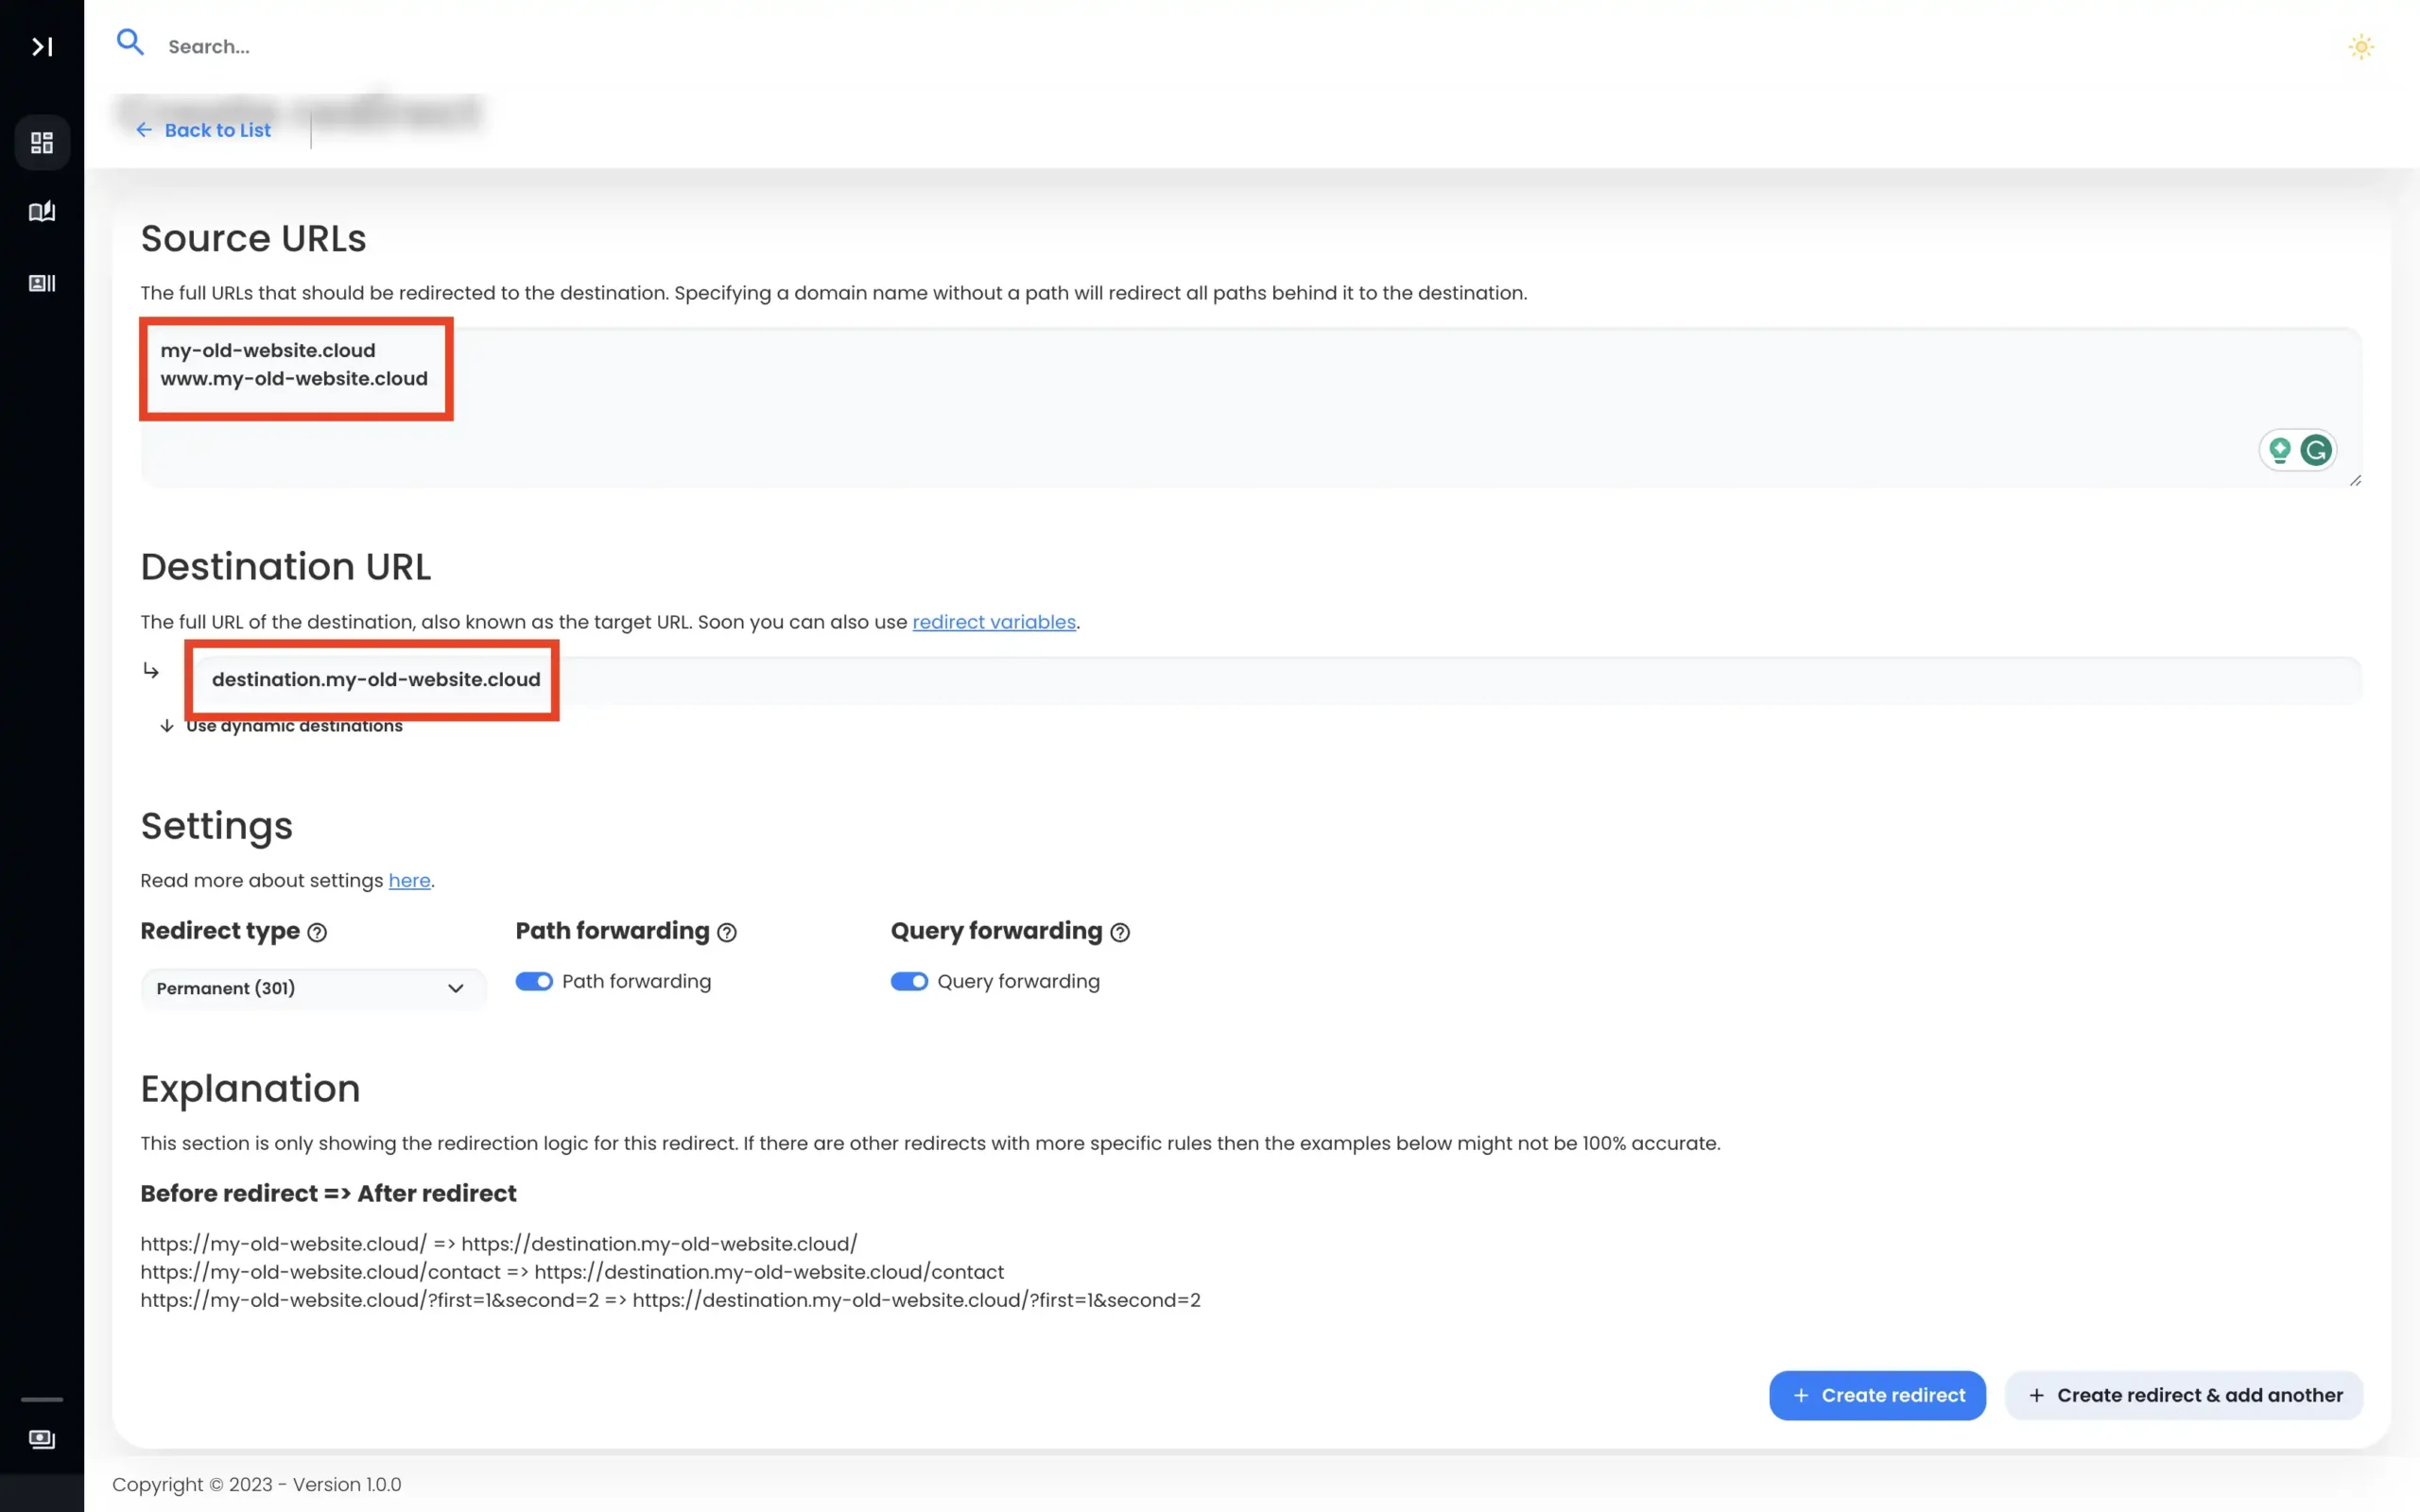
With all this information entered, we need to go ahead and create our redirect.
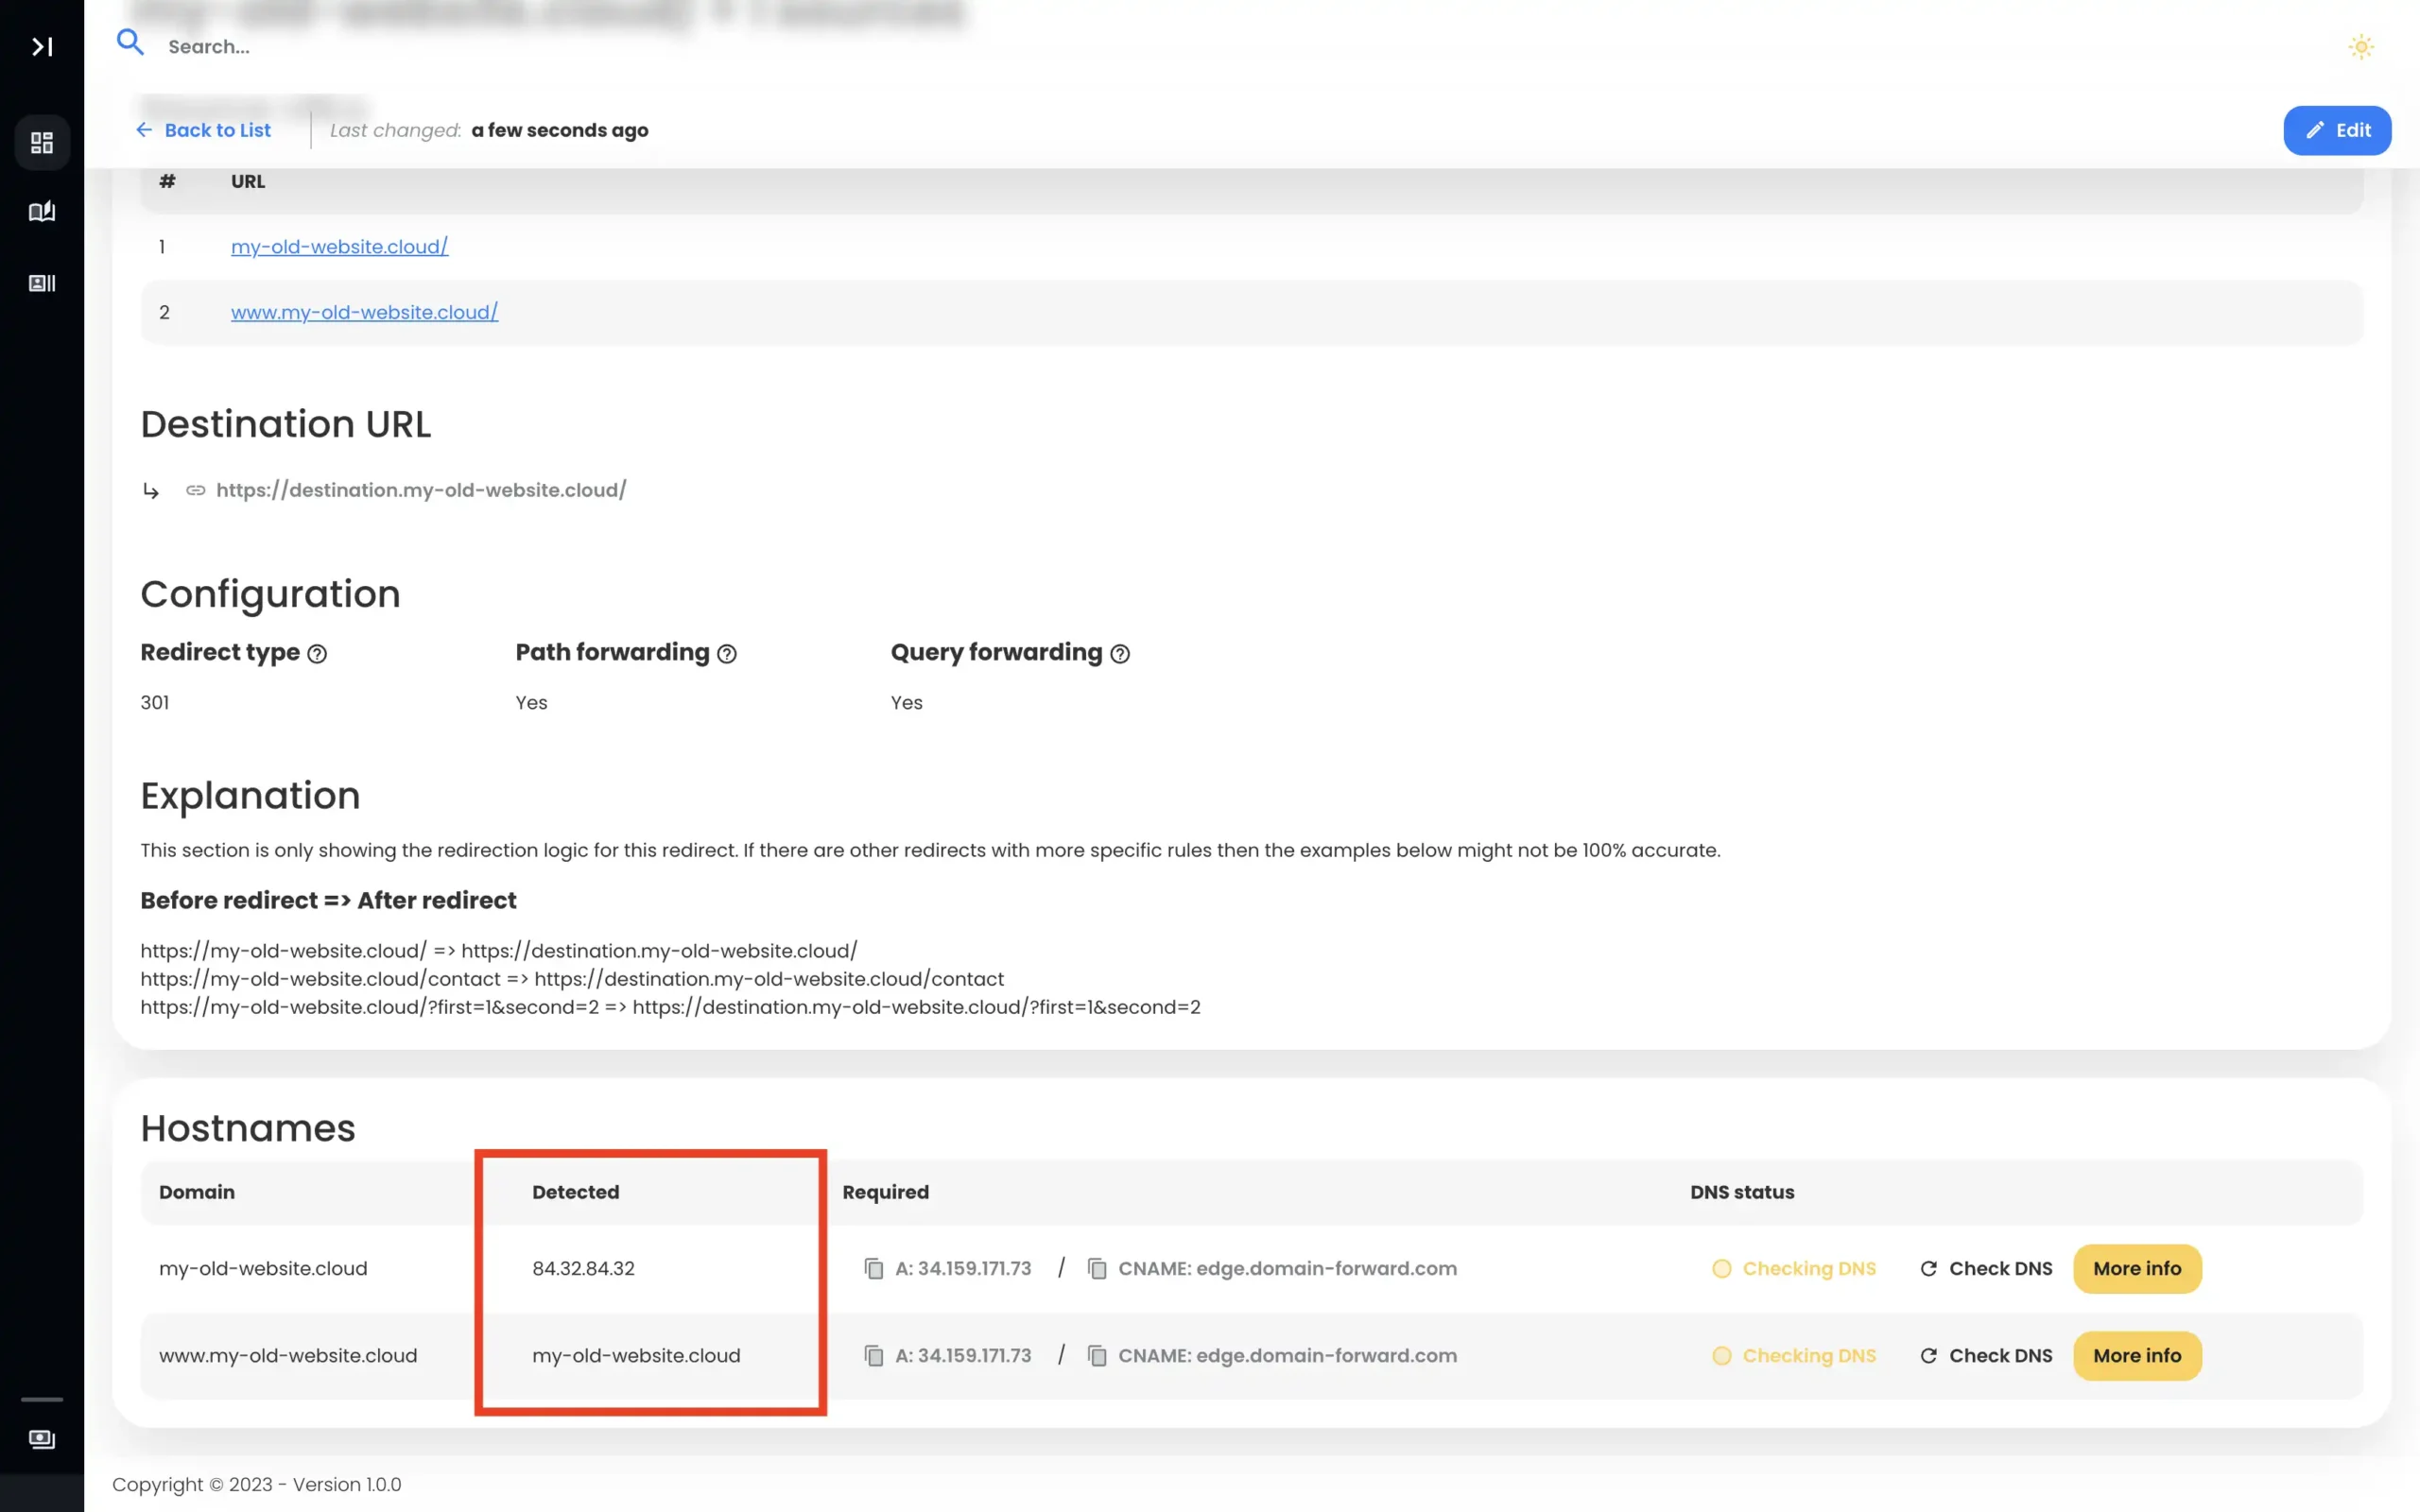
Note: After creating the redirect, you’ll notice the DNS entries are detected. Unfortunately, the required values are different. We need to fix that.
Step 5: Head over to Hostinger
To complete our domain redirect using Domain-Forward, we need to head to Hostinger to tweak the DNS changes.
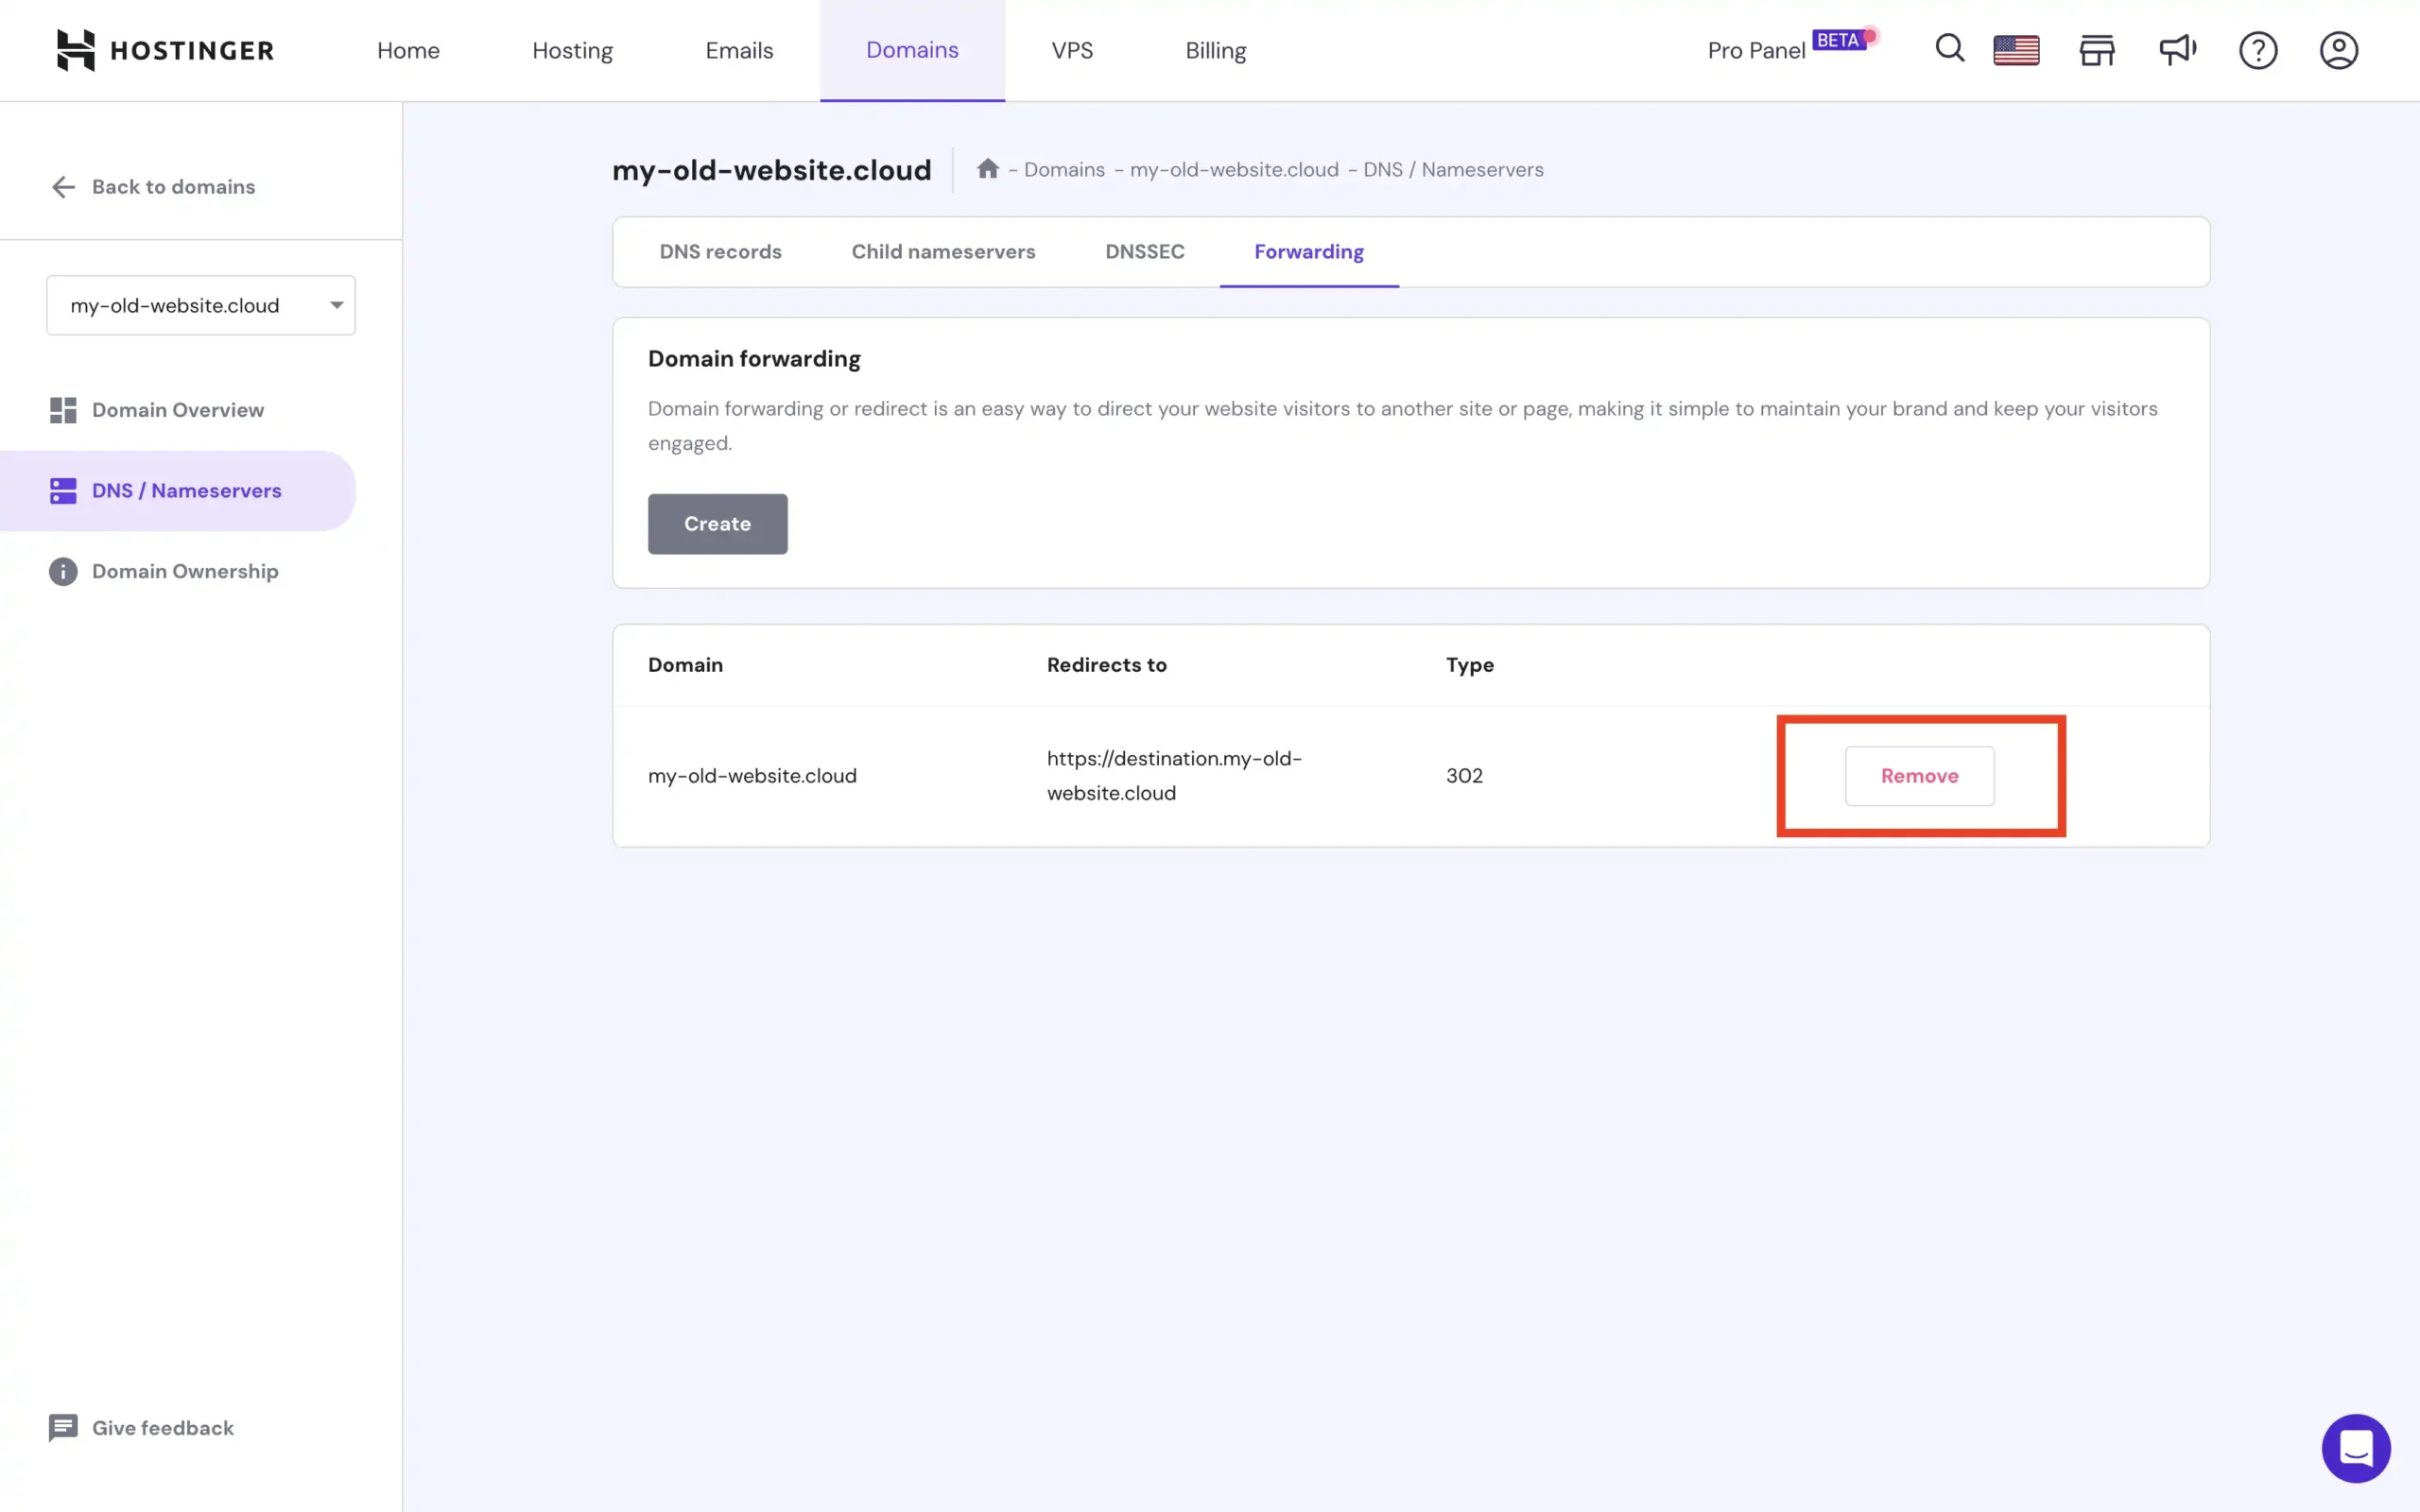
So log in to your Hostinger account, navigate to your Dashboard, and select the option for Manage for the domain you want to redirect. Under the domain forwarding settings, remove the old forwarding if it has been enabled.
Step 6: Change DNS settings
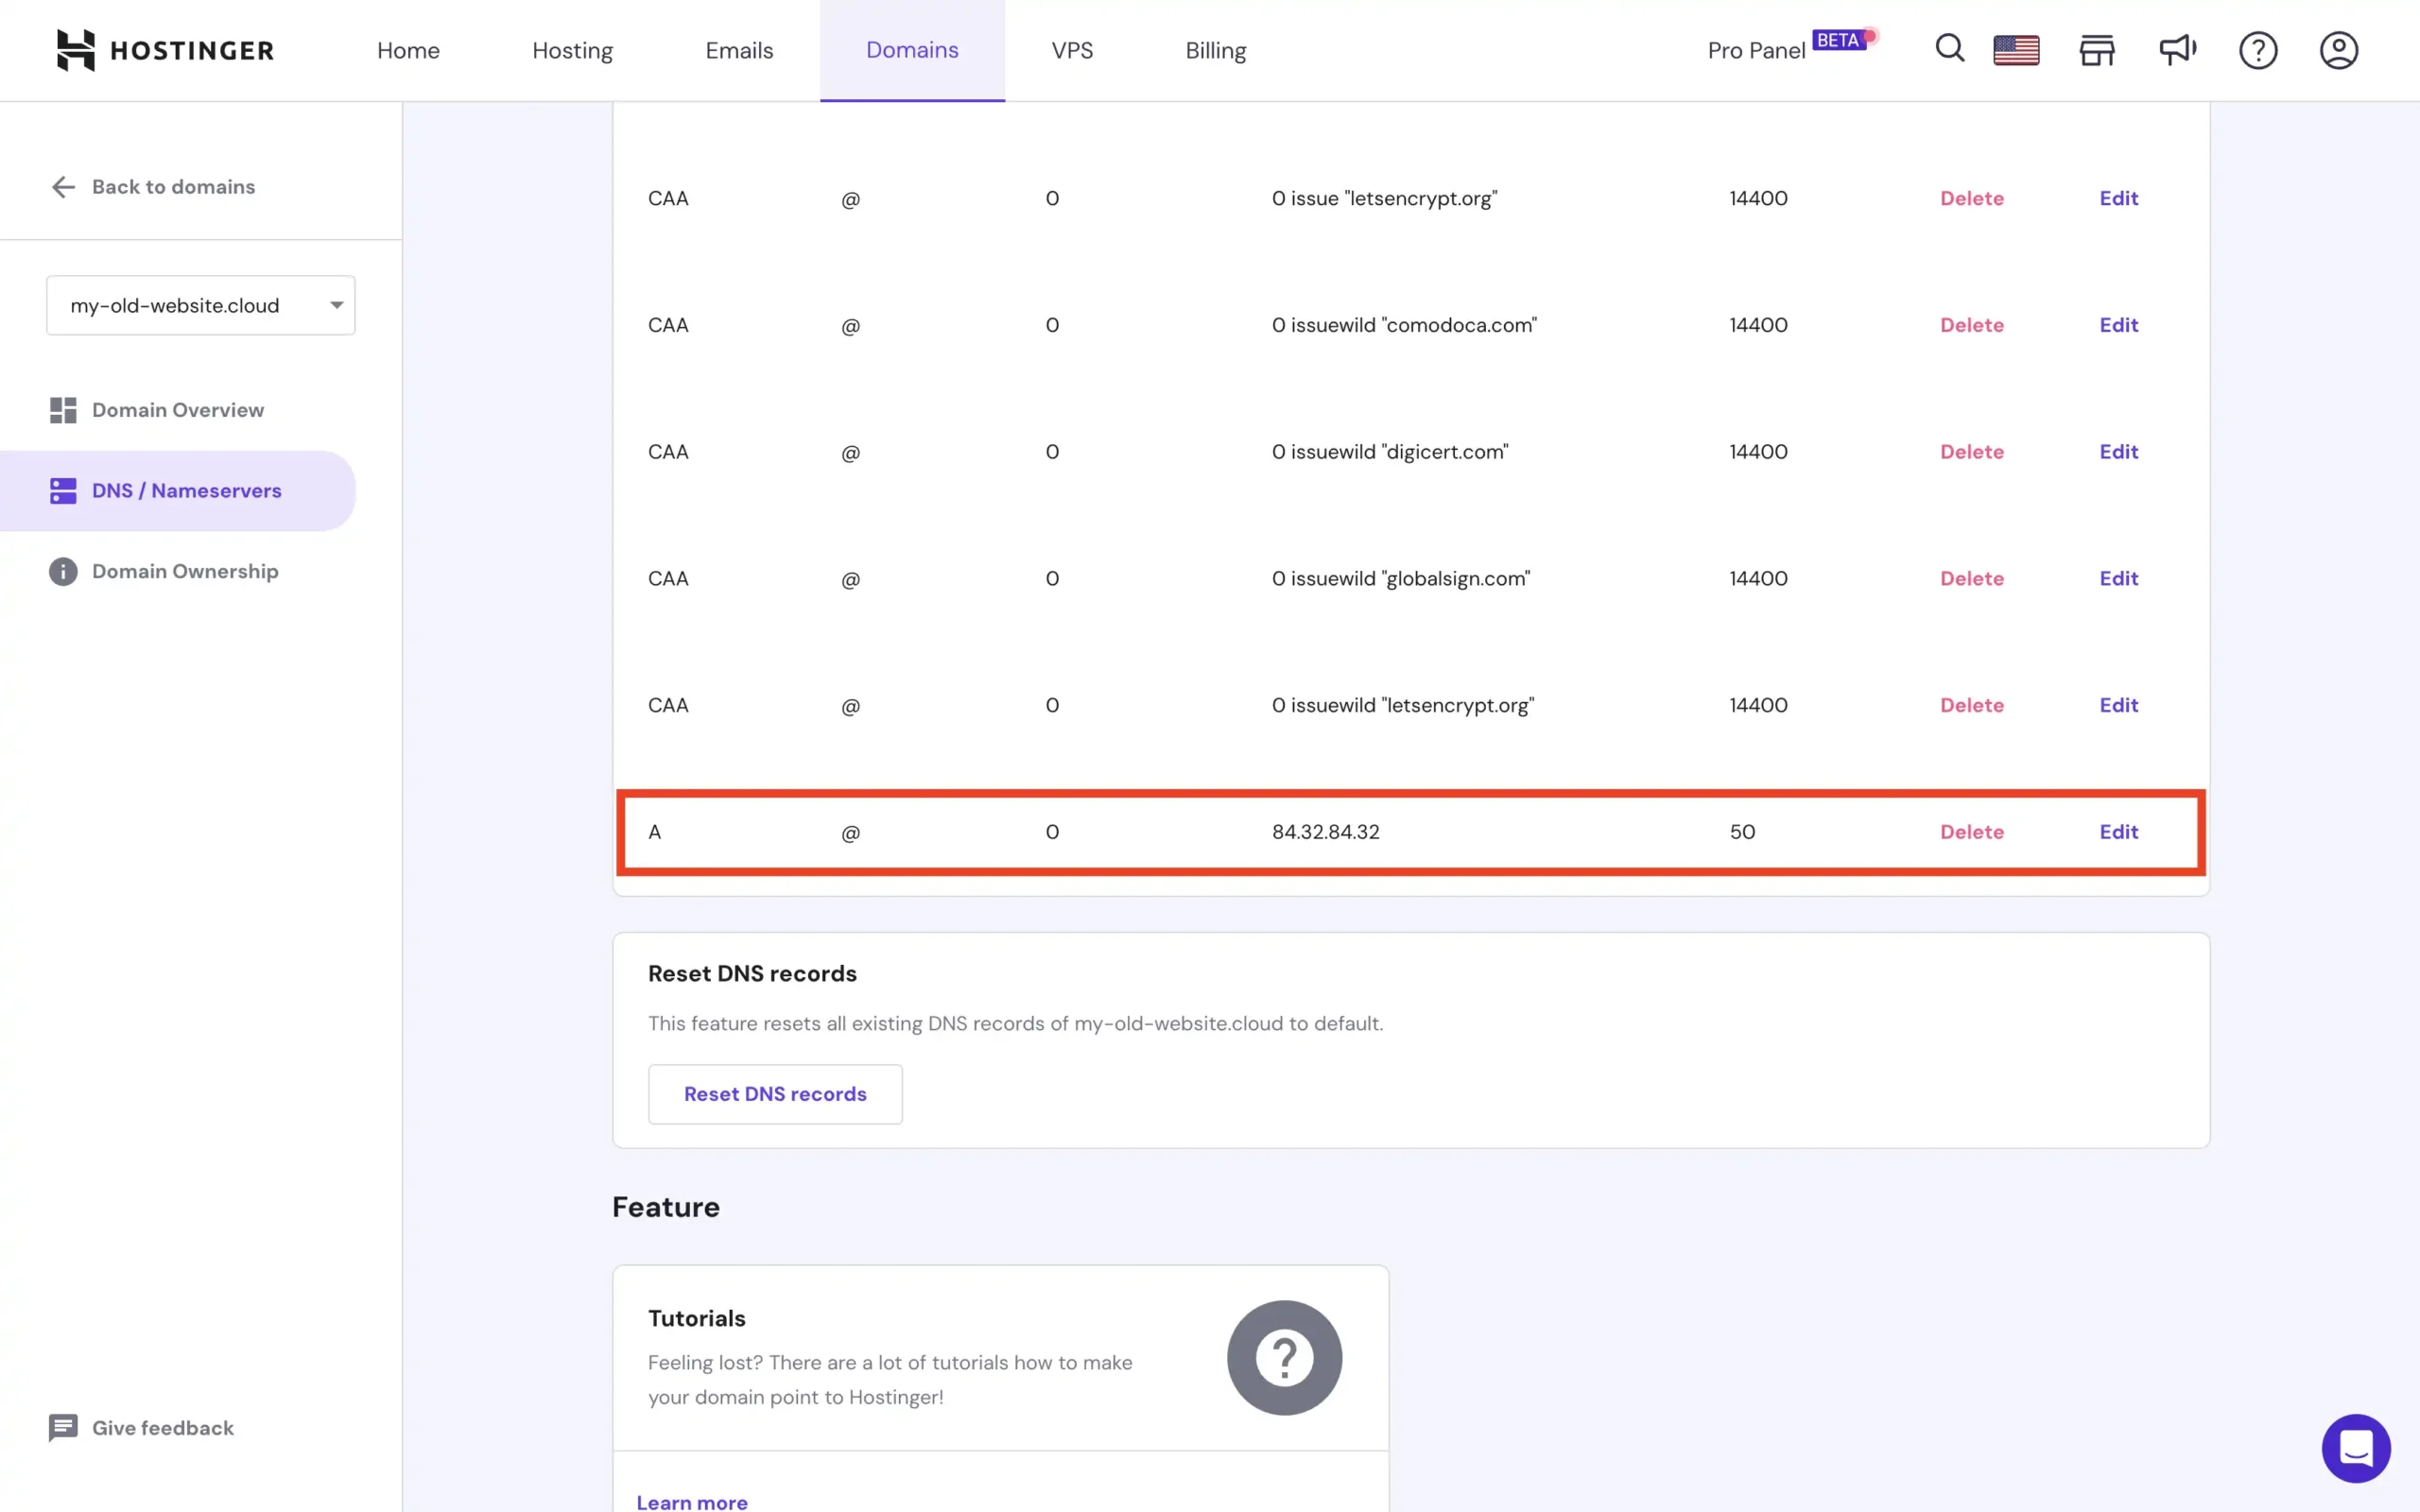
Now, it’s time to tweak our DNS settings. On the same page where you removed the domain forwarding, click on the “DNS records” menu item. In the list of records, you might have previously configured A or CNAME records that you will have to change. The image below shows the A record that we have to change. To do that, click on “Edit”.
Select the Type CNAME Record and enter @ as Name with edge.domain-forward.com as target. Please check that this is the value that is also provided for you in the Domain Forward app before you configure it like that. ALIAS or A records work as well, but we have opted for CNAME in this case.
It is possible that Hostinger will change the CNAME to ALIAS after you click “Update”, but that doesn’t matter.
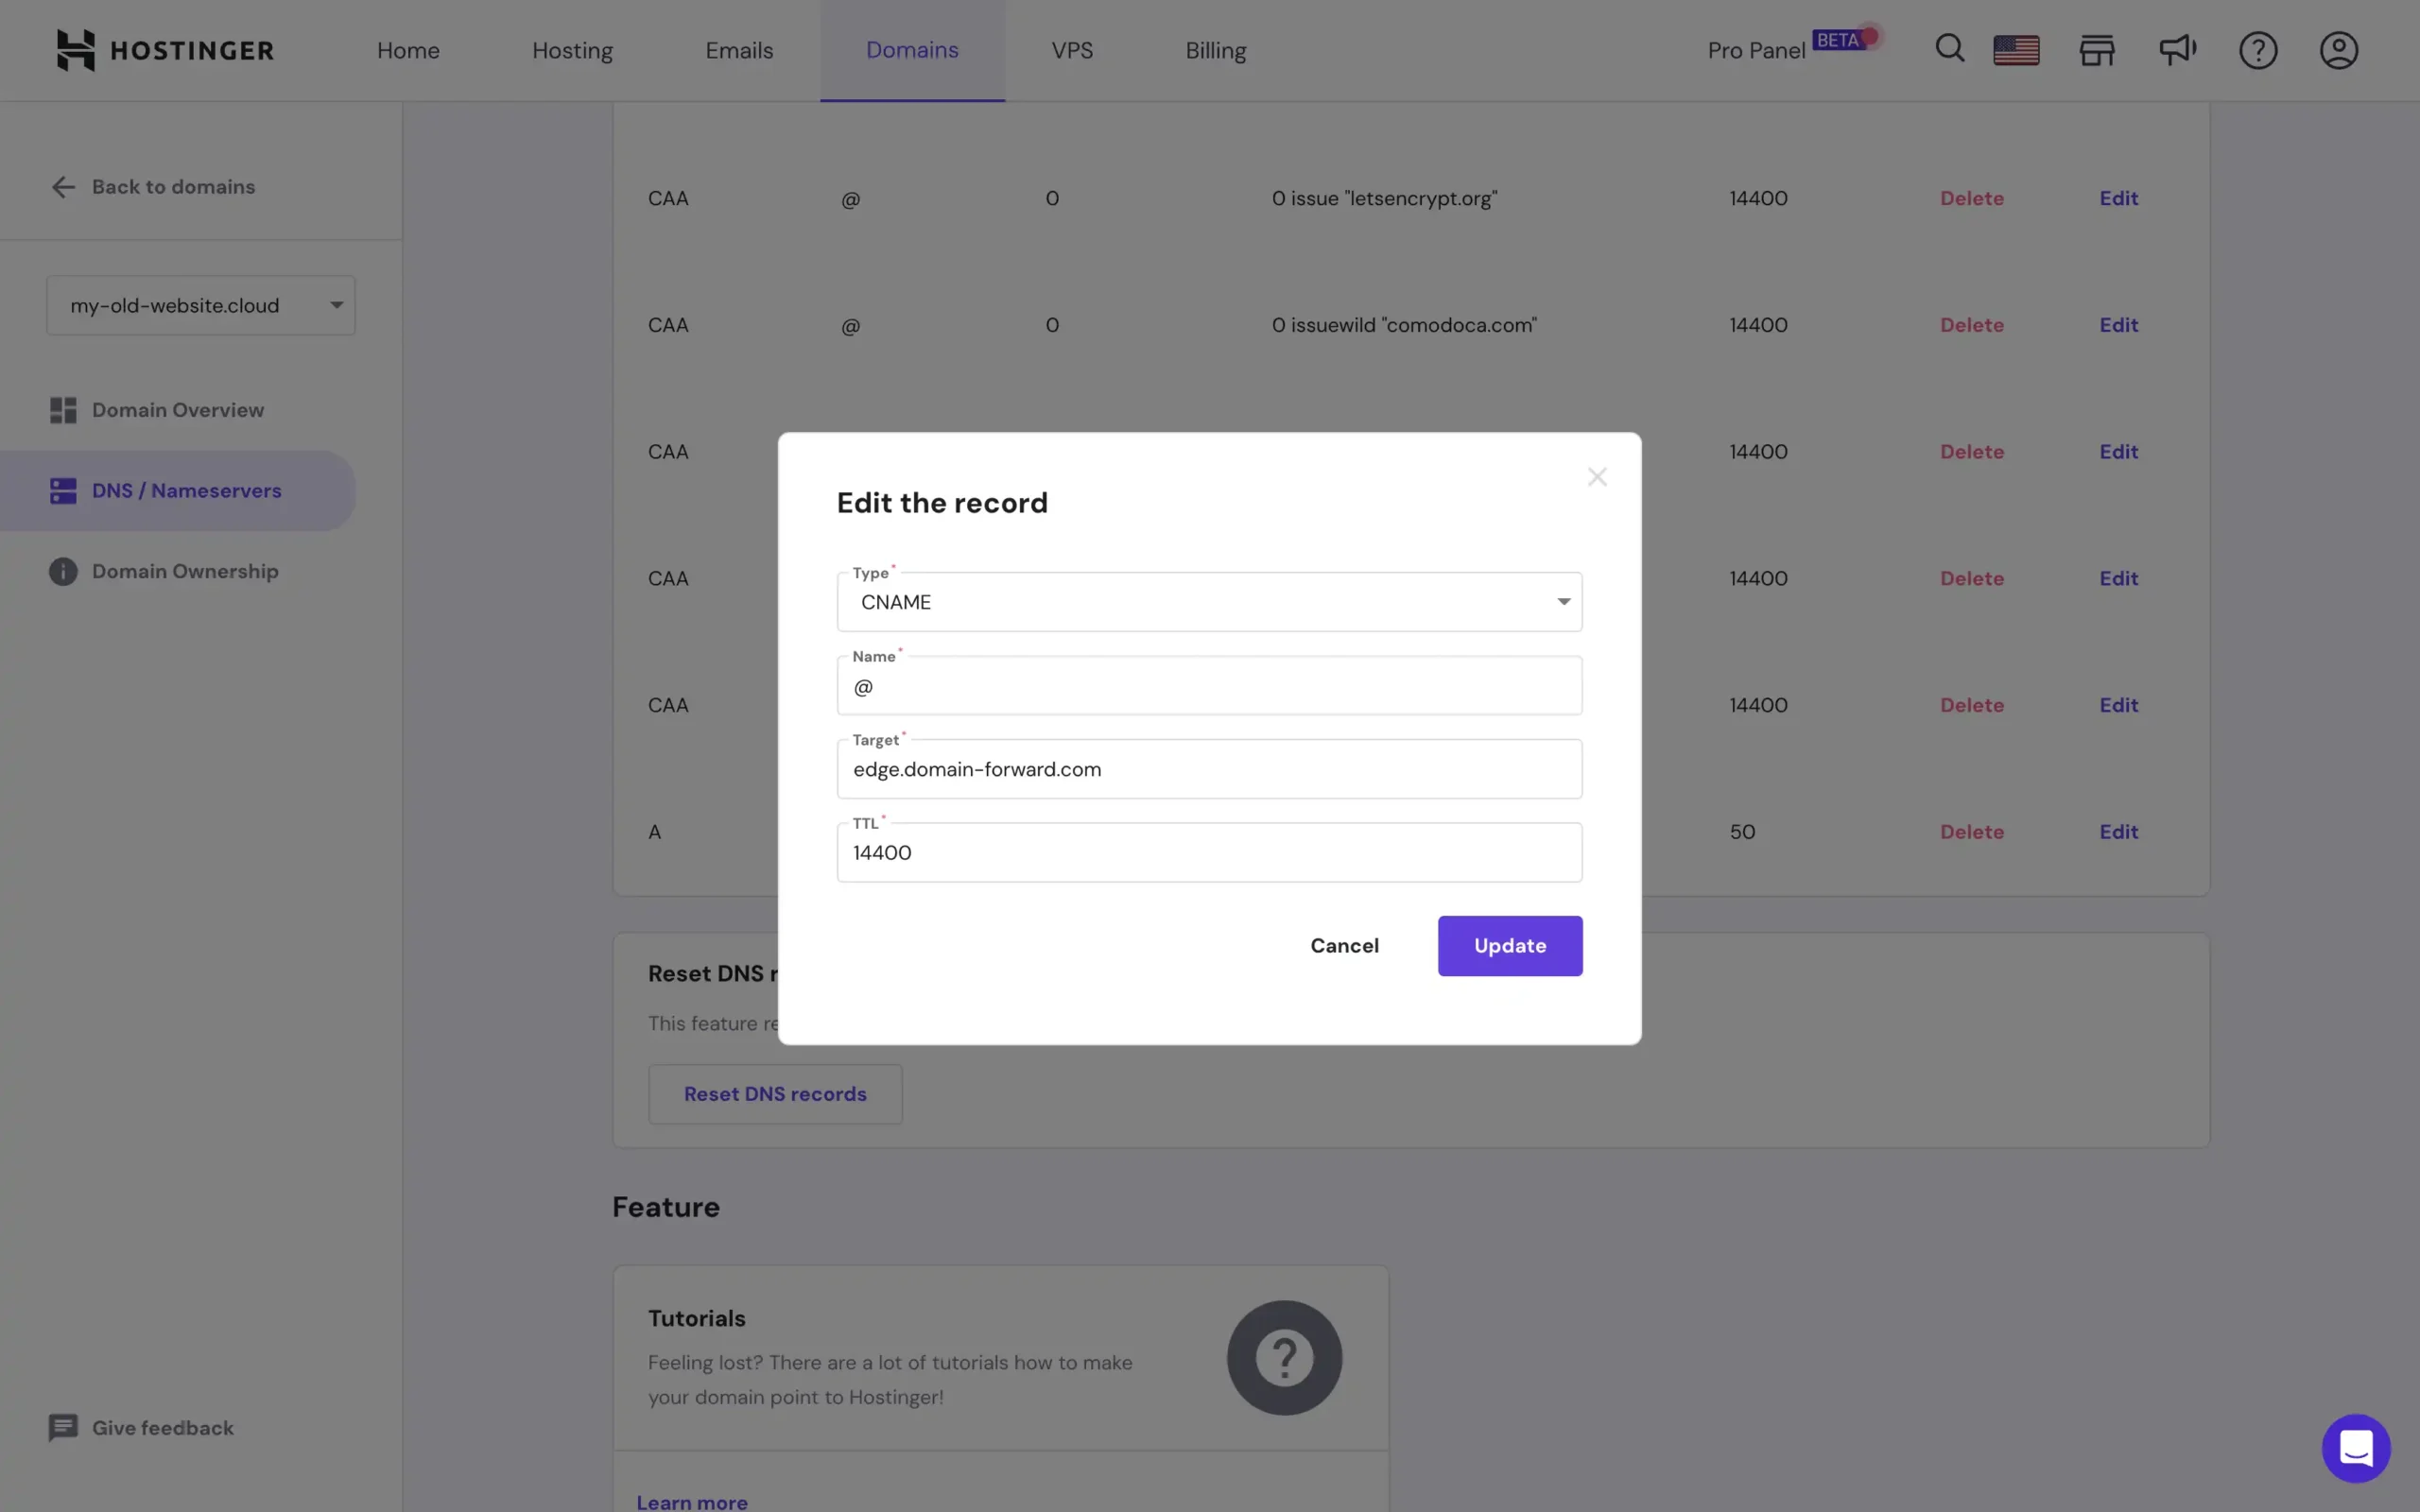
With that done, we need to repeat the process. For the second option, select the CNAME record again and enter www as Name with ‘edge.domain-forward.com’ as the target.

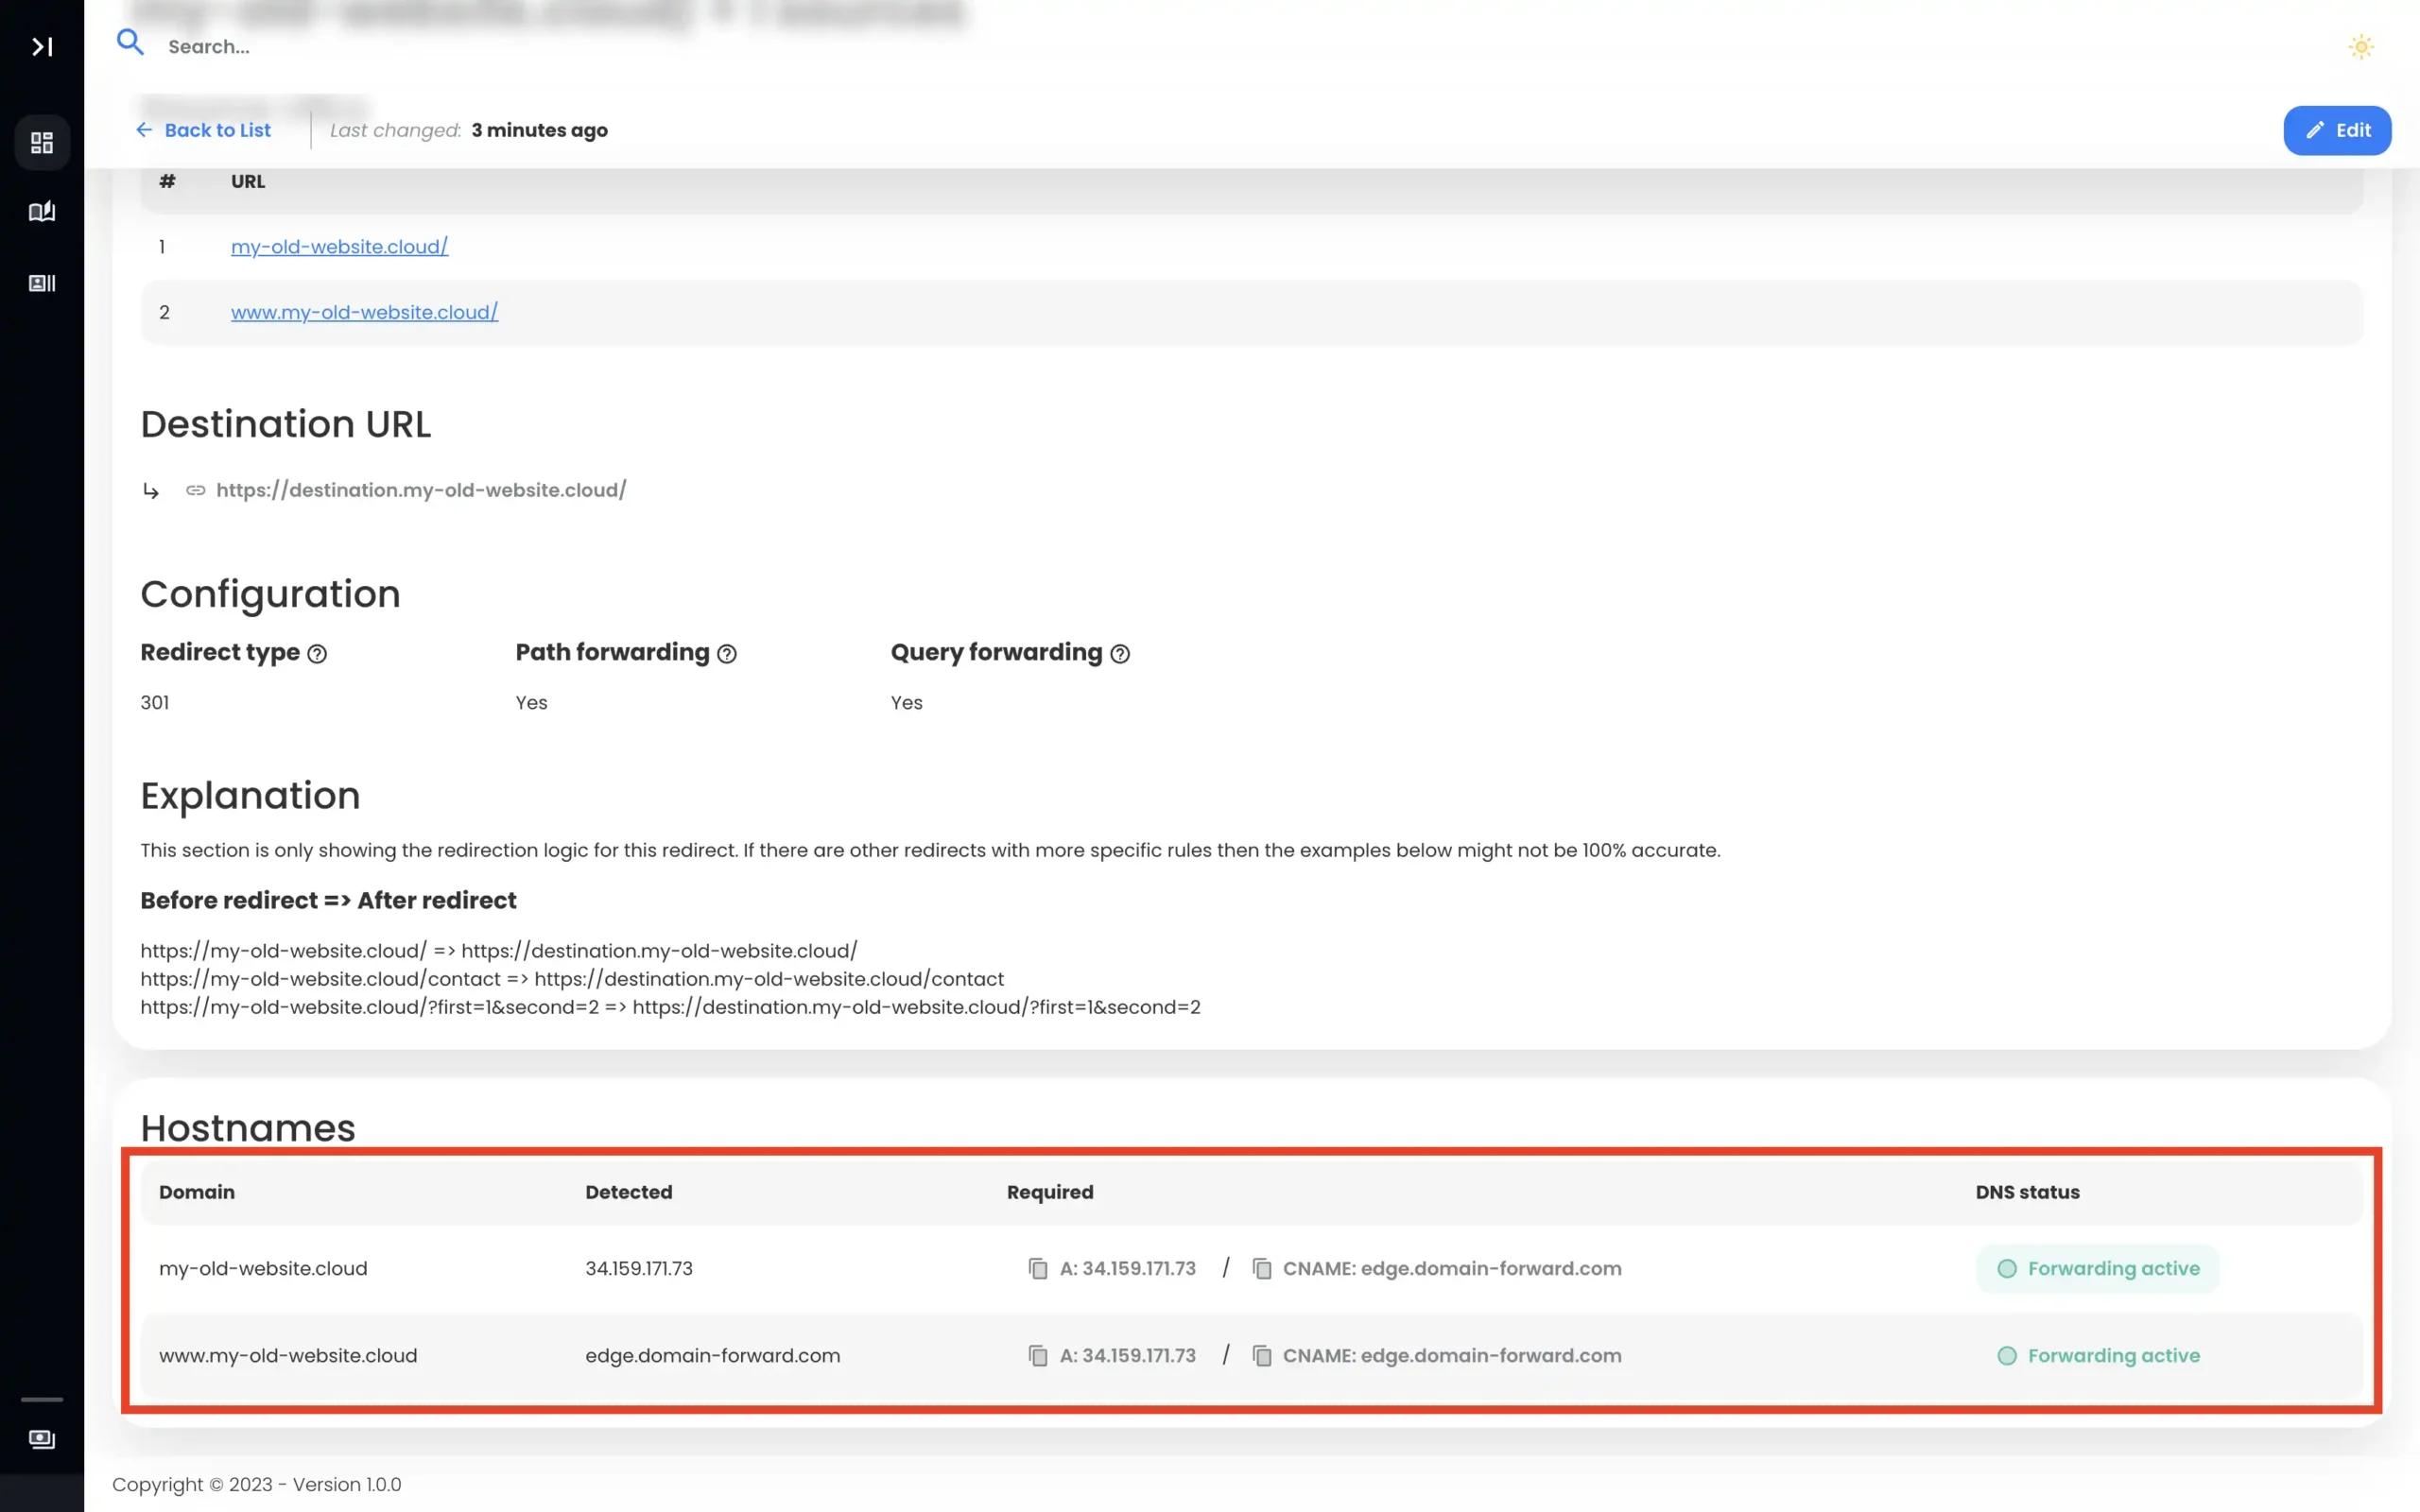
Step 7: Verify DNS At Domain-Forward.com
With our DNS changes now tweaked from the Hostinger backend, we only need to wait some time for the changes to be effected. Depending on the TTL set on those records, everything should be done in a few hours.
Here is what it should look like after the changes have been effected.
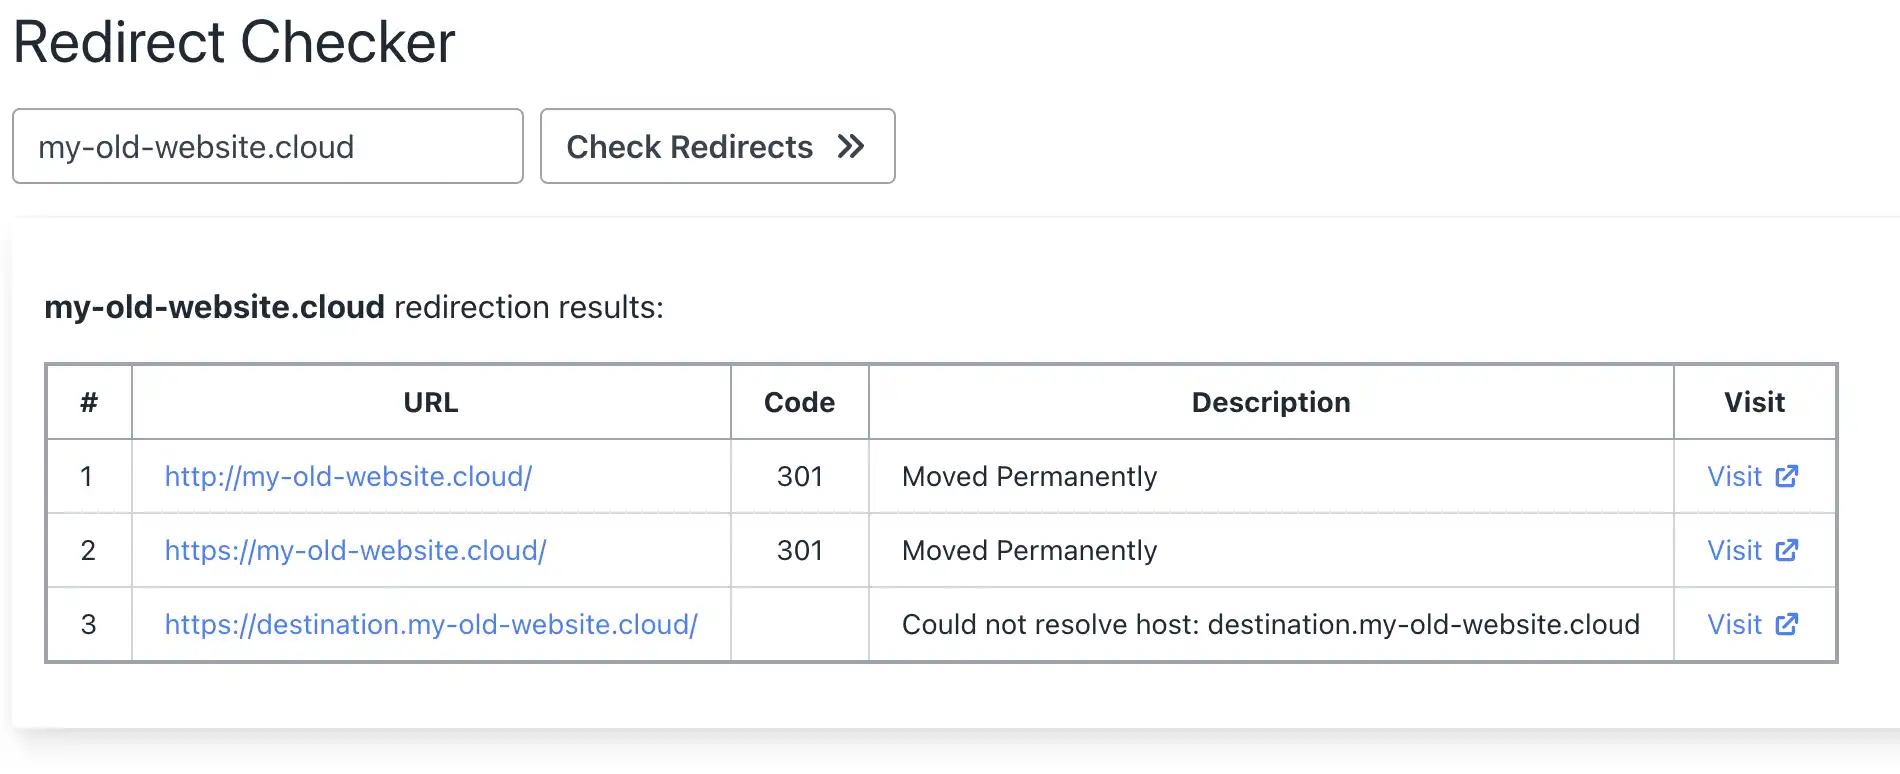
Step 8: Verify Redirect Using Online Tools
Now that we have configured the redirect in domain forward and the DNS entries as well, we can check if the redirection actually works. Below is an image that is taken from an online “redirect testing tool” and it does confirm that our redirection works correctly.
Conclusion
If you have read to this point, we are sure you’ll agree that the Domain-forward.com redirect option makes things much easier compared to when you only use Hostinger. The cool part is that the Domain-forward.com option offers full HTTPS support, something you don’t get with Hostinger.
If you found this post helpful, you can support us by subscribing to our paid plans. It will go a long way to ensure we keep offering quality services.