- ekkeuustalu
- 0 Comments
- 228 Views
A domain name is the first thing your visitors notice; it’s the address and the welcoming entry to your online realm. But what if you have multiple sub-domains or have migrated to a new domain and you want your visitors to be redirected automatically? That’s where wildcard redirects come into play. A wildcard redirect allows you to redirect all subdomains and pages of an old domain to a new domain.
This feature is crucial for maintaining the SEO ranking, managing multiple subdomains effortlessly, and ensuring a seamless user experience. Namecheap, a prominent domain and hosting service provider, offers a straightforward solution for configuring wildcard redirects. In this blog, we will delve into what wildcard redirects are, why they are beneficial, and how you can configure them via Namecheap’s dashboard.
What are Wildcard Redirects?
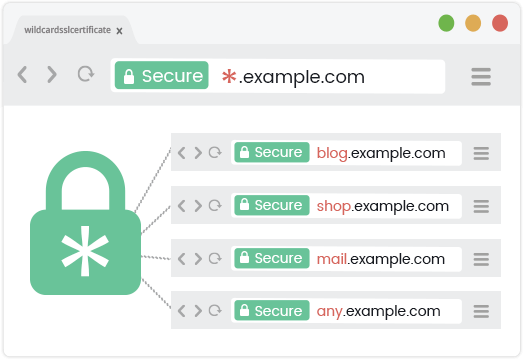
Wildcard redirects are a type of domain redirection that allows you to point all the sub-domains of a particular domain to another domain or sub-domain. This is extremely useful in cases where you have multiple subdomains and want them all to lead to a specific page or site.
Example: Suppose you own the domain my-old-web.site, and you have multiple sub-domains like blog.my-old-web.site, shop.my-old-web.site, and forum.my-old-web.site. If you decide to consolidate all these sub-domains into a new domain, say, mysite.com, a wildcard redirect will ensure that all traffic to your old sub-domains will be redirected to mysite.com seamlessly.
Benefits of Wildcard Redirects
SEO Preservation
Wildcard redirects are crucial for preserving SEO rankings when migrating to a new domain or consolidating sub-domains. They ensure that the link equity built over time is retained, as visitors and search engines are automatically redirected to the new domain. This seamless redirection maintains organic search performance and assists in building the authority of the new domain.
User Experience
A superior user experience is pivotal in retaining visitors, and wildcard redirects significantly contribute to this. They ensure that visitors are not met with broken links or 404 errors when trying to access old pages or sub-domains. Instead, they are smoothly redirected to the new domain, which is crucial for keeping the audience engaged and satisfied.
Simplified Management
Managing multiple sub-domains can be challenging, but wildcard redirects simplify this process significantly. By centralizing the redirection process, wildcard redirects eliminate the need to set up individual redirects for each sub-domain, saving time and effort. This simplified management is particularly beneficial for large websites or online enterprises with numerous sub-domains, allowing web administrators to focus on other essential aspects of website management and optimization.
How to Configure Namecheap Wildcard Redirects
Configuring a wildcard redirect on Namecheap is a simple process. If you aren’t sure how to set up redirects or you are not sure what the potential risks are then check out our URL redirection quick guide. For Namecheap, the steps you need to take to configure wildcard redirects are listed below:
Step 1: Sign Into the Namecheap Dashboard
If you aren’t logged in, you can log into the admin dashboard here. If you’re already logged in, you can continue to the second step.
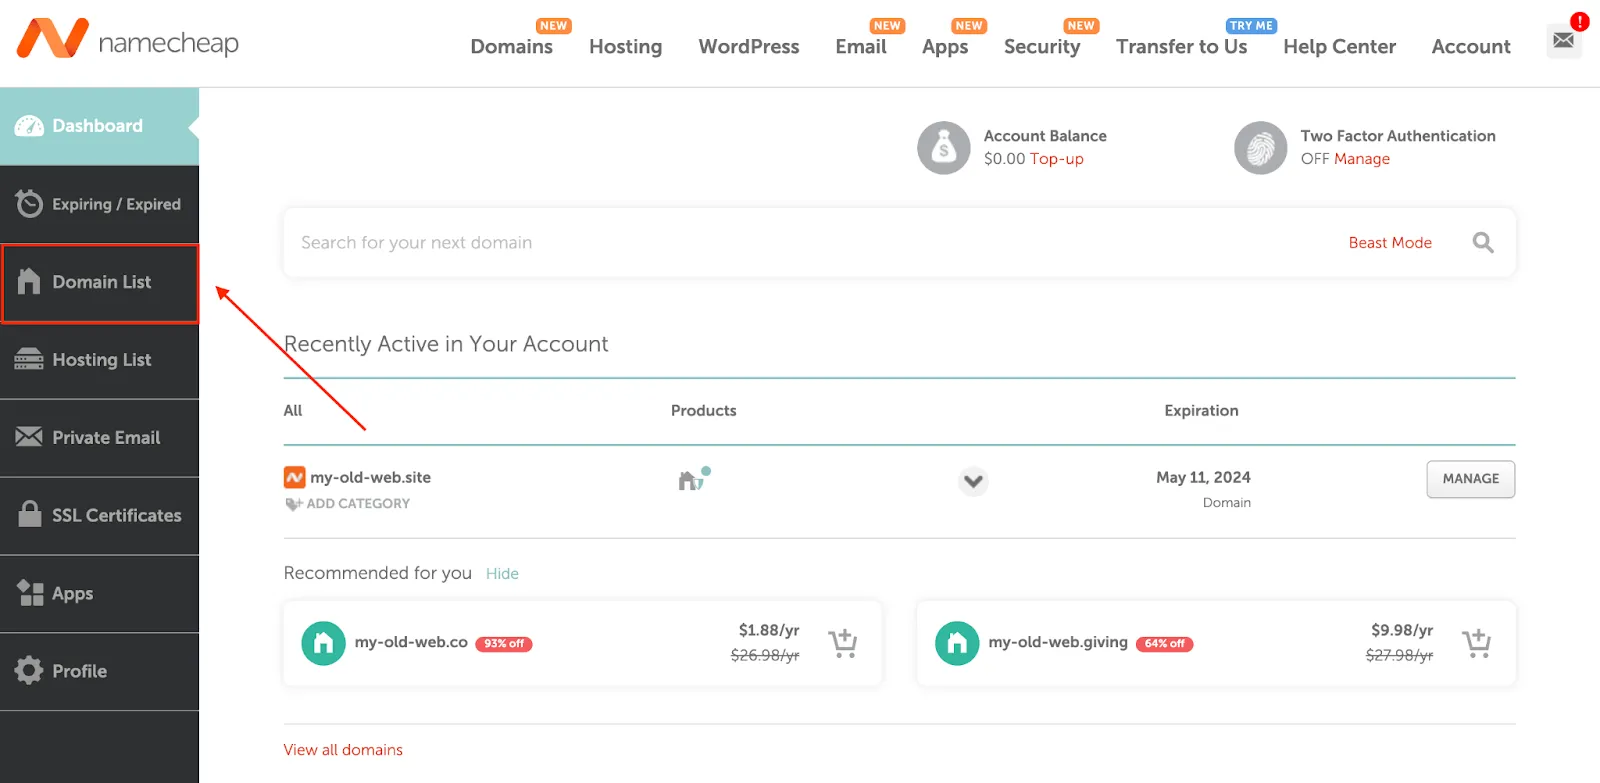
Step 2: Navigate to the Domain List
After gaining access to your dashboard, scroll down and select the option for Domain List. The image below shows you exactly how to go about that:
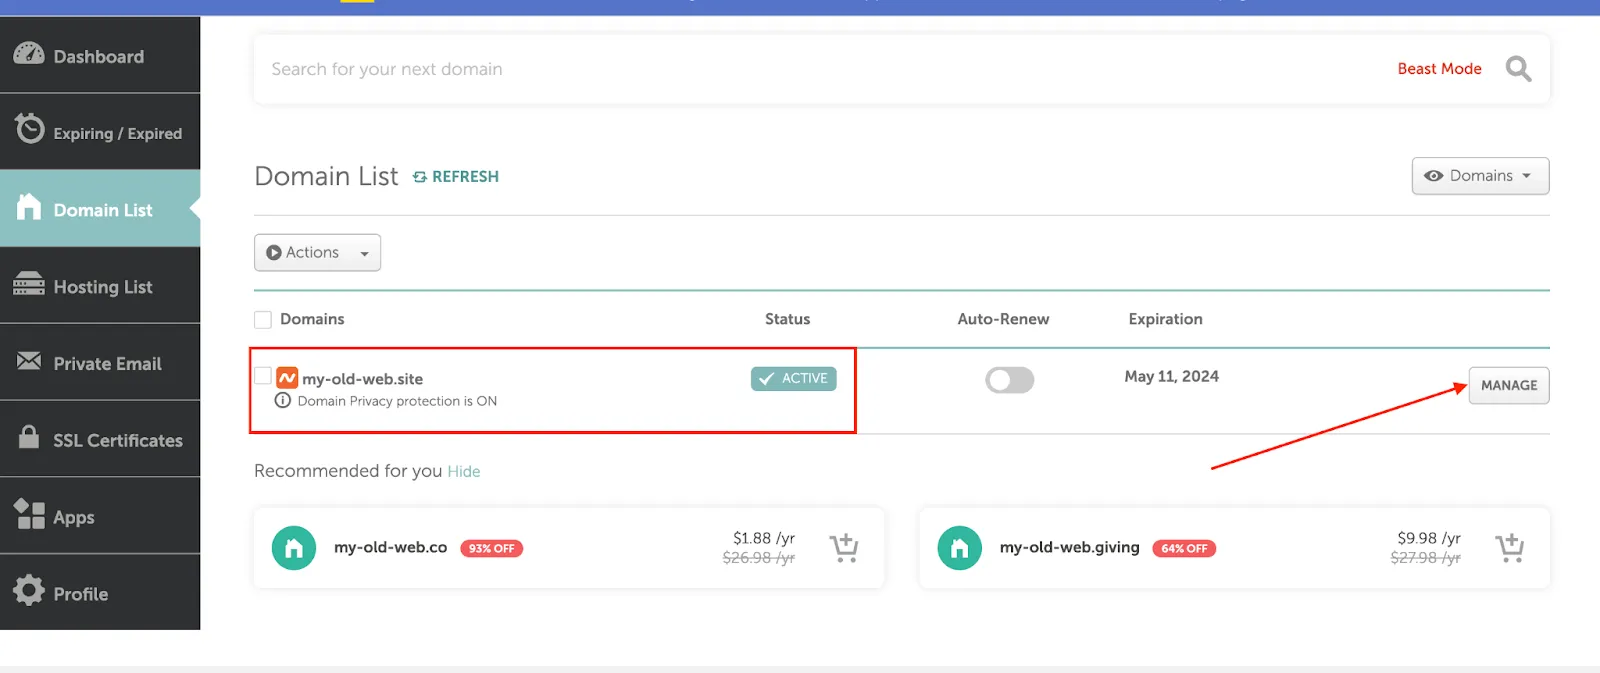
Step 3: Select the option for Manage
After clicking on the option for Domain List, a new page should launch. Scroll down to the domain you’d like to redirect and select the option for Manage.
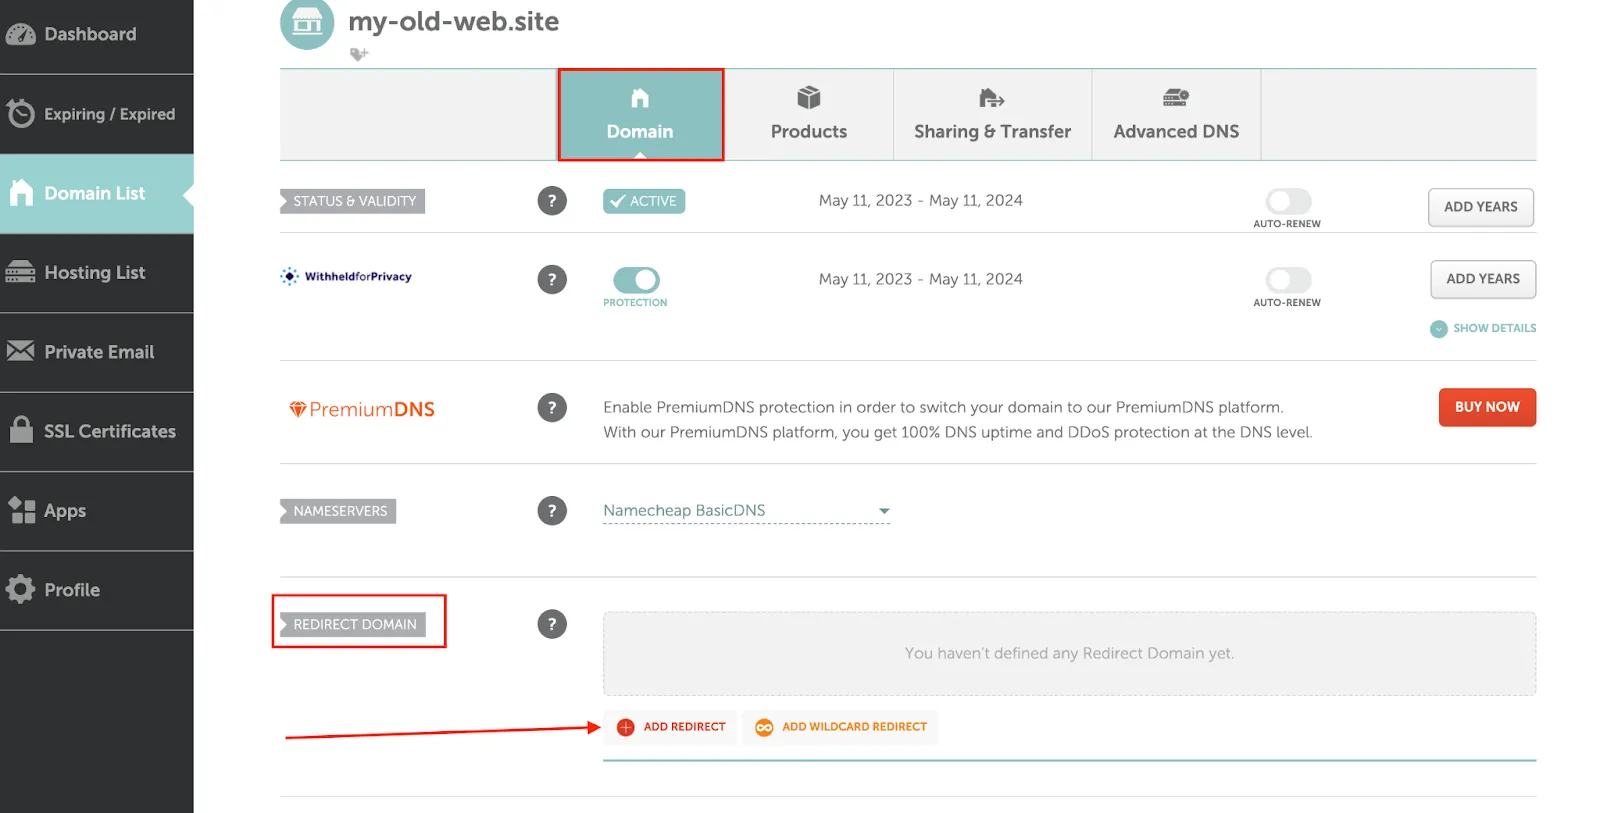
Step 4: Redirect Domains > Add Wildcard Redirect
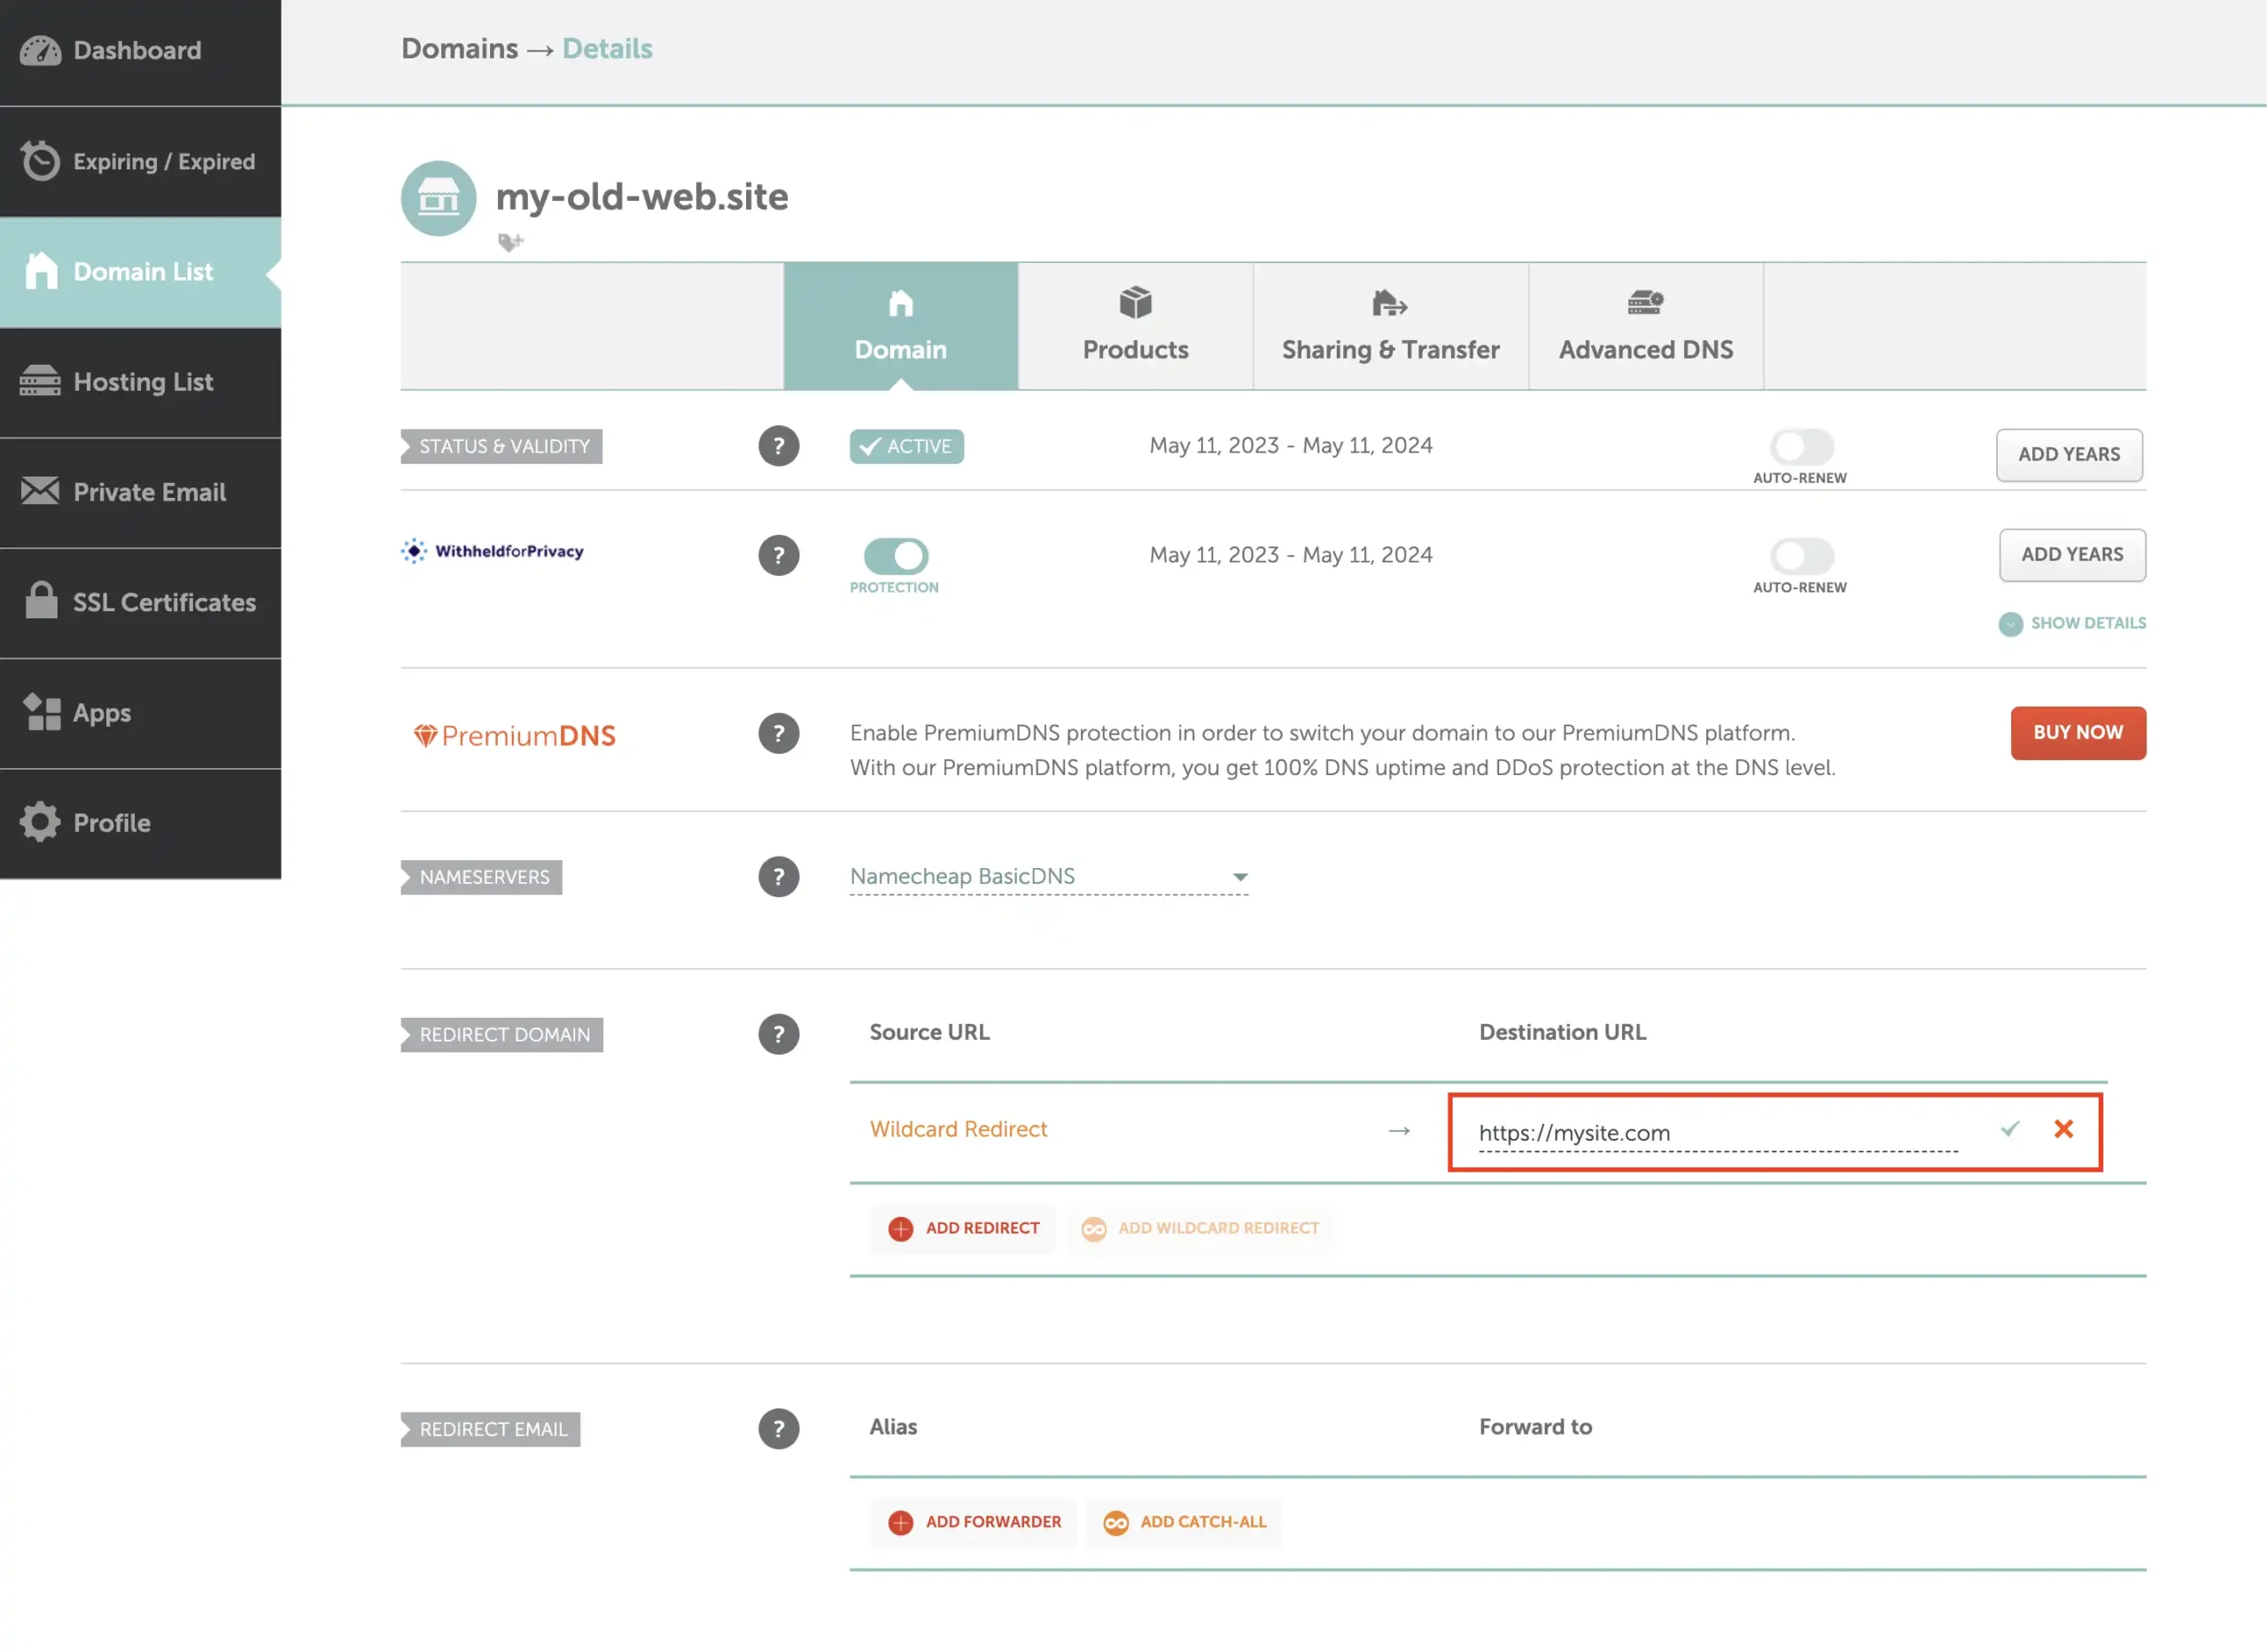
Here is where things get interesting, so be patient while we walk you through. After clicking the option for Manage, scroll all the way down to the Redirect Domain section and click on the option for Add Wildcard Redirect.
Step 5: Configure Wildcard Redirect
Enter the destination URL where all traffic should be redirected to. For the destination URL, you can also use HTTPS for a more secure experience. Once you’re happy, just click on the green checkmark to apply the changes.
Step 6: Check and Remove Unnecessary DNS Entries
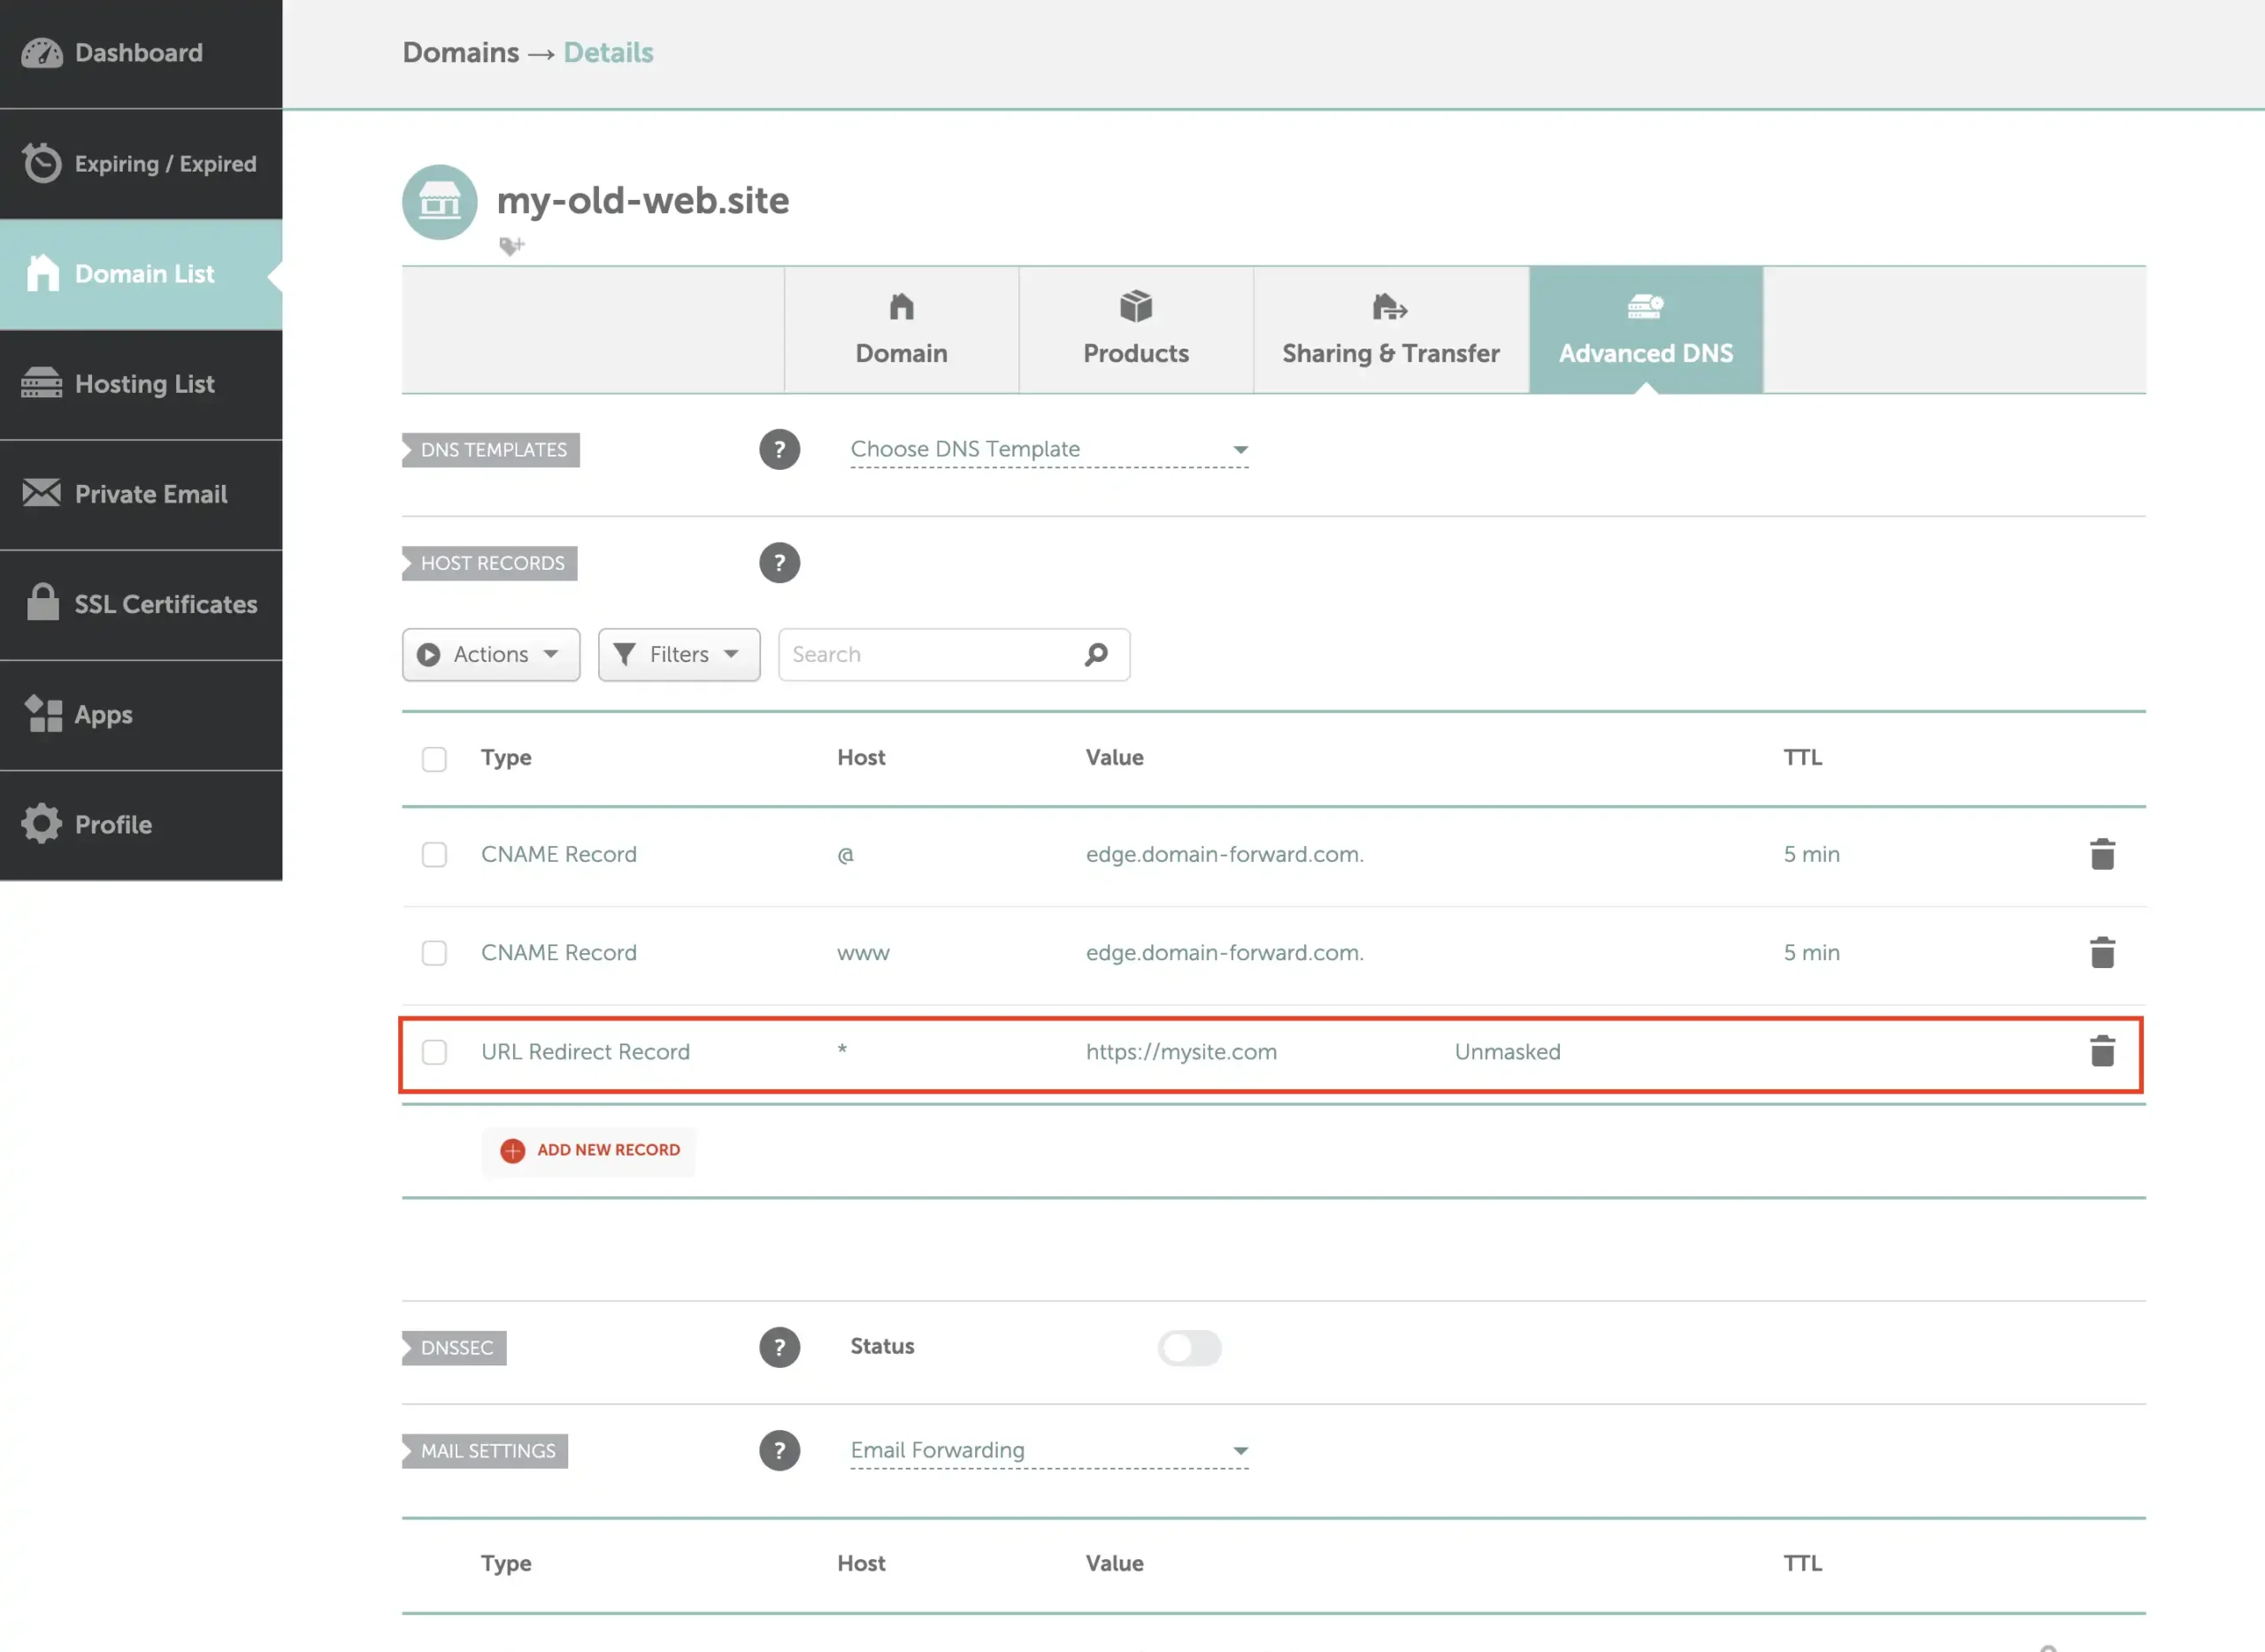
If you already had some web hosting or other rules for the affected subdomains, then you also need to remove those entries from under the Advanced DNS view.
You can also see the created wildcard entry below highlighted. Make sure that you DO NOT delete that row because that also removes the wildcard configuration from the previous steps.
Step 7: Wait for Changes to be Applied
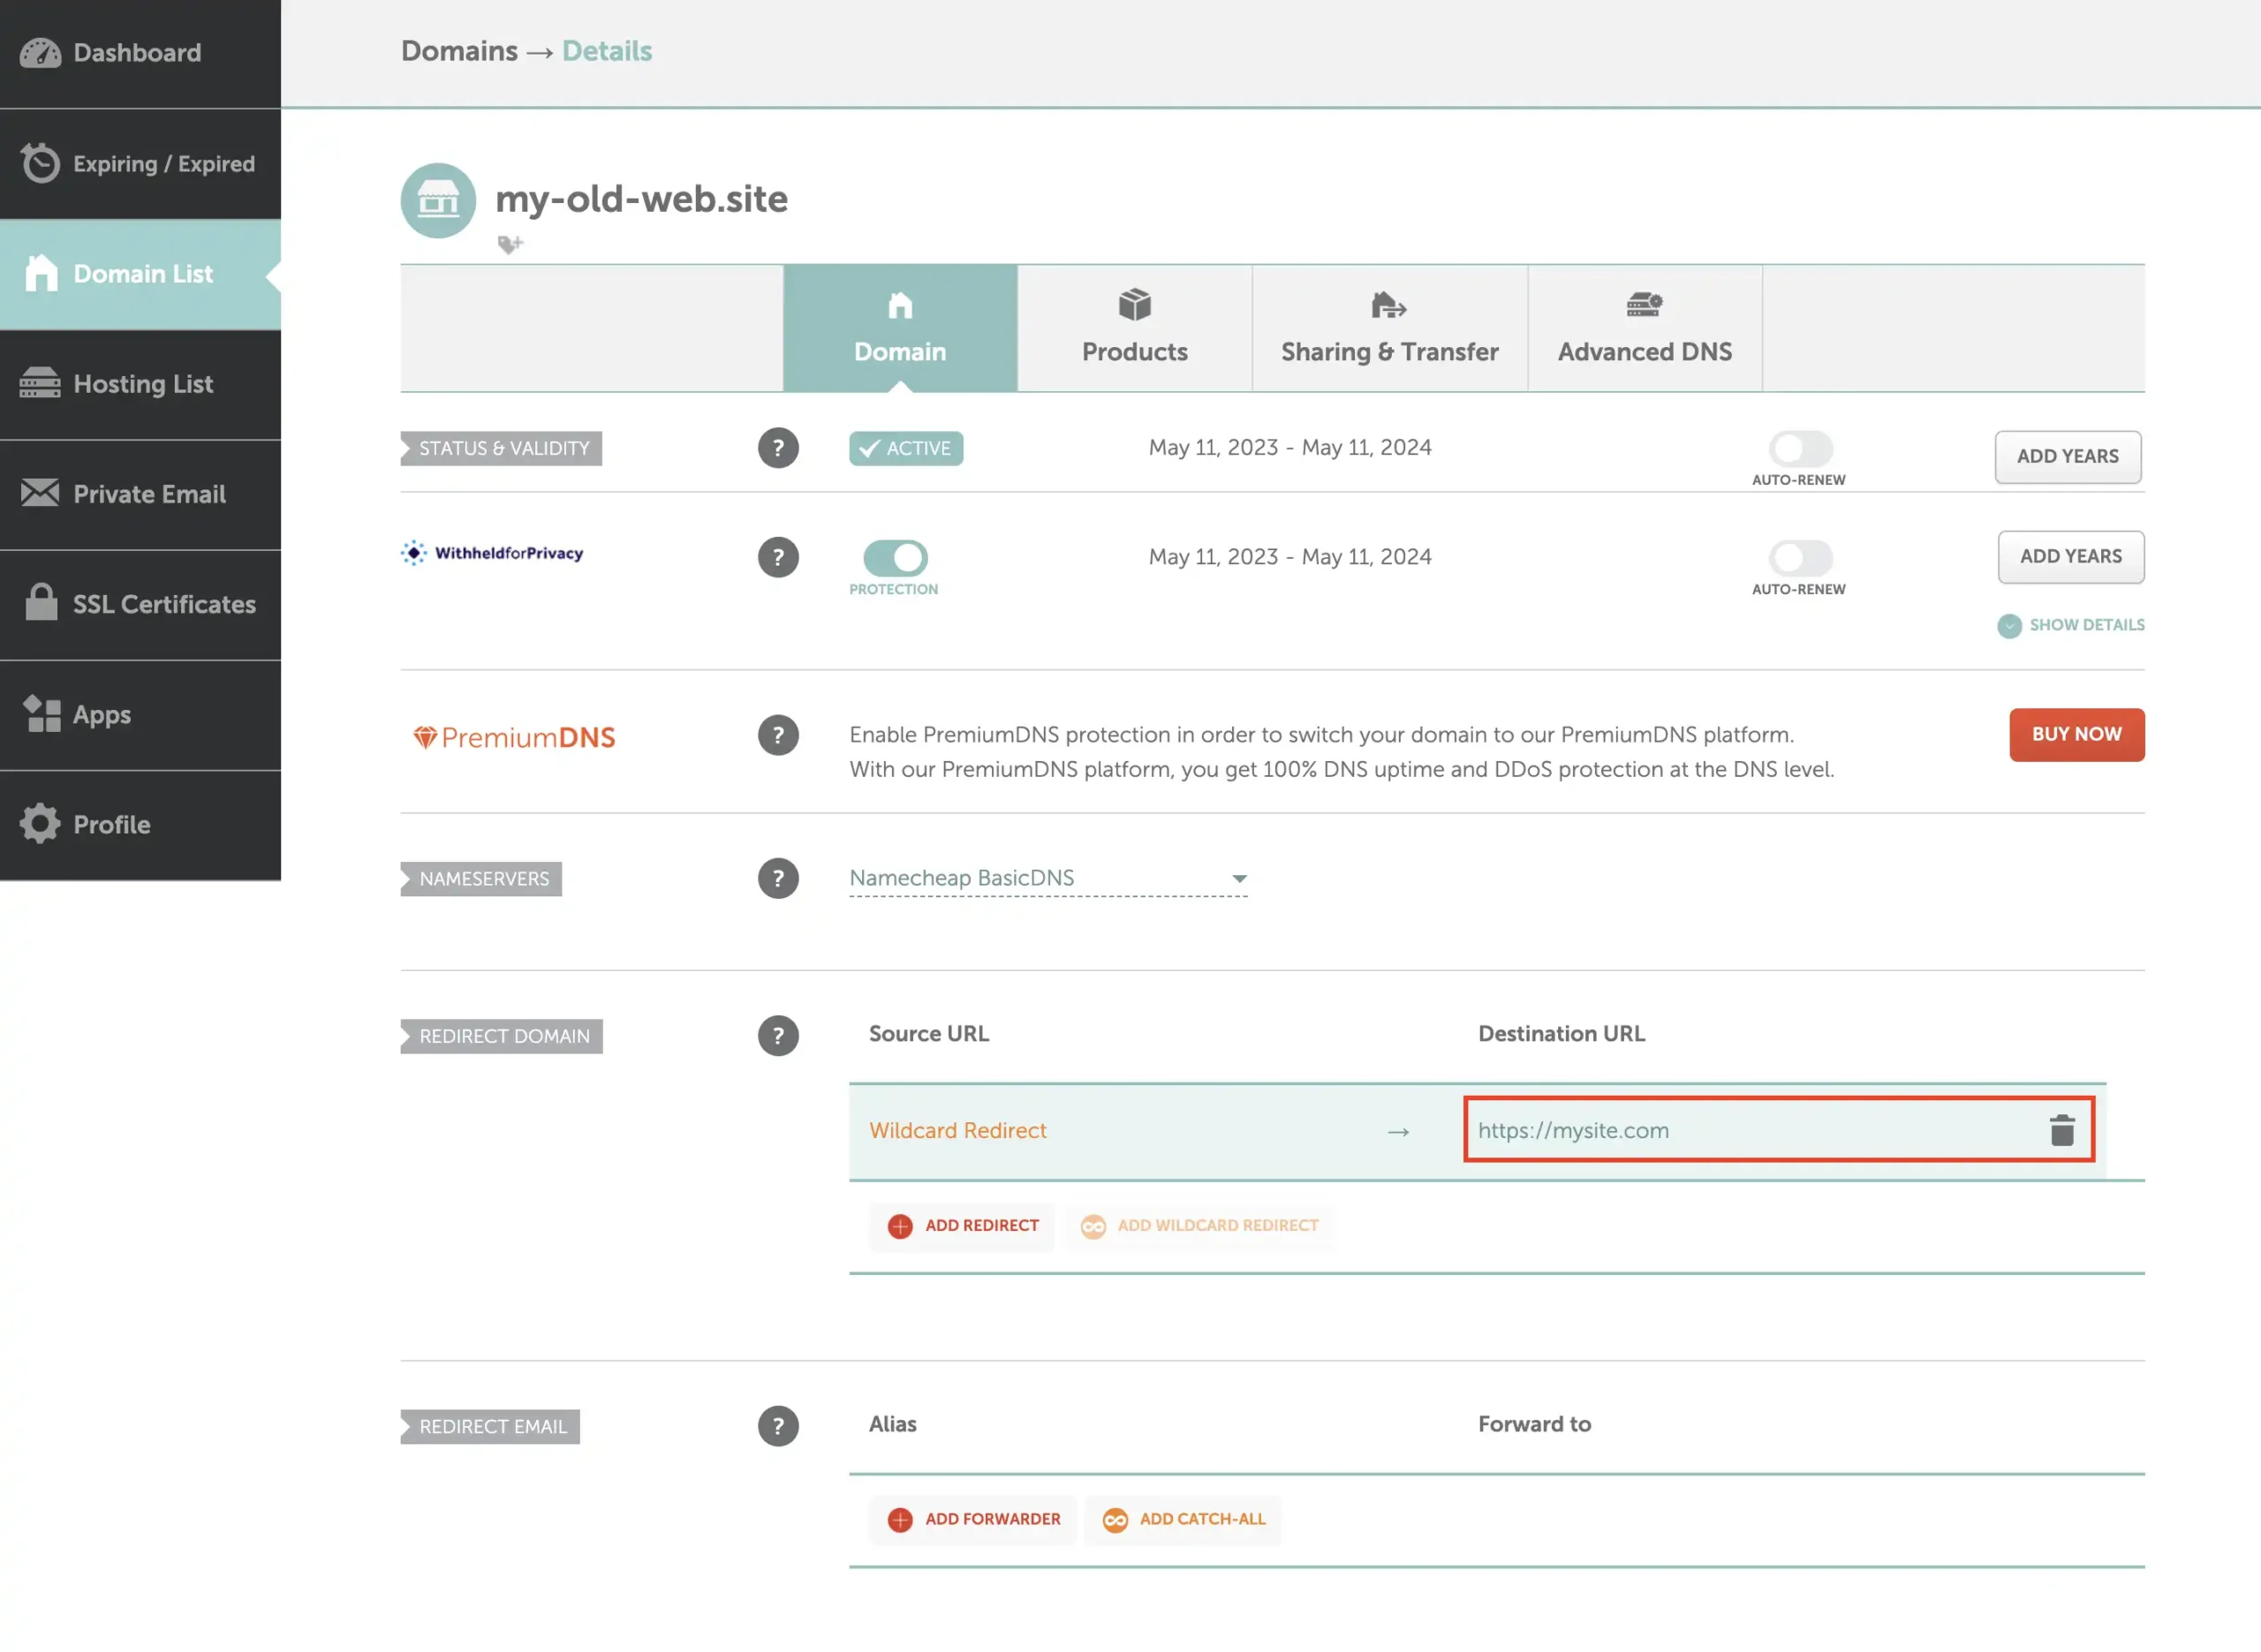
Save the changes, and the wildcard redirect should be active within 30 minutes. It can take longer depending on your previously used DNS settings and whether your computer is caching the old redirect somehow.
From the image below you can see that the wildcard redirect is configured in the “Redirect Domain” section.
Step 8: Test the Redirects
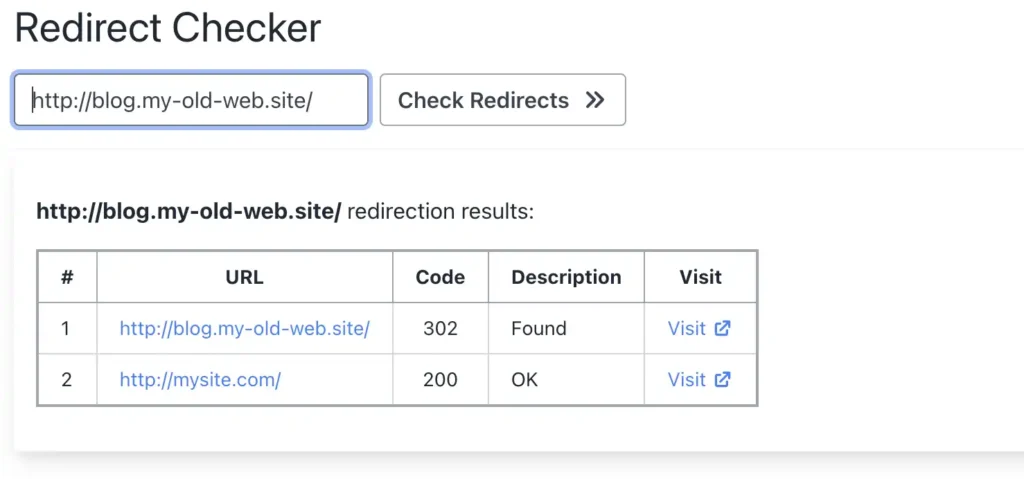
As we can see from using a redirect checker, the “shop.my-old-web.site” gets redirected correctly to the destination that we configured above.
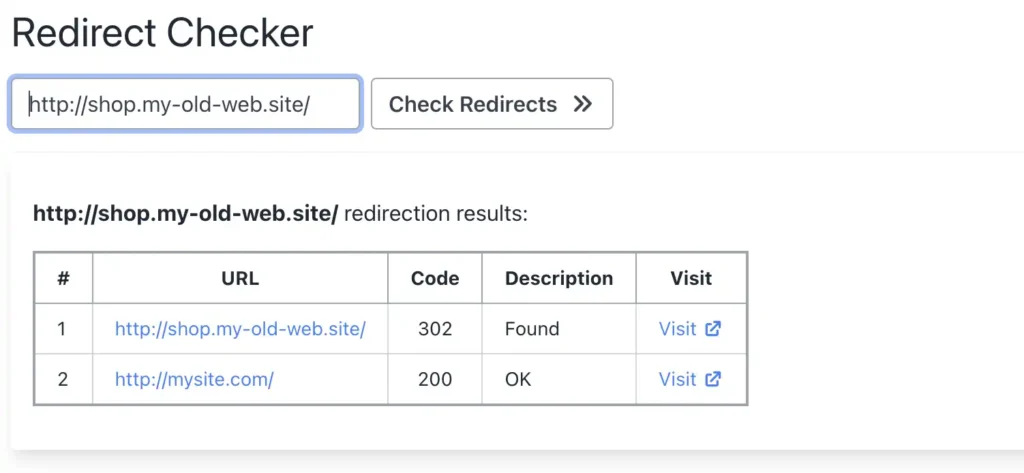
We can see that the same is true for blog.my-old-web.site.
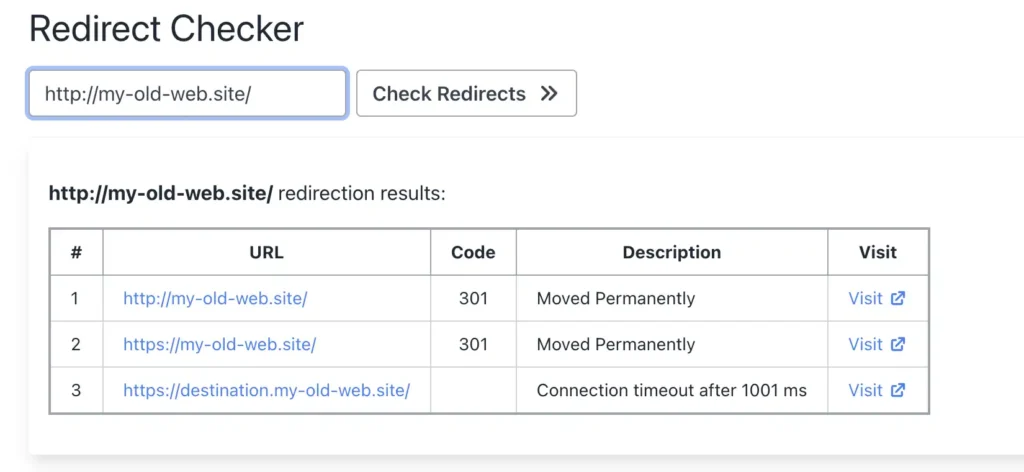
We had an already explicitly defined DNS entry configured for the root (and www) domains. This means that the wildcard does not apply to those two, and the traffic gets redirected to a different destination than the wildcard. In the image below, row #3 is showing a failure because “destination.my-old-web.site” isn’t hosted.
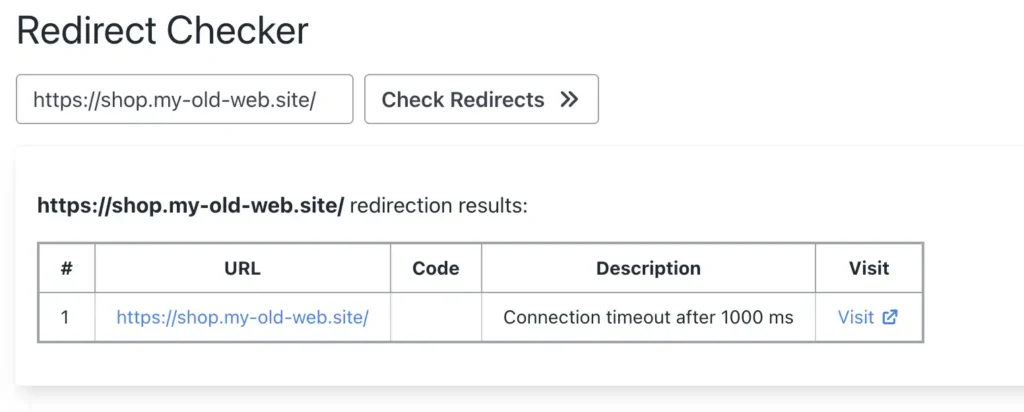
Step 9. HTTPS does not work
When we try the “shop” subdomain redirect with HTTPS, it unfortunately does not work. Let’s dig deeper into why it doesn’t work and what one of the options is to make it work.
Downsides of Namecheap Provided Redirects
The Lack of HTTPS Support
Even though the Namecheap solution was very easy to set up, there is a huge elephant in the room. Namecheap’s wildcard redirect solution does not support HTTPS since no SSL certificate is installed for your domain when you use the DNS-based redirects. An SSL testing tool shows us that there is no SSL certificate configured for the domain.
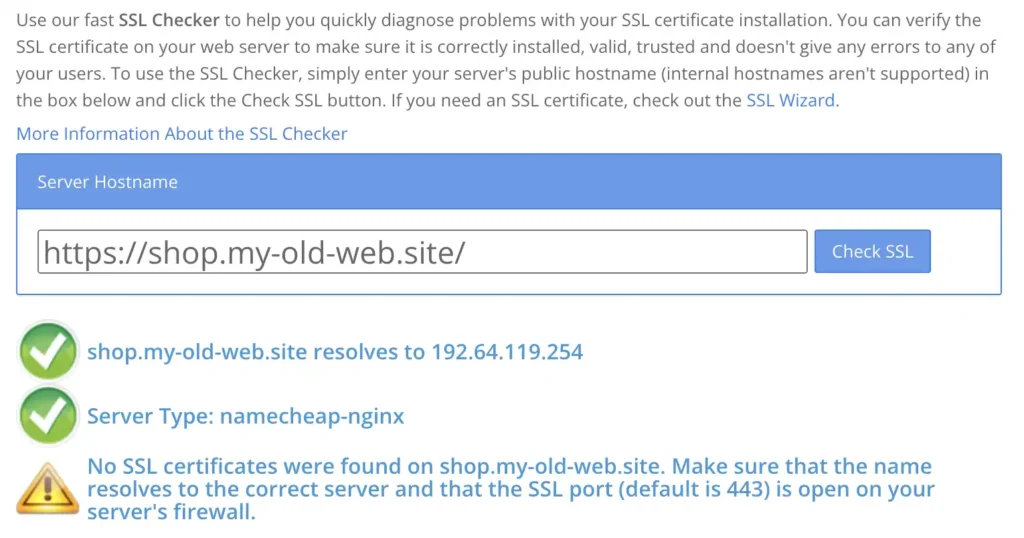
This is a significant downside as it can potentially impact the security and SEO ranking of your site. Visitors may also receive a warning that the connection is not secure, which may deter them from proceeding to your site.
Lack of Precise Control
Wildcard redirect is a one-size-fits-all solution, which might not work for those needing precise control over individual sub-domain redirection. For example, you might even have author-based subdomains for each author in the format of {author-user-name}.blog.my-old-web.site, which you might want to redirect to a different address and not mysite.com like the others.
Unfortunately, with Namecheap, it is not possible to achieve this with the default redirection toolkit. You can only configure one wildcard subdomain which will not let you define it detailed enough.
You can make it work by getting a hosting package from Namecheap and programming the webserver to redirect traffic using Apache redirects, but this might not be comfortable for most people. Especially if you don’t have much web development or technical background.
Domain-forward.com: The Ultimate Solution for Wildcard Redirects
Even though Namecheap provides basic support for forwarding your domain, their domain forwarding service is missing essential features like HTTPS and Analytics.
When you execute a domain redirect on Namecheap, your destination domain won’t have an SSL certificate. Causing visitors to get SSL errors when visiting the domain via HTTPS.
Thankfully, Domain-Forward is here to save the day. When you use our platform for domain redirects, we automatically install and manage the SSL certificate, ensuring it never expires. Read on for a step-by-step guide on how to forward a domain with HTTPS support.
Step 1: Create an Account
First things first, you need to create an account, which is pretty straightforward.
Step 2: Add your domain to Domain-forward.com
After successfully creating an account, it’s time to add the domain you’d like to redirect. To do that, click on the option to Add Redirect.

Since we already have a domain with Namecheap, “my-old-web.site,” we will add the wildcard version of the domain to the Source URL field. Also, we need to set the Destination URL, i.e., where we want to forward to. In our case, we want to forward all of the traffic to our new site, mysite.com.
If you have matching source paths (for example, both sites have a /contact page) for your pages also at your destination then you can leave “Path forwarding” on. If you want all of the traffic to be sent to the homepage, then leave it off.
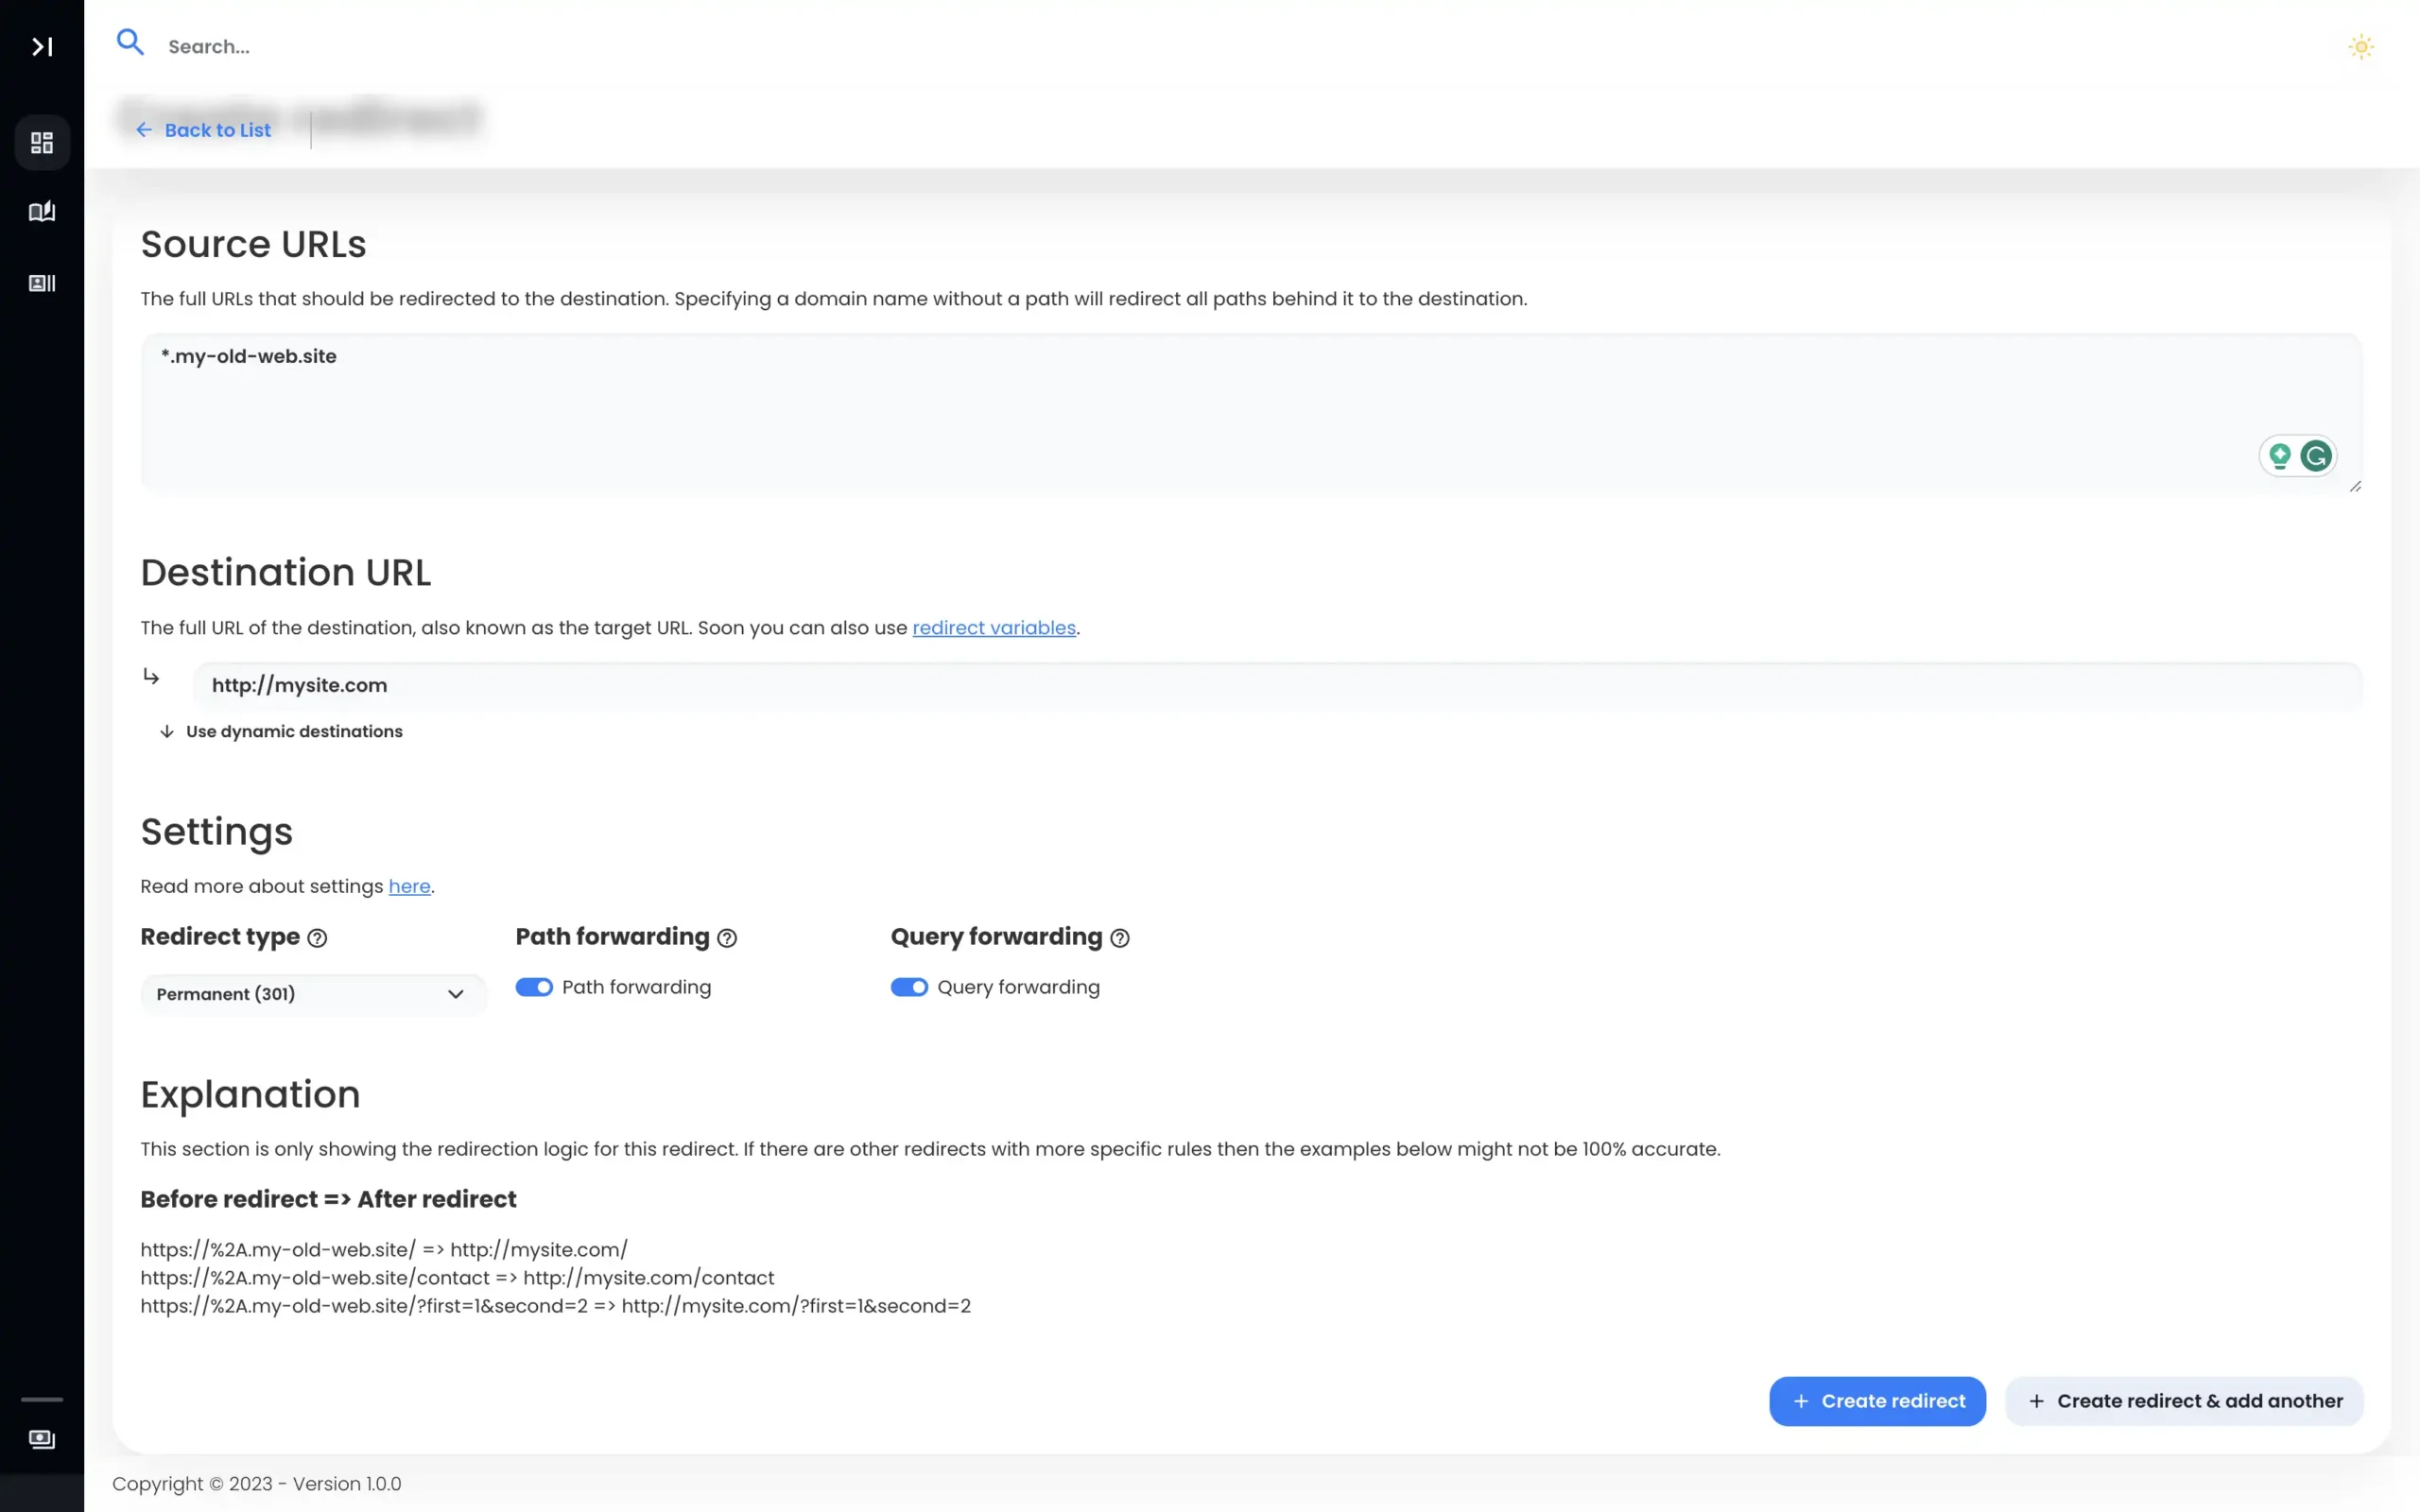
With all this information entered, we need to go ahead and create our redirect using the button below.
Note: After creating the redirect, you’ll notice the DNS checking as detected, and the required values are different. We need to tweak that. If no values are shown, try clicking “Check DNS” and see if the old value shows up.
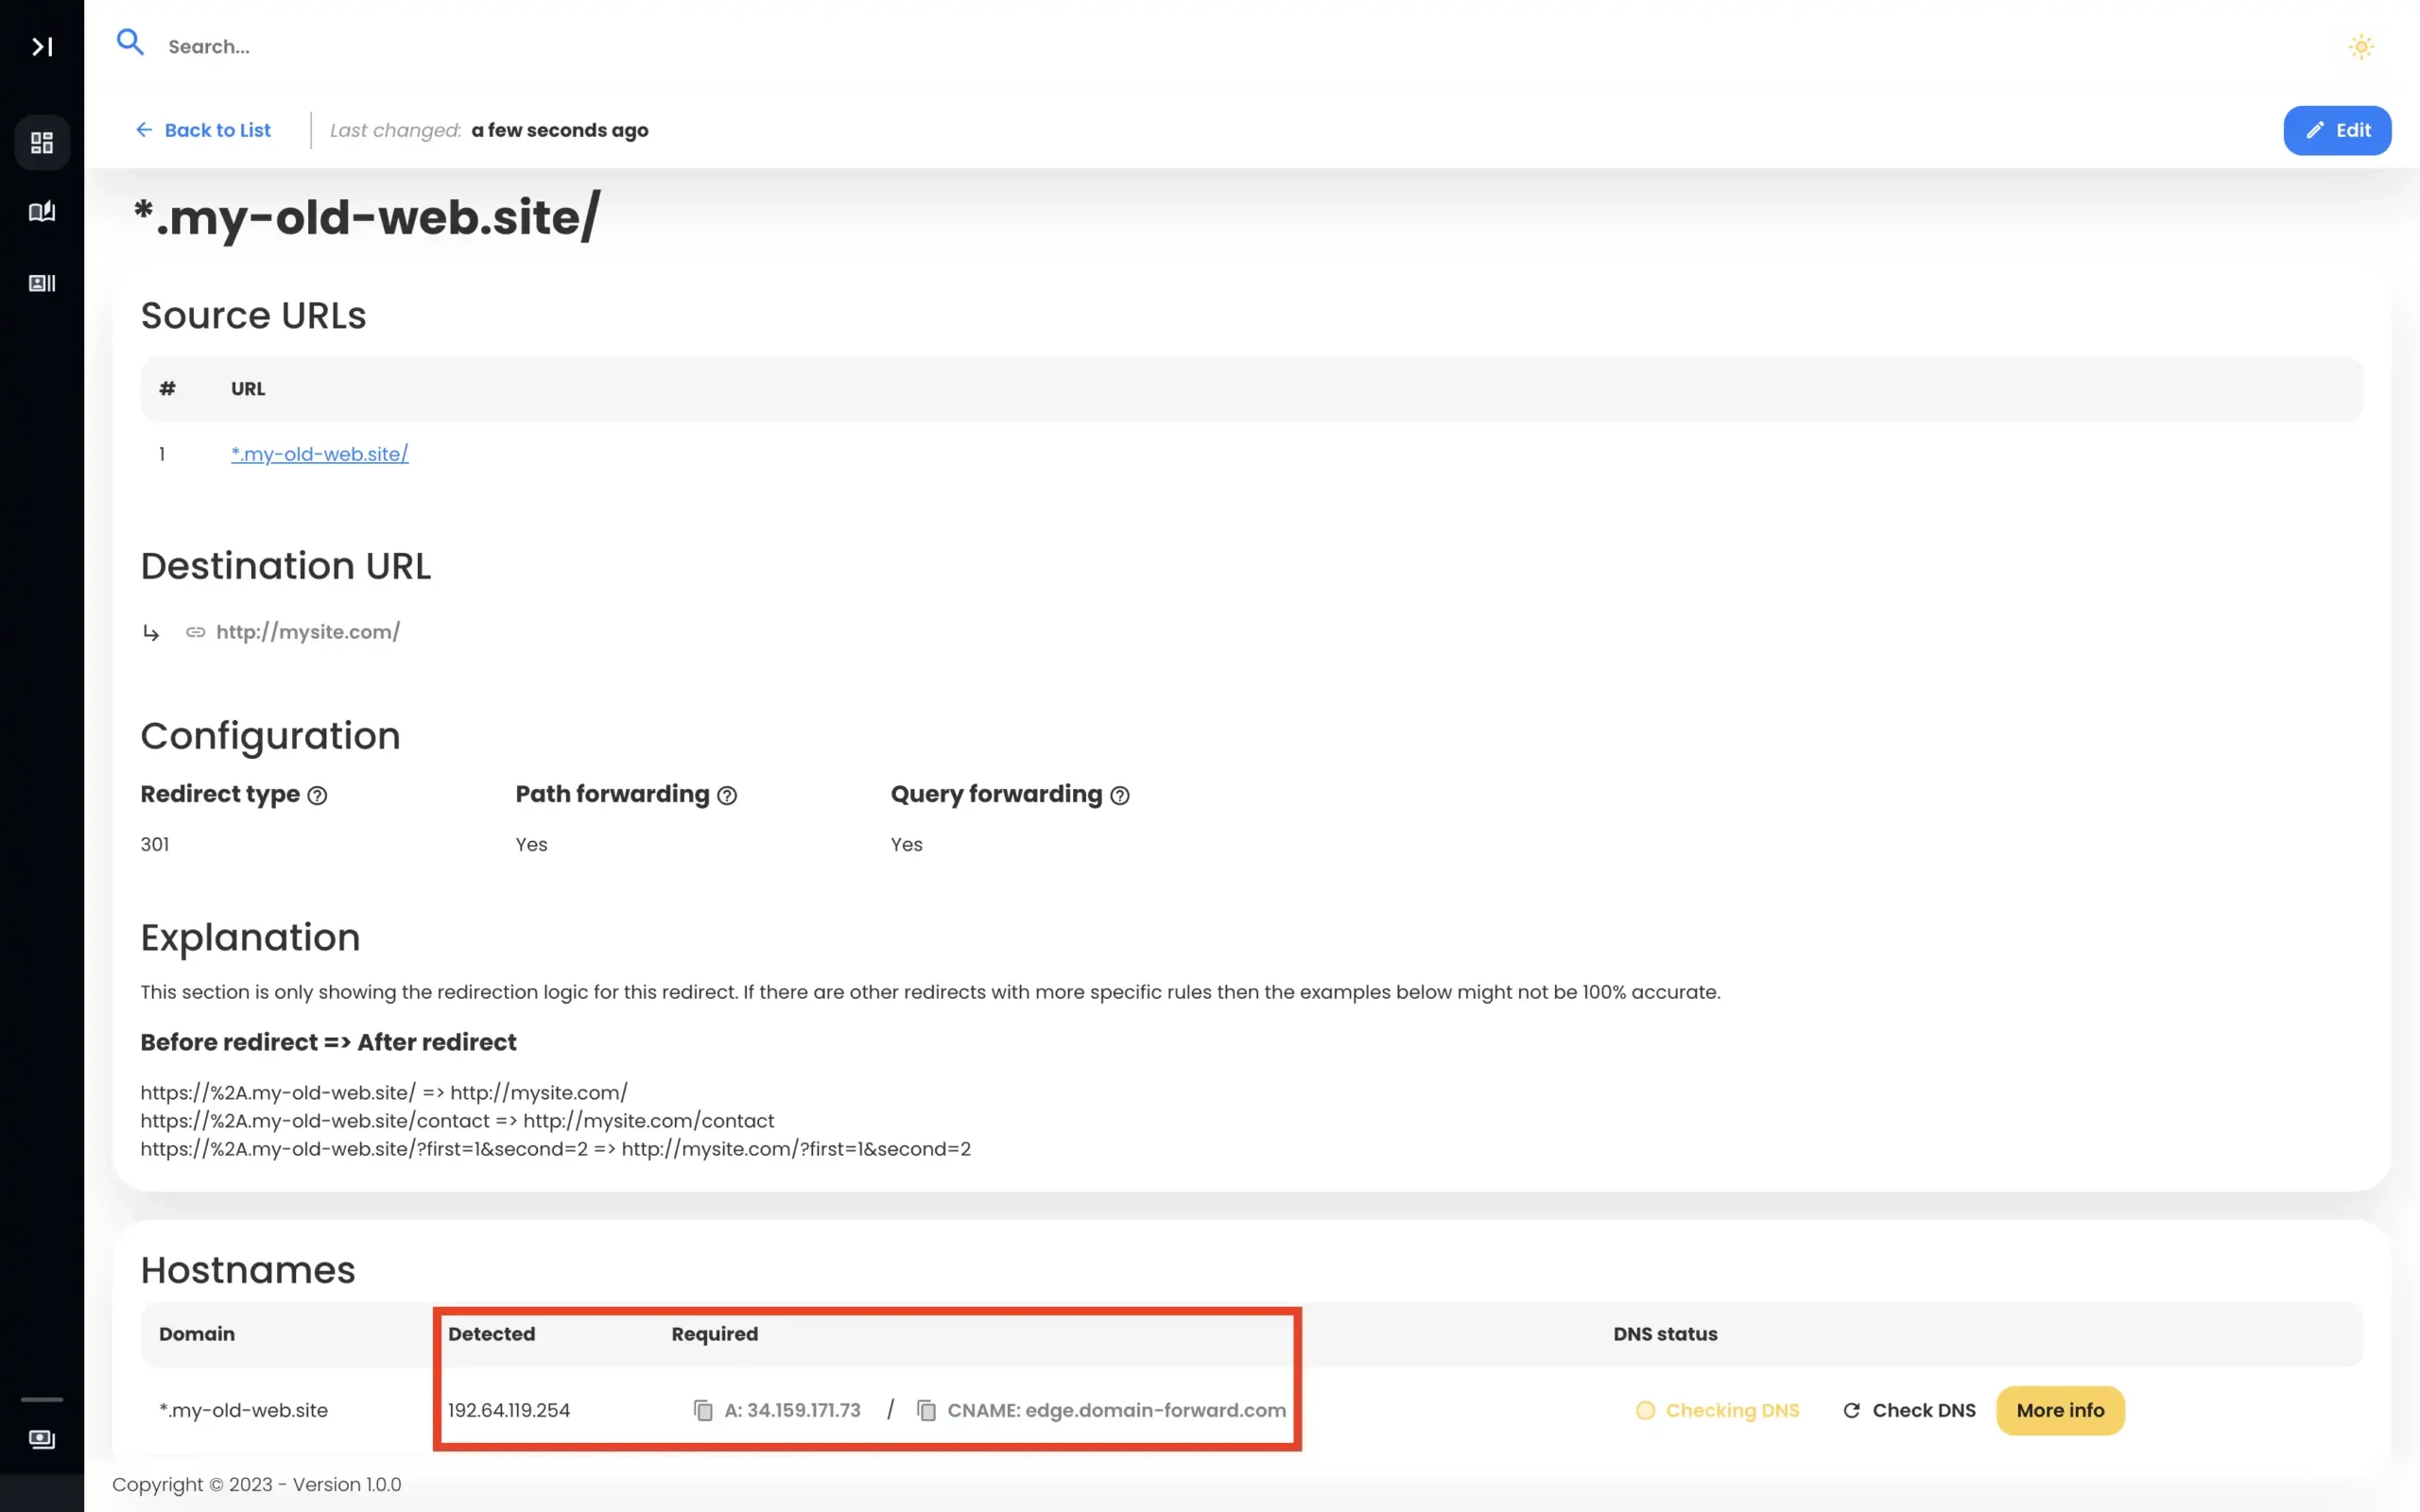
Step 5: Head over to Namecheap
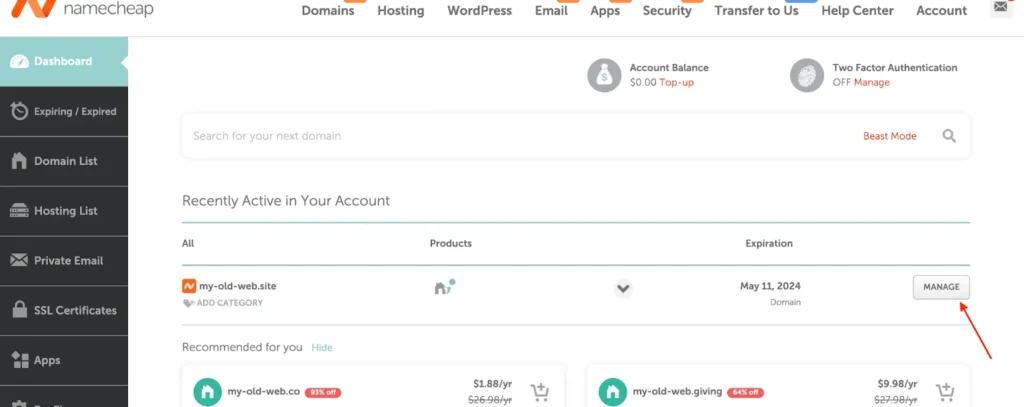
To complete our domain redirect using Domain-Forward, we need to head to Namecheap to tweak the DNS changes.
So log in to your Namecheap account, navigate to your Dashboard, and select the option for Manage for the domain you want to redirect.
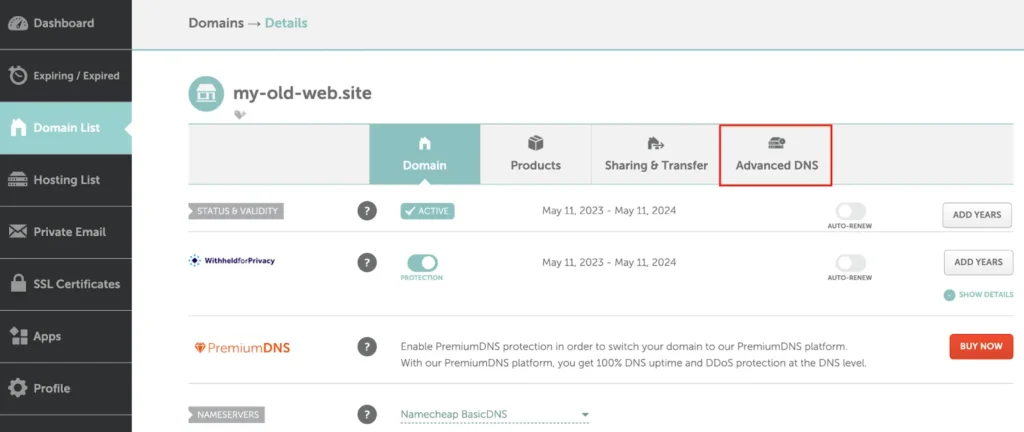
When the domain details page loads, select the option for Advanced DNS
Step 6: Change DNS settings
Now, it’s time to tweak our DNS settings. If you have previously set up a URL redirect, you need to ensure you remove those records.
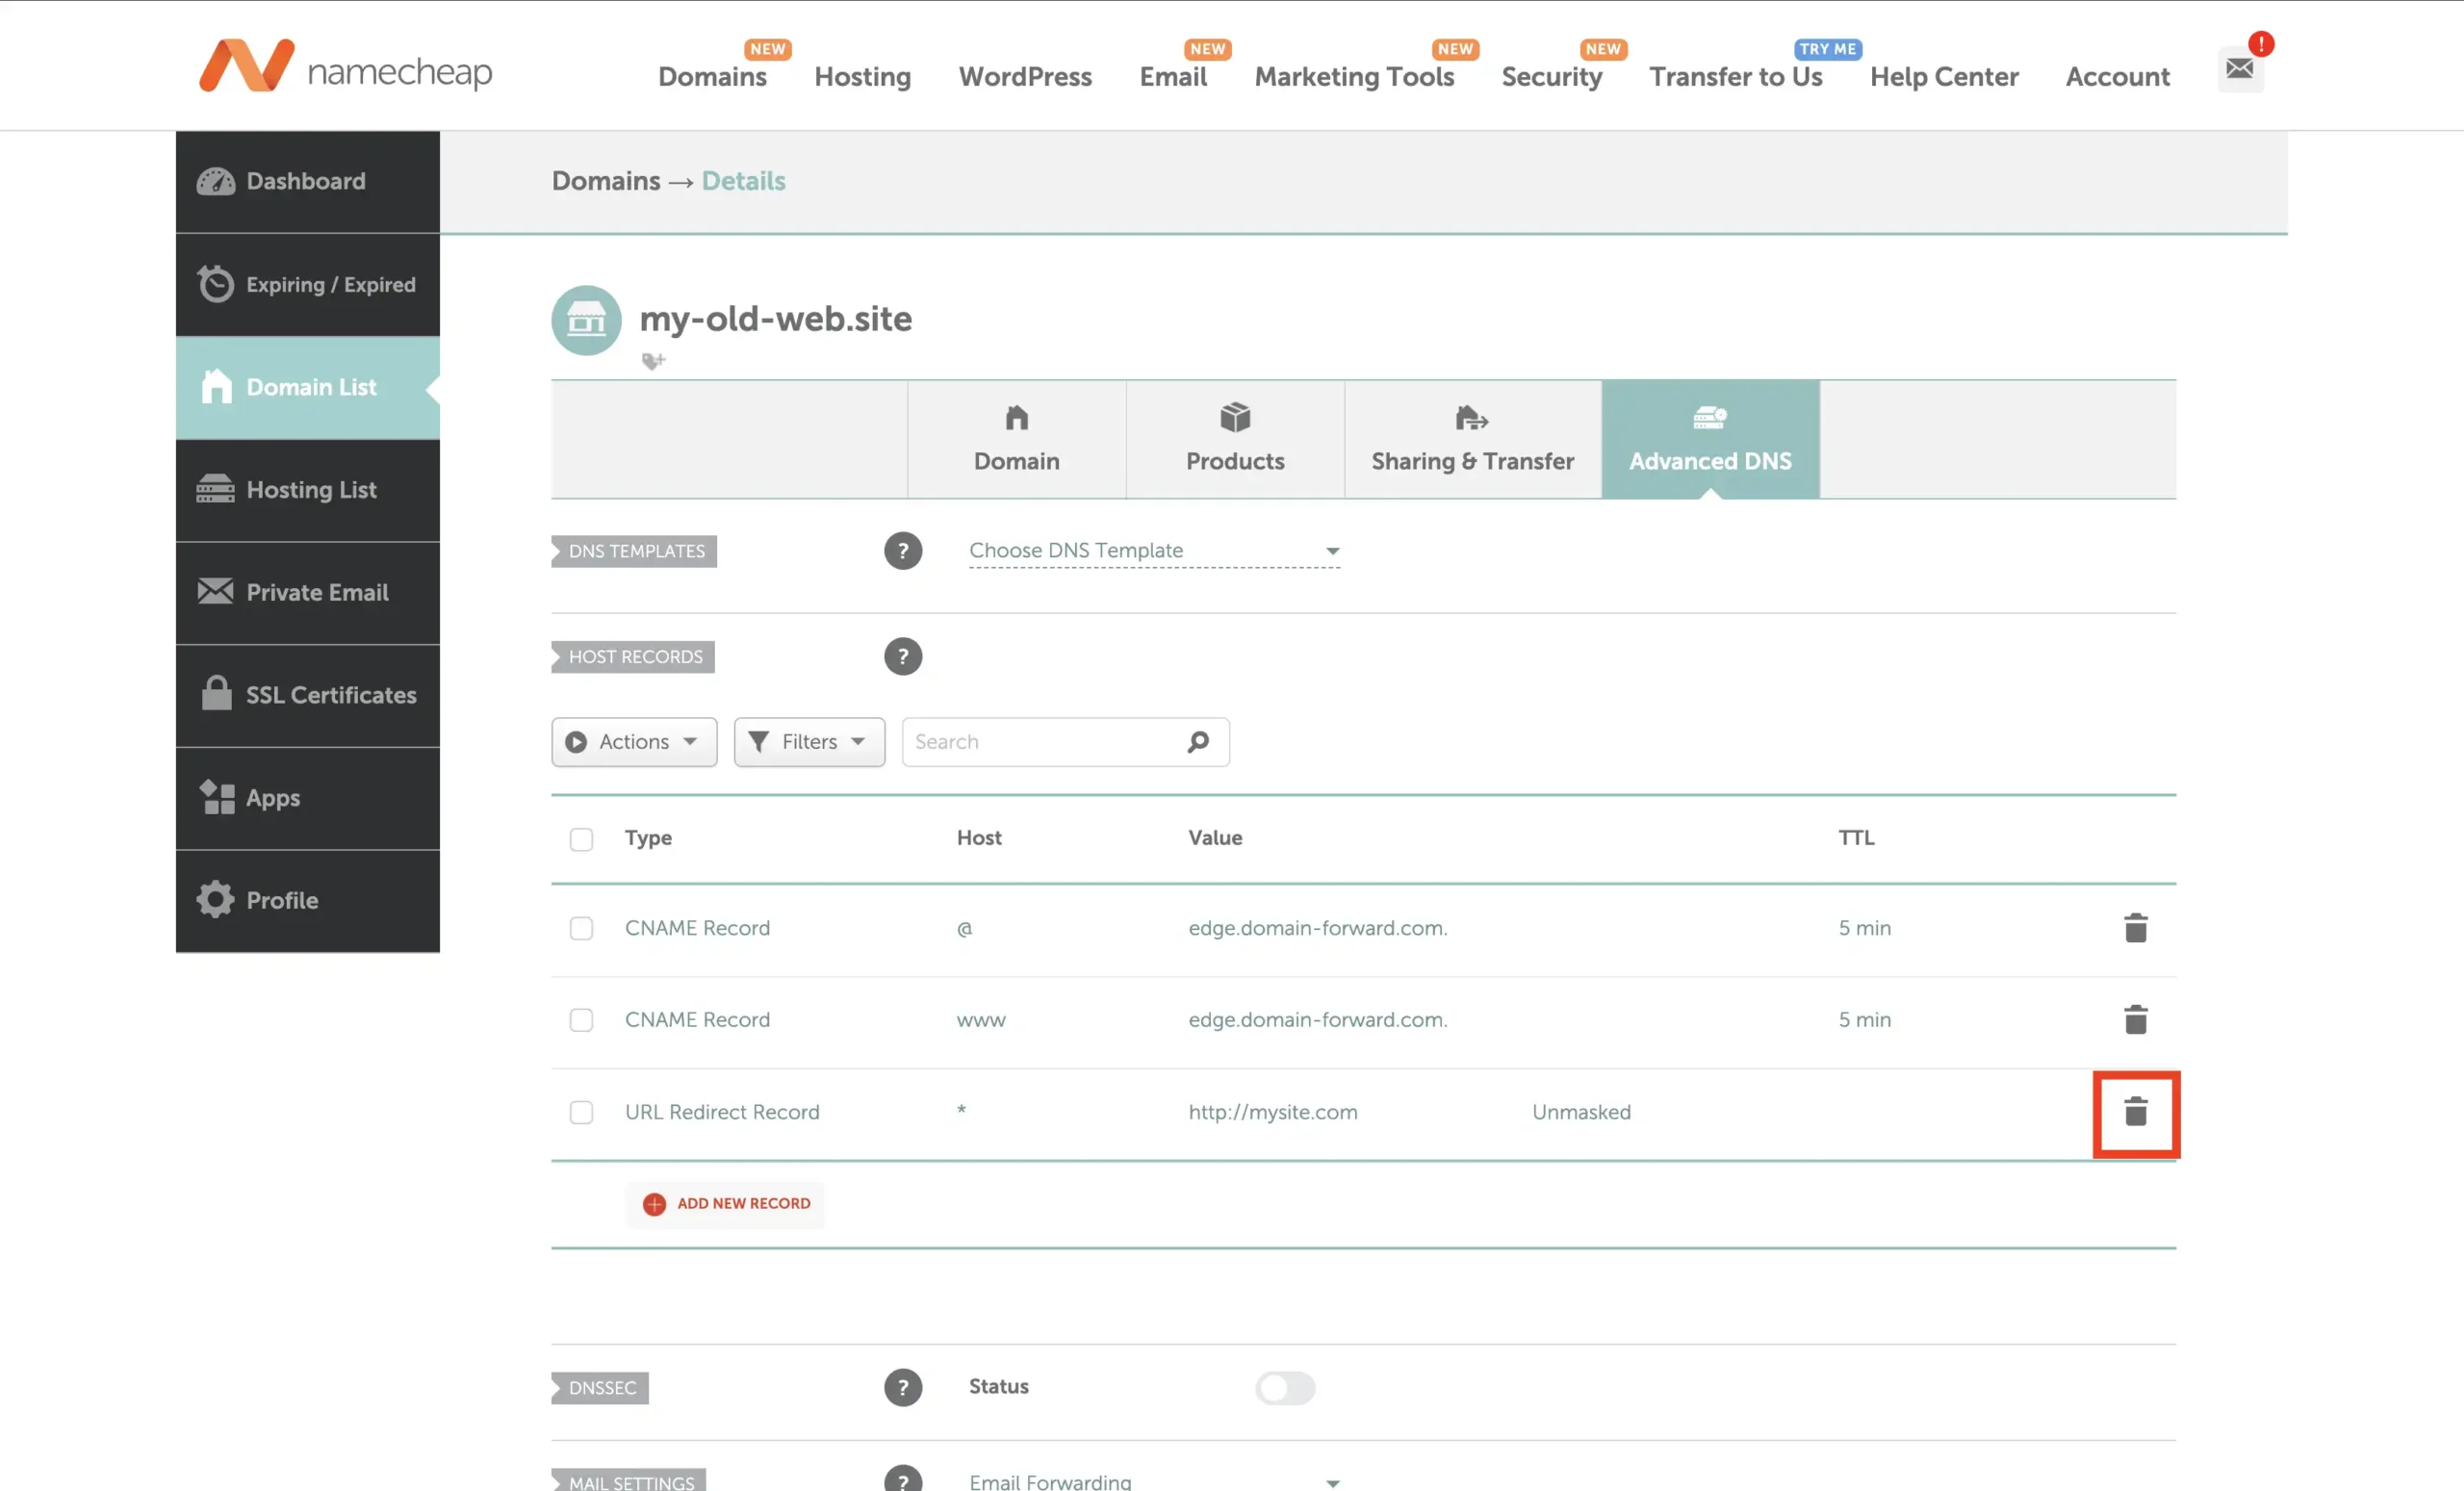
After deleting any previous redirects you have, click on the option for ADD NEW RECORD.
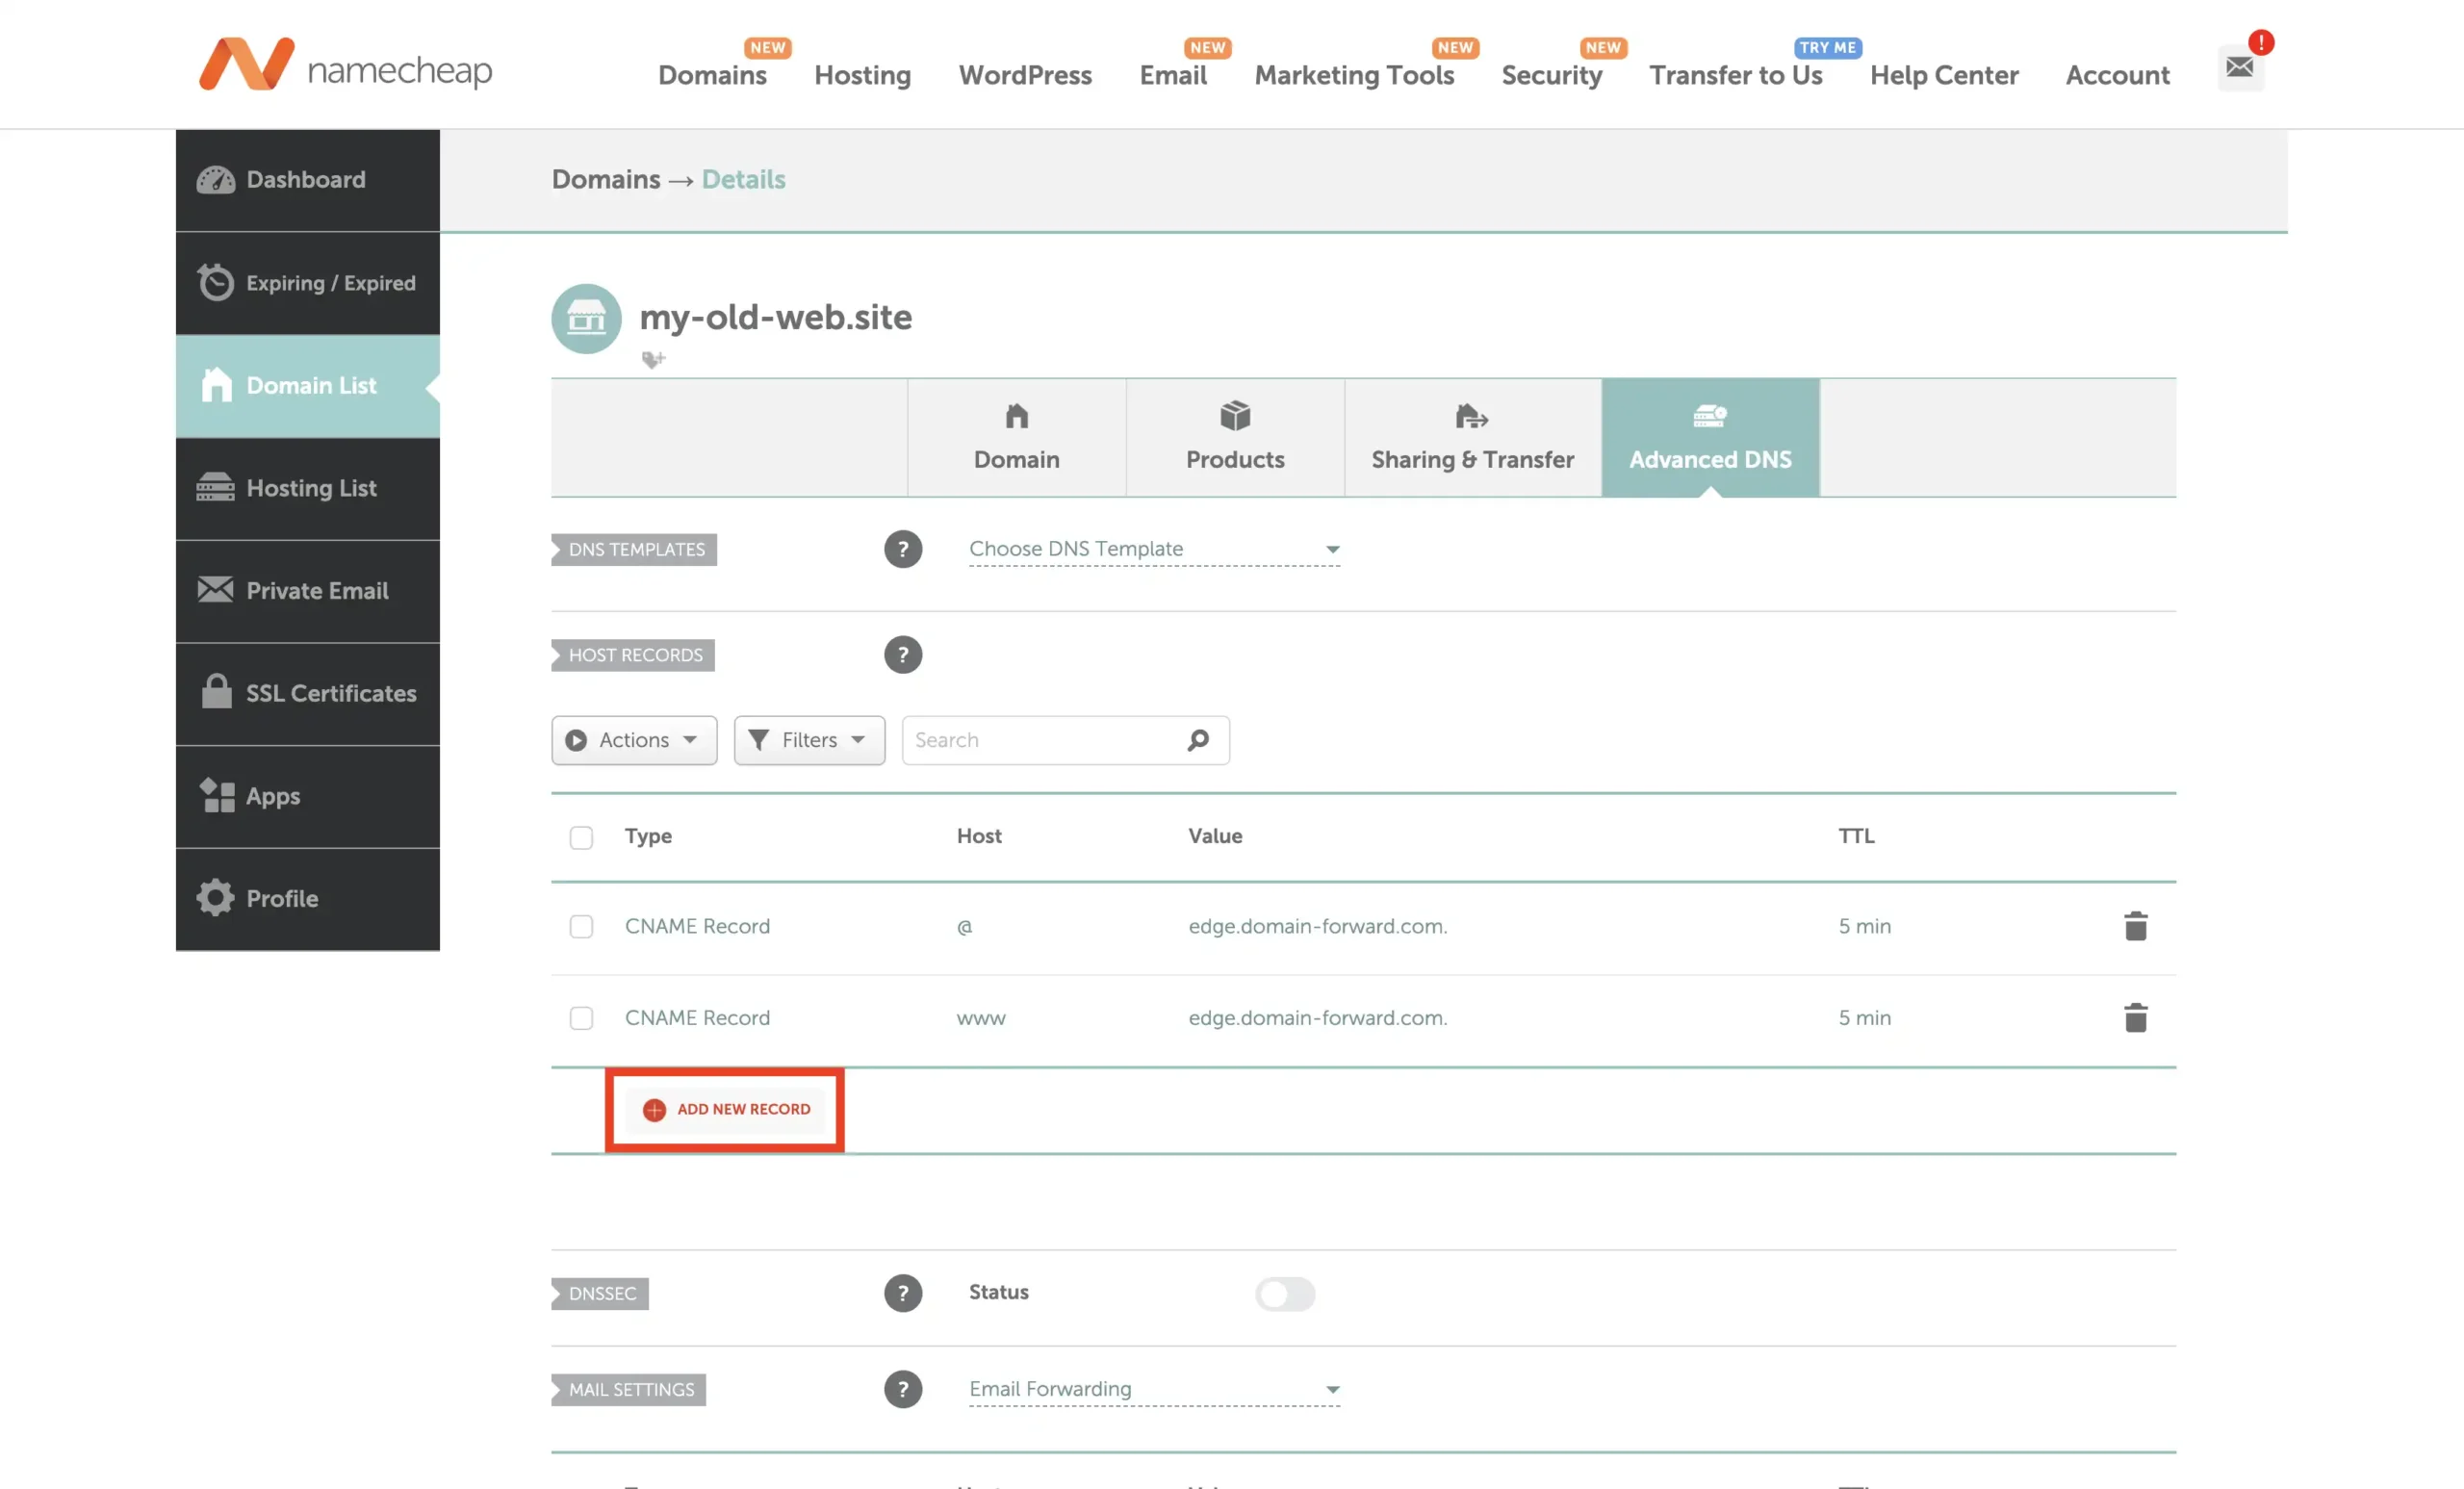
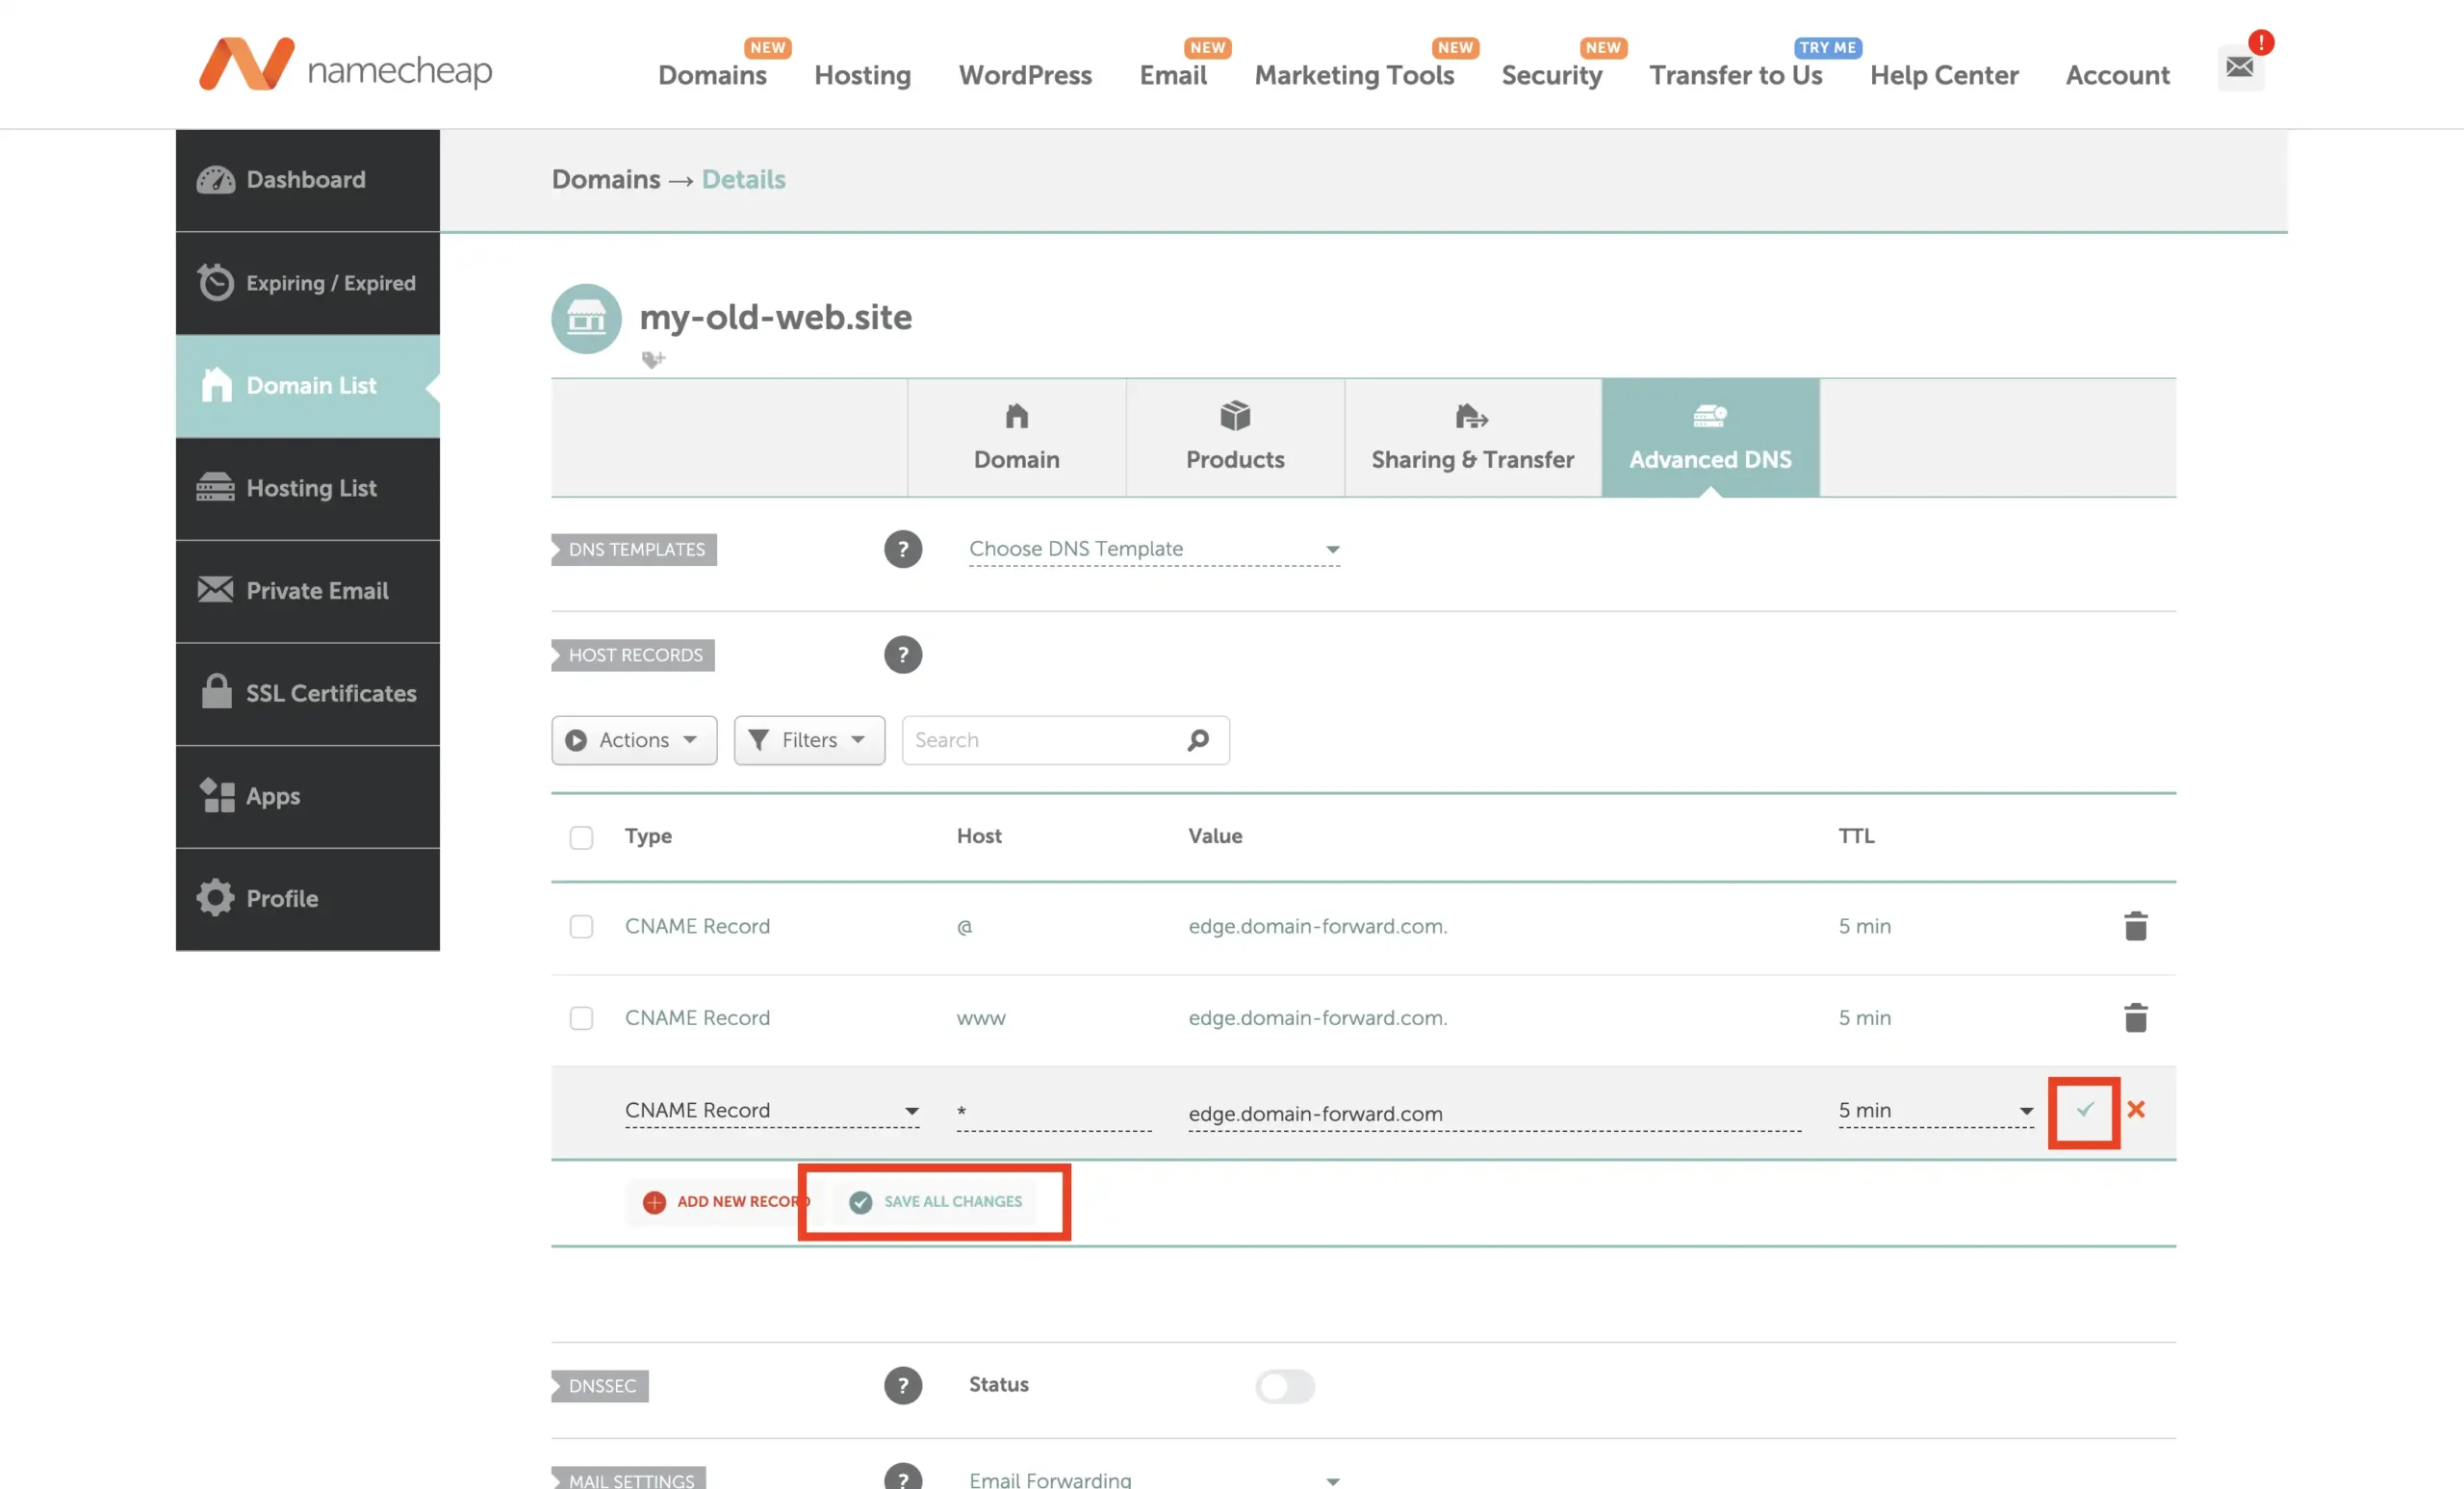
Select the Type ‘CNAME Record and enter * as Host with edge.domain-forward.com as Value. Please check that this is the value that is also provided for you in the Domain Forward app before you configure it like that. IP entries work as well, but we have opted for CNAME in this case.
After providing all the necessary information, click on “Save all changes” or on the green checkmark at the end of the row.
Step 7: Verify DNS At Domain-Forward.com
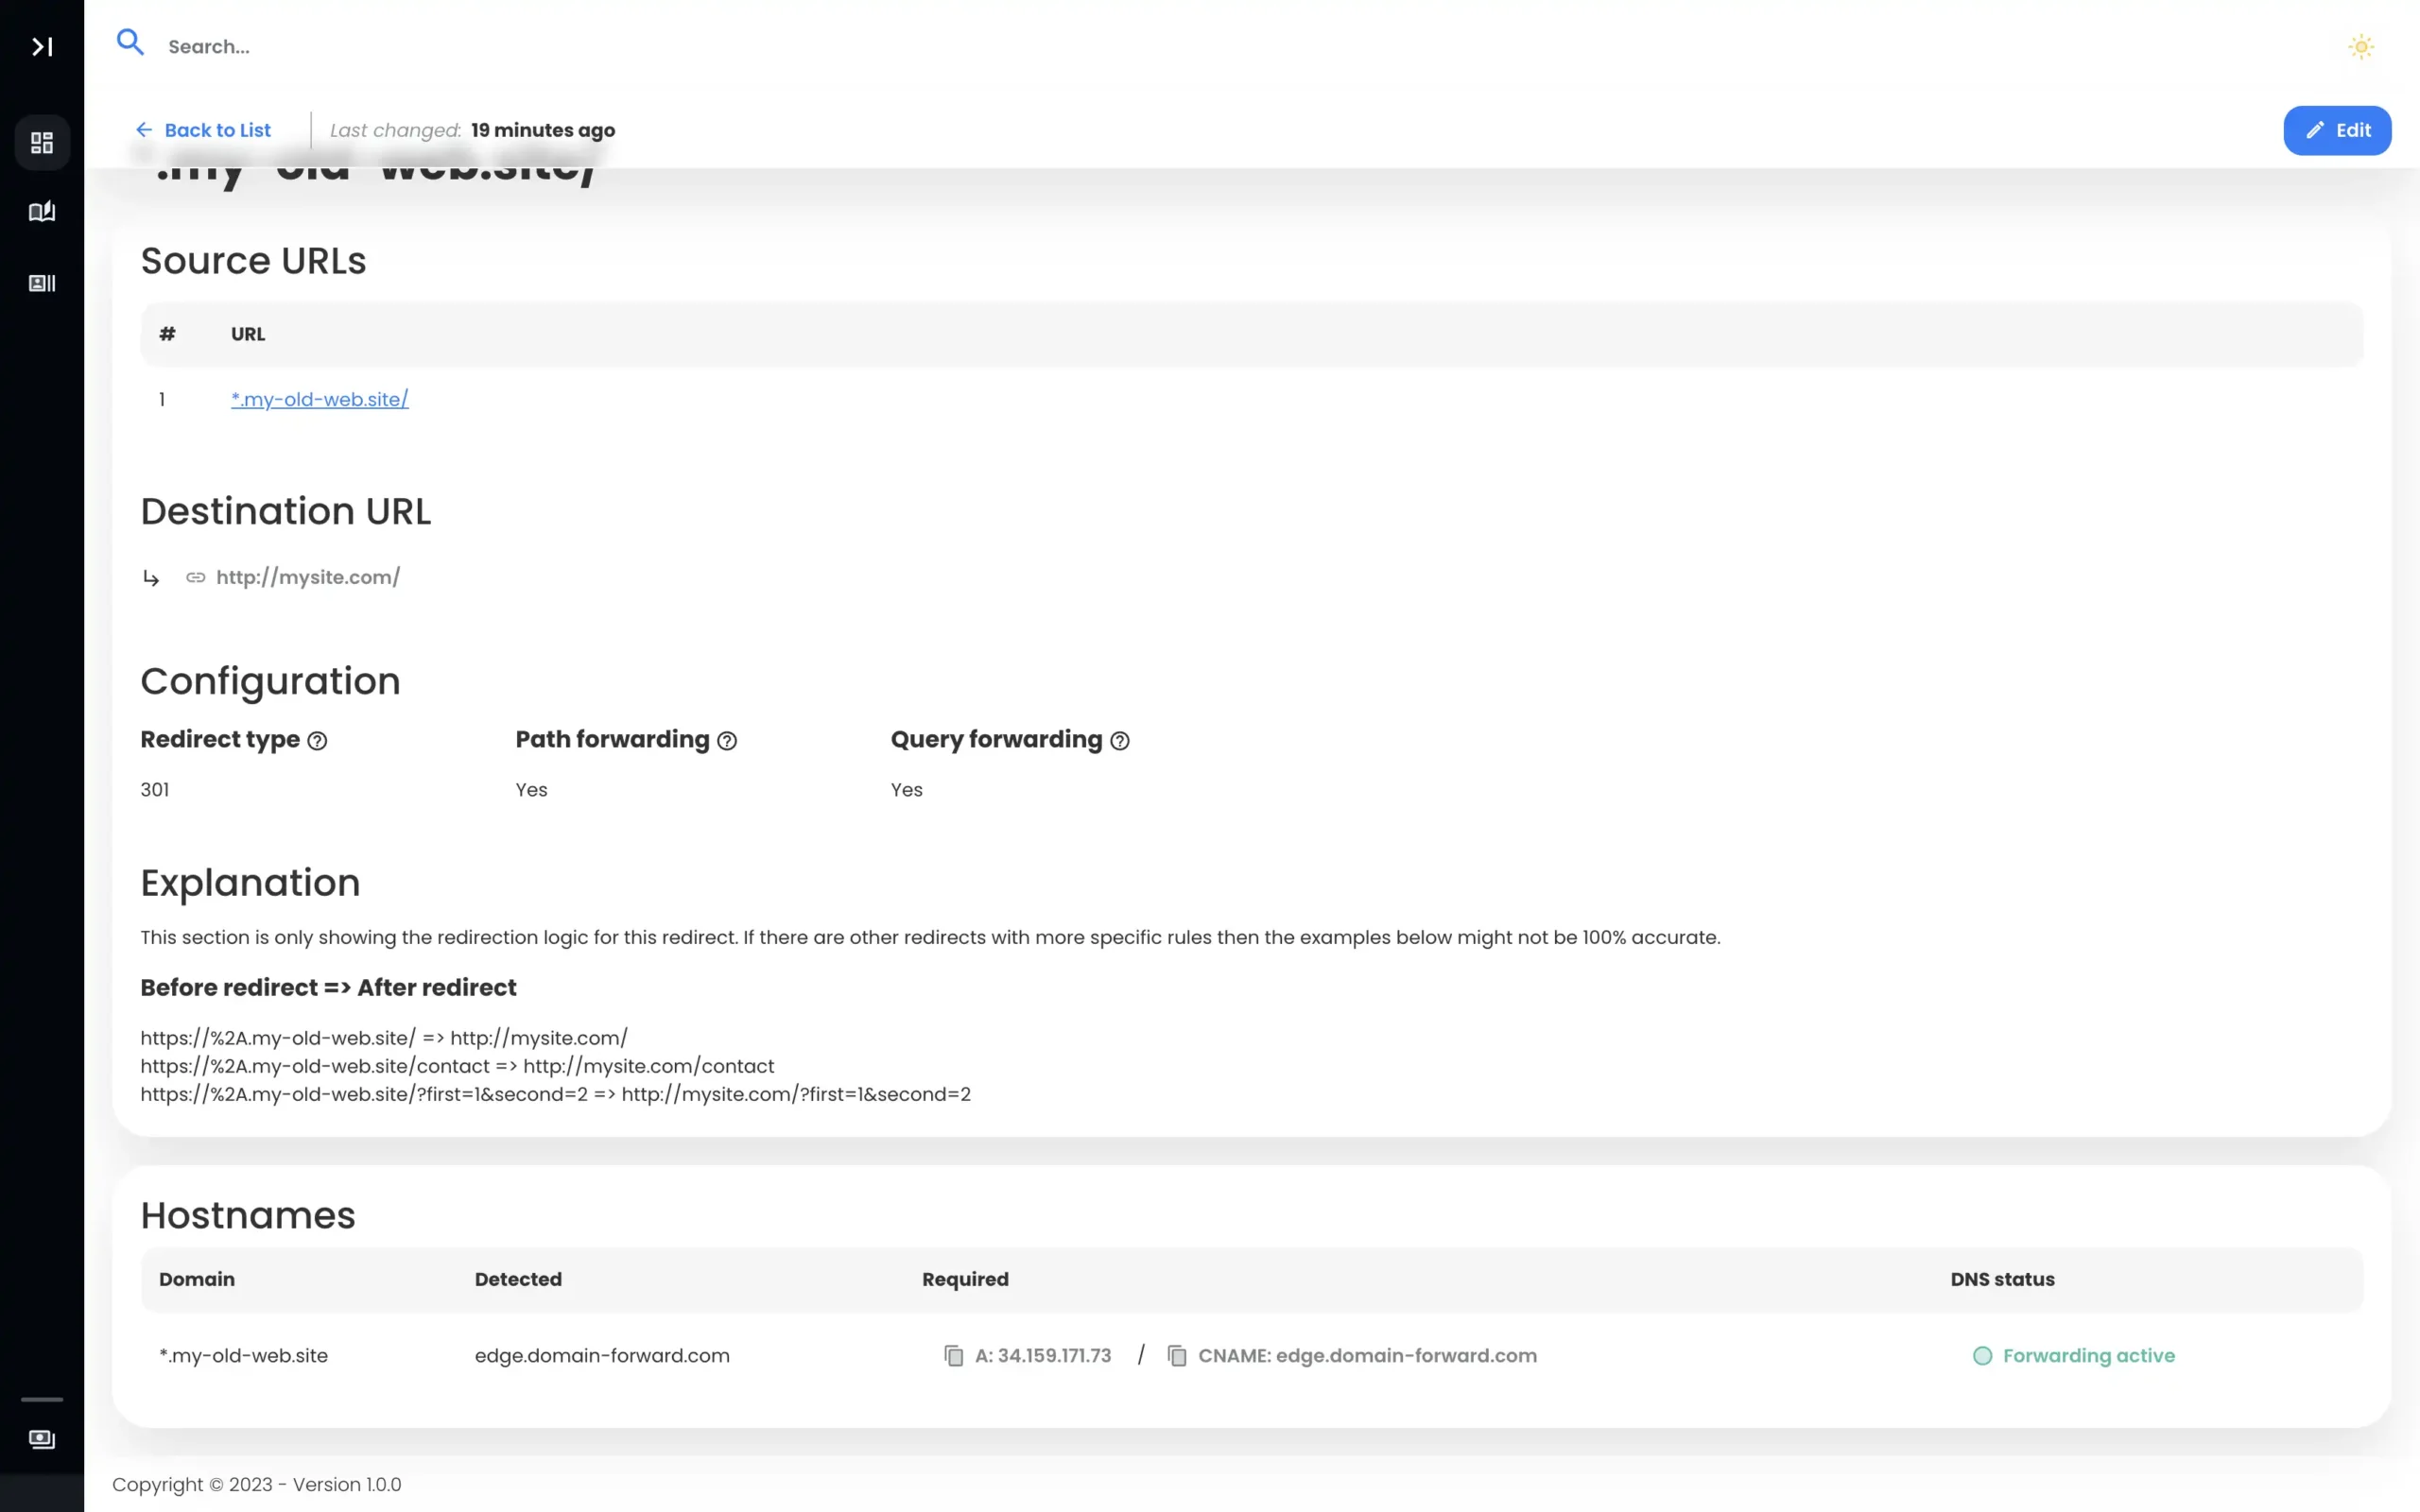
With our DNS changes now tweaked from the Namecheap backend, we only need to wait for a short while for the changes to be effected. Everything should be done in a few minutes or latest in a few hours depending on the old TTL set on those records. You can try clicking on “Check DNS” to have it update the entries in real-time.
Here is what it should look like after the changes have been detected by Domain Forward.
Step 8: Verify Redirect Using Online Tools
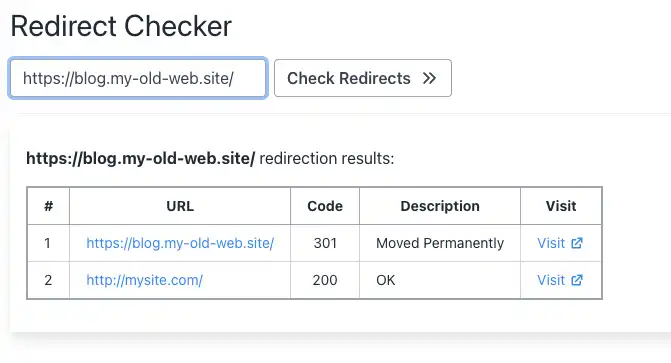
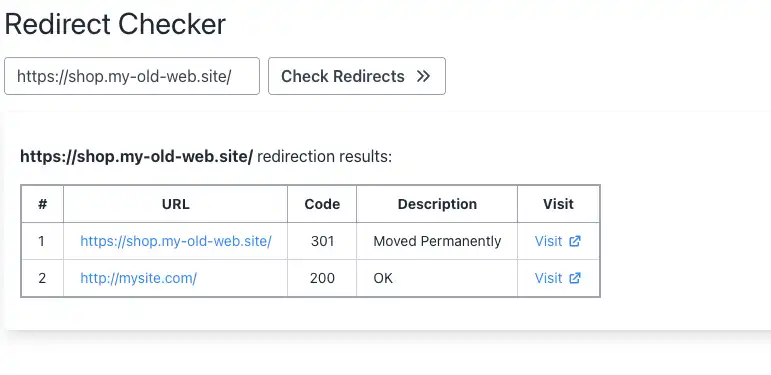
Now that we have configured the domain and the DNS entries as well, we can check if the redirection actually works. Below are images that are taken from an online “redirect testing tool” and it does confirm that our redirection works correctly.
Conclusion
Wildcard redirects are a powerful tool for website owners looking to manage multiple sub-domains or migrate to a new domain while maintaining SEO rankings and a superior user experience. Although Namecheap provides an easy solution to configure wildcard redirects, the lack of HTTPS support is a noteworthy limitation. It’s advisable to weigh the pros and cons before opting for this solution, and perhaps consider alternative methods or providers if HTTPS redirection is crucial for your project.
If you have read to this point, we are sure you’ll agree that the Domain-forward.com redirect option makes things much easier compared to when you use Namecheap. The cool part is that the Domain-forward.com option offers full HTTPS support, something you don’t get with Namecheap.
If you found this post helpful, you can support us by subscribing to our paid plans. It will go a long way to ensure we keep offering quality services.


