- ekkeuustalu
- 0 Comments
- 328 Views
This blog post will share how to redirect traffic from one domain to another using AWS Route53 and CloudFront. This might be useful if you are rebranding your company, changing your domain, or need to redirect traffic for some other reason. By the end of this tutorial, you will be able to implement a seamless domain redirection that is scalable and highly available.
The Basics
AWS Route 53
This is Amazon’s scalable and highly available Domain Name System (DNS). It’s designed to give developers and businesses an extremely reliable and cost-effective way to route end users to Internet applications.
Amazon CloudFront
This is a fast content delivery network (CDN) service that securely delivers data, videos, applications, and APIs to your viewers globally with low latency and high transfer speeds. We are using CloudFront as it is one of the recommended methods from the official AWS Route 53 KB article. We also chose it as it is relatively easy to configure compared to the other AWS options.
Without further ado, let’s dive right in!
Step 1: Set up an AWS CloudFront Web Distribution
First, we will create a CloudFront web distribution for the domain we are redirecting from.
Sign in to the AWS Management Console and open the CloudFront console at https://console.aws.amazon.com/cloudfront/.
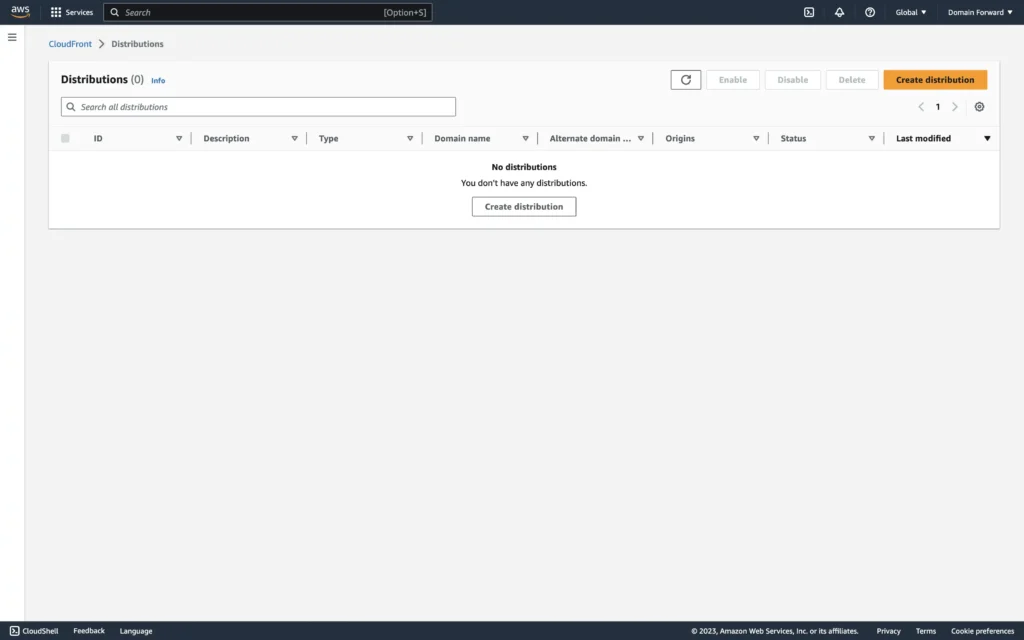
Choose Create Distribution.
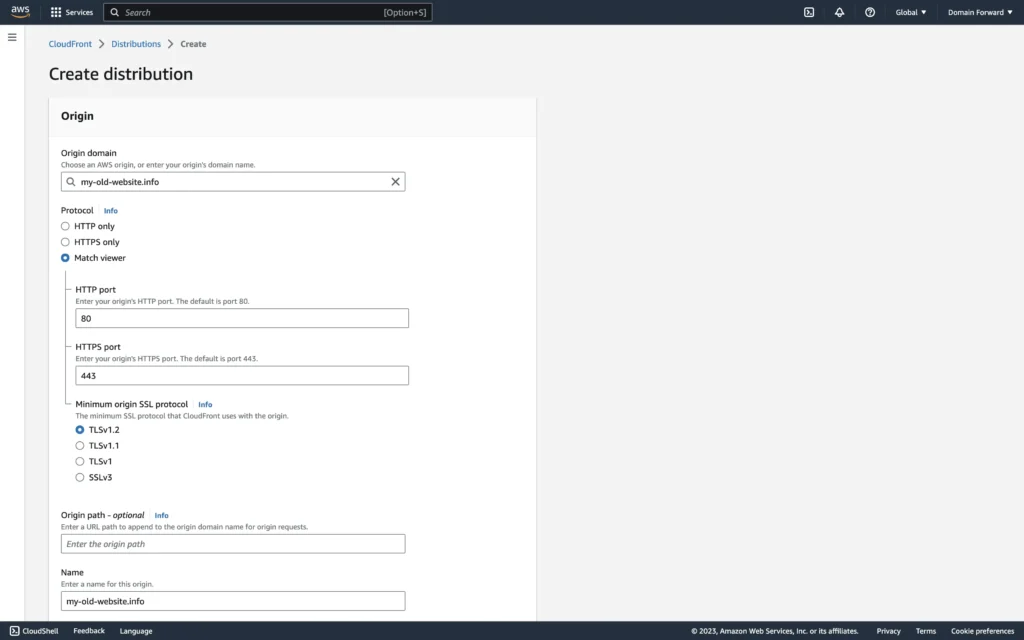
In the Origin Settings section, type the domain you are redirecting to in the Origin Domain Name box.
In the Protocol radio, select the Match viewer option.
Leave the remaining settings in the Origin Settings section at their default values.
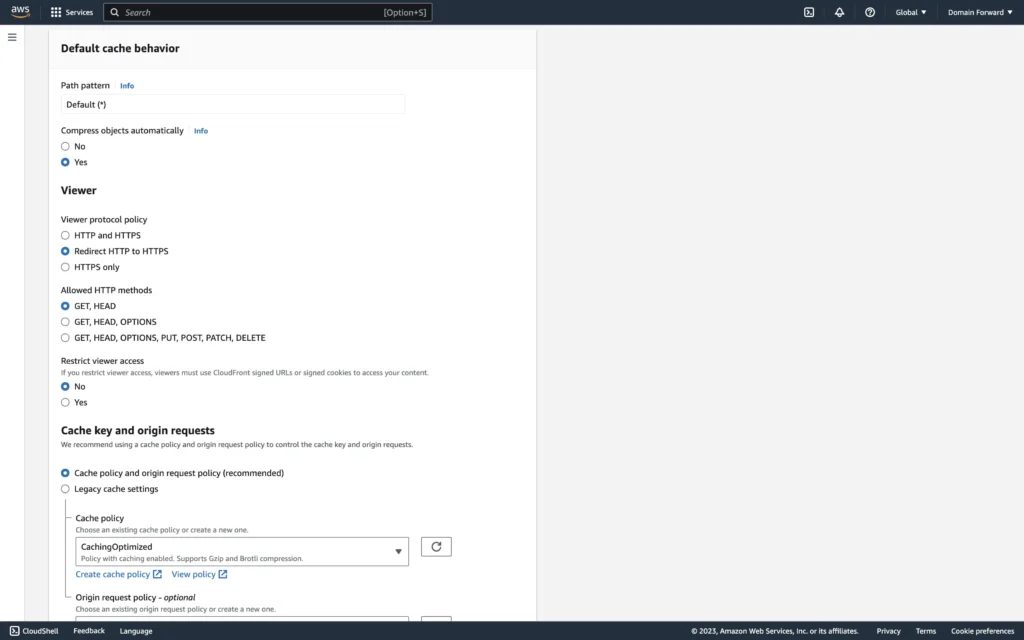
In the Default Cache Behavior Settings section, for Viewer Protocol Policy, choose Redirect HTTP to HTTPS and for Cache Policy, select CachingOptimized.
Leave the remaining settings in the Default Cache Behavior Settings section at their default values.
In the Web Application Firewall (WAF) section, you can select Do not enable security protections.
In the Settings section, for Alternate Domain Names (CNAMEs), type the domain you are redirecting from.
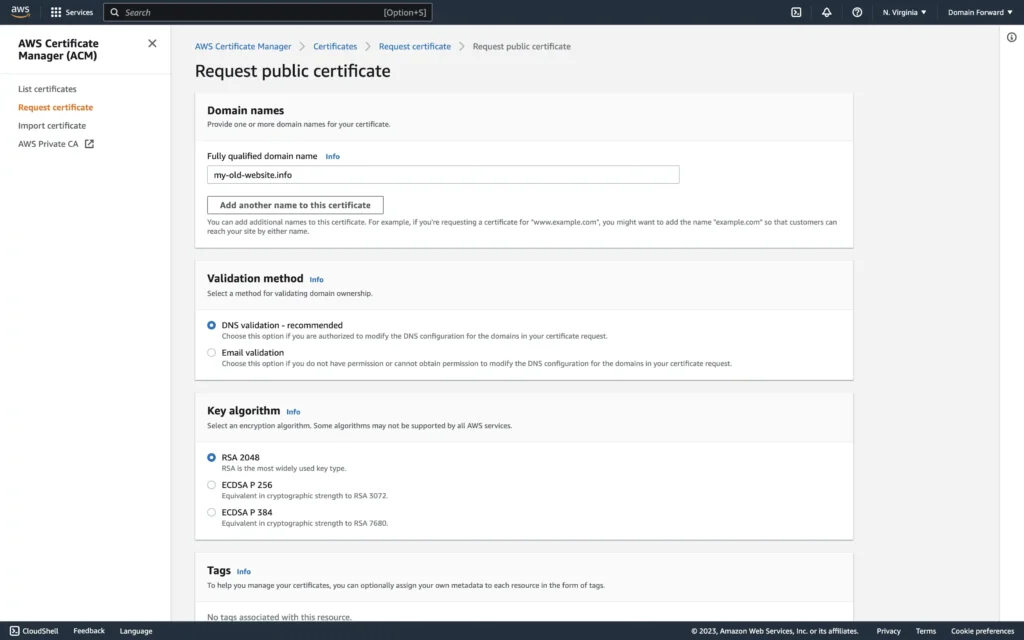
For SSL Certificate, in the Custom SSL Certificate, click on Request certificate.
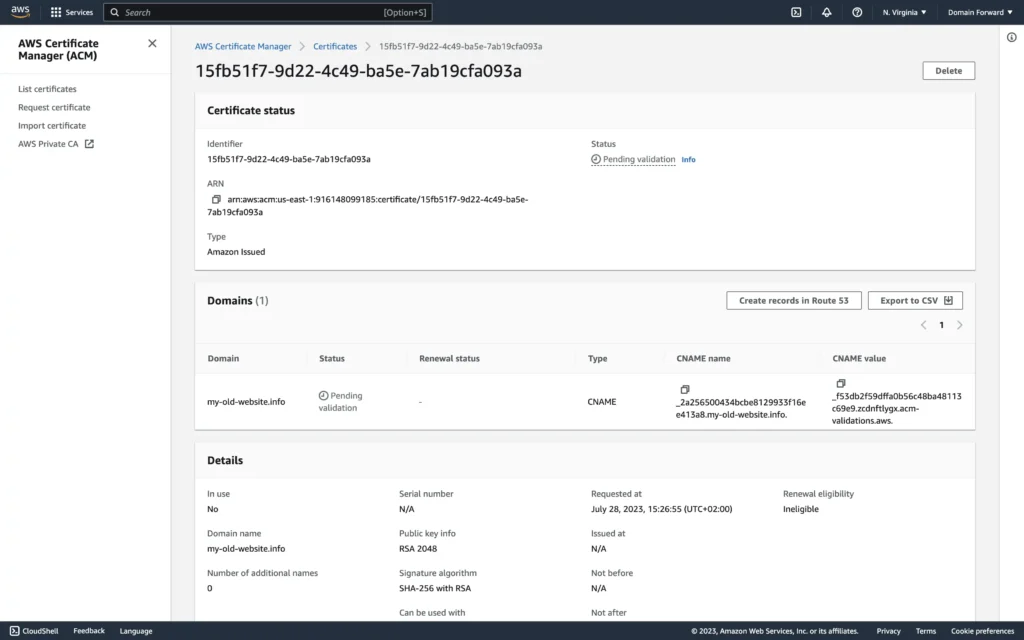
The easiest is to select the DNS validation option and configure the validation CNAME entry under Domains that is given to you after you create the certificate.
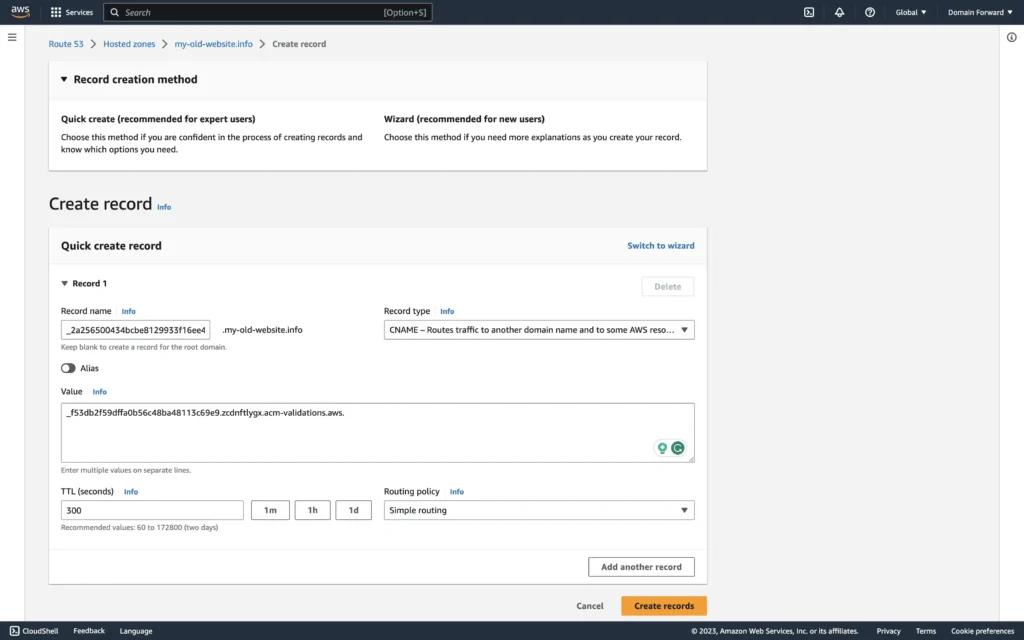
You then have to go into your Route53 settings and input the CNAME entries for your redirected domain as requested from the certificate process.
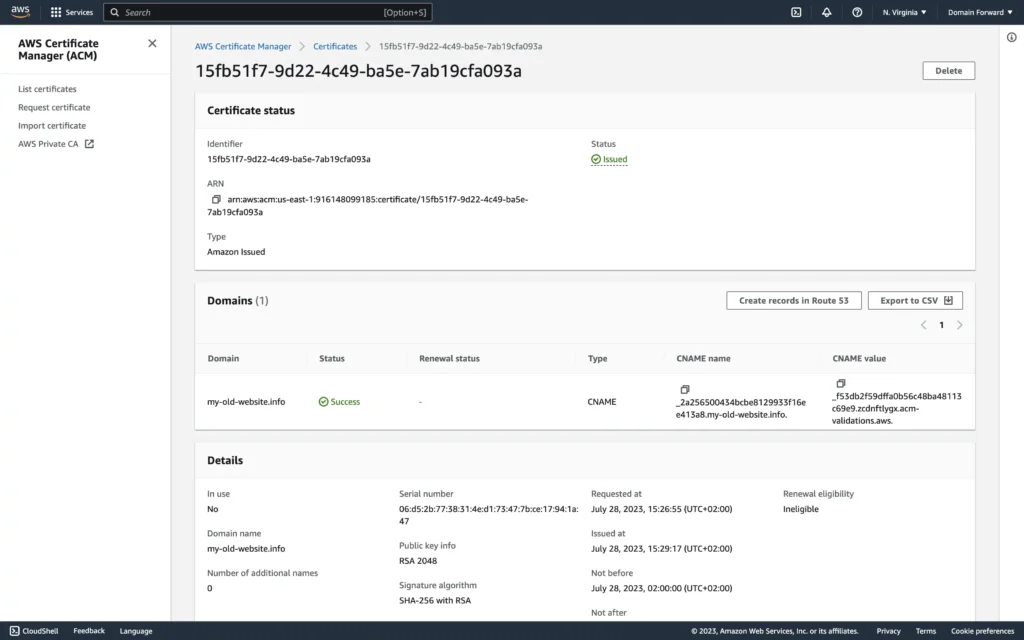
It is possible that after a few minutes the DNS settings have been picked up and the certificate is also issued.
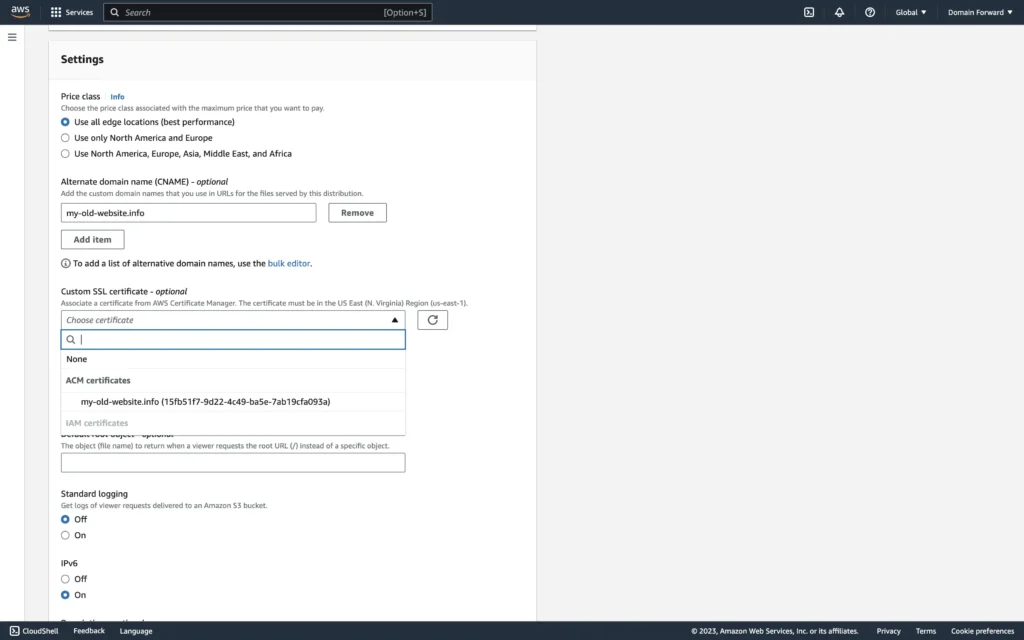
Once that is the case, go back to the browser tab where we input all of the information about the CloudFront distribution. In the Custom SSL certificate dropdown, select the ACM certificate that we just created. You might need to refresh the list with the button next to the dropdown.
Leave the remaining settings in the Settings section at their default values. Choose Create Distribution.
Step 2: Configure AWS Route53
Next, we will configure Route53 to redirect requests to the CloudFront distribution.
Open the Route53 console at https://console.aws.amazon.com/route53/.
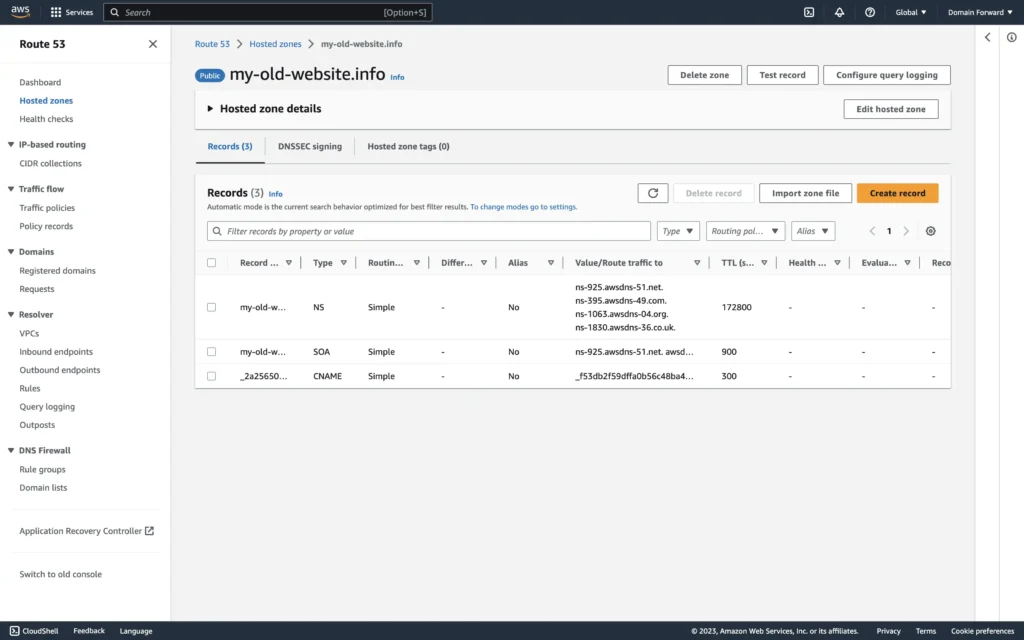
In the navigation pane, choose Hosted zones and choose the hosted zone for the domain that you’re redirecting from.
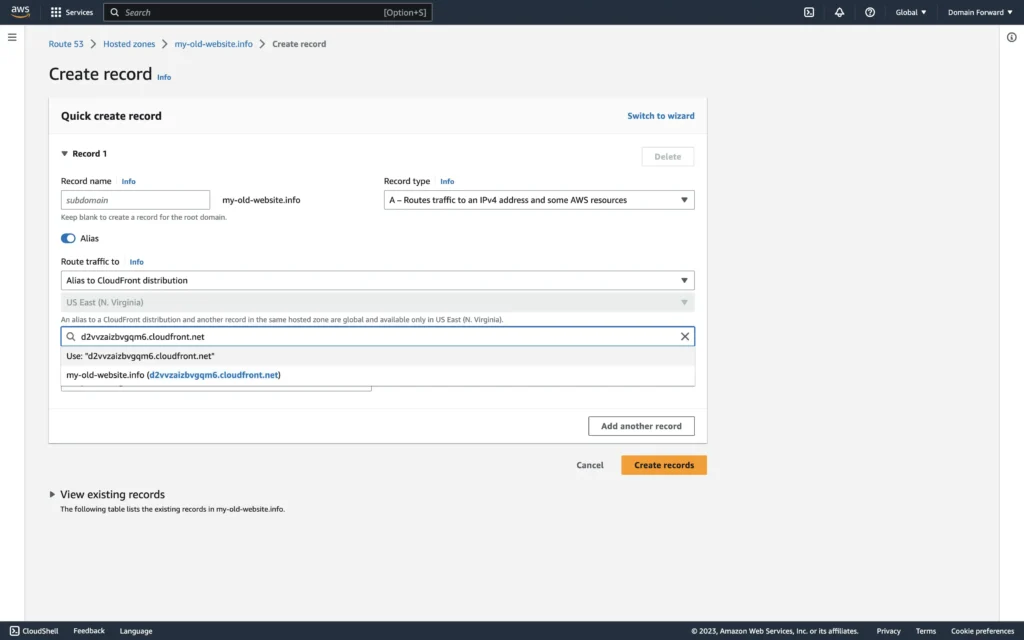
Next, choose Create Record and in the Quick Create record dialog box, specify the following values:
- For Record name, type the domain you are redirecting from.
- For Record type, choose A – Routes traffic to an IPv4 address and some AWS resources.
- For Alias, choose Yes.
- For Alias target, choose the CloudFront distribution that you created in step 1.
And then choose Create records.
Voila! Your Route 53 and CloudFront are now configured to redirect traffic from one domain to another. The entire process can take some time, up to 24 hours, to propagate changes throughout the internet.
Now all we have to do next is to actually configure logic to redirect the users to the new domain.
Step 3: Configure a CloudFront Function
CloudFront Functions is a new serverless scripting capability that allows you to run JavaScript code at over 225+ Amazon CloudFront edge locations to augment, modify or generate HTTP(S) requests or responses. You can use these functions to implement lightweight, request/response manipulations that execute globally at low latency.
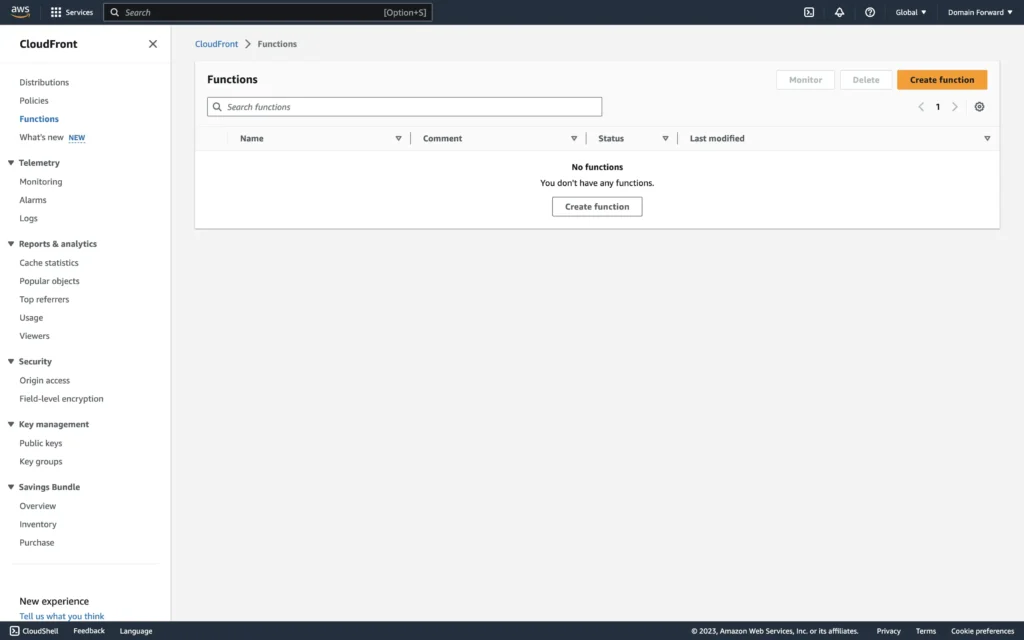
From the dashboard, select Create function.
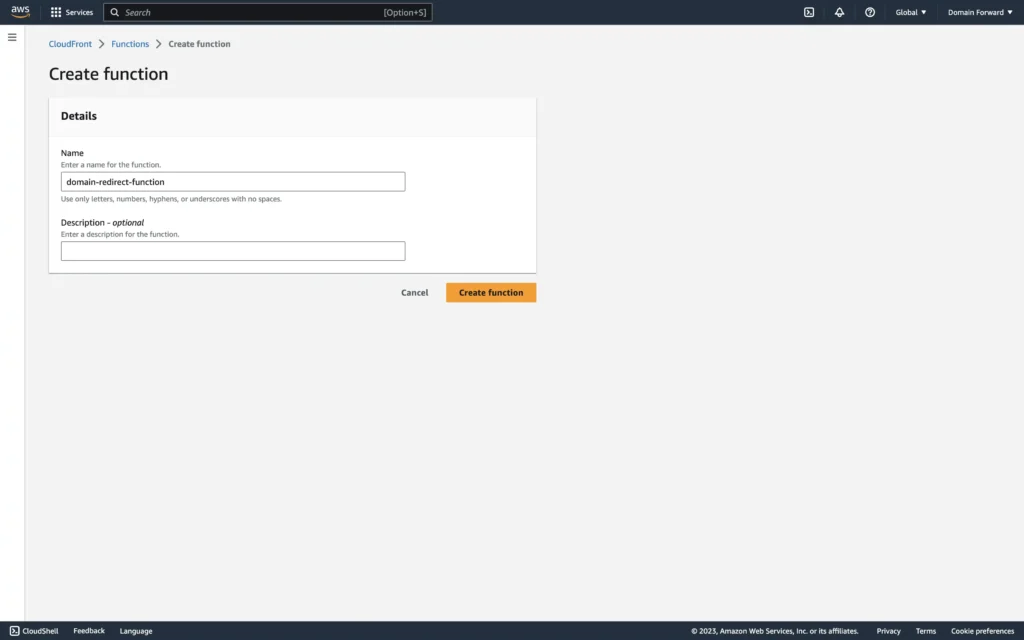
In the Create function screen, provide a name and description that will make it easy to understand what the function is about. Then, click Create function.
Here’s an example of a CloudFront function that will redirect a request to a new domain, preserving the original path and query parameters.
/**
 * Patches lack of
 * https://developer.mozilla.org/en-US/docs/Web/API/Location/search in event.
 * Inspired by
 * https://github.com/aws-samples/amazon-cloudfront-functions/issues/11.
 * @param {import("aws-lambda"). CloudFrontFunctionsQuerystring} querystring The weird format exposed by CloudFront
 * https://docs.aws.amazon.com/AmazonCloudFront/latest/DeveloperGuide/functions-event-structure.html#functions-event-structure-query-header-cookie
 * @returns {string} Tries to return the same as
 * https://developer.mozilla.org/en-US/docs/Web/API/URLSearchParams/toString
 */
function getURLSearchParamsString(querystring) {
    var str = [];

    for (var param in querystring) {
        var query = querystring[param];
        var multiValue = query.multiValue;

        if (multiValue) {
            str.push(multiValue.map((item) => param + '=' + item.value).join('&'));
        } else if (query.value === '') {
            str.push(param);
        } else {
            str.push(param + '=' + query.value);
        }
    }

    return str.join('&');
}

function handler(event) {
    var request = event.request;
    var newHost = "www.google.com";

    var query = request.querystring && getURLSearchParamsString(request.querystring) ? getURLSearchParamsString(request.querystring) : '';

    var response = {
        statusCode: 301,
        statusDescription: 'Permanent',
        headers: {
            "location": {
                "value": "https://" + newHost + request.uri + (query == "" ? "" : "?" + query)
            }
        }
    };

    return response;
}
PS. To make sure that your traffic gets redirected to the correct place, you need to replace the value of the newHost variable to your destination domain.
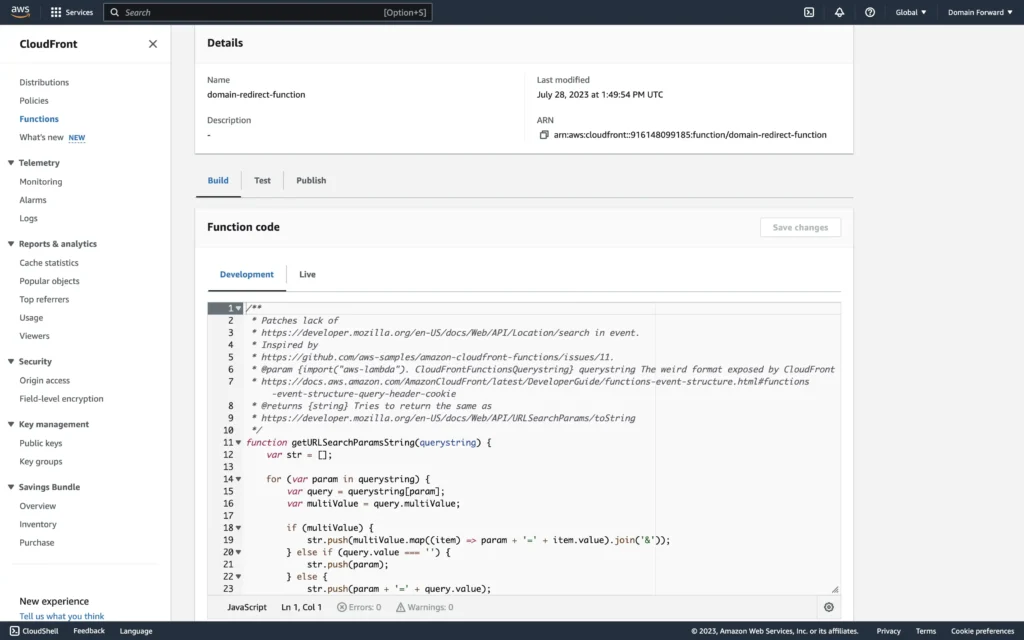
We then need to take the code snippet from above and paste it into the Function code section. After that, click on Save changes.
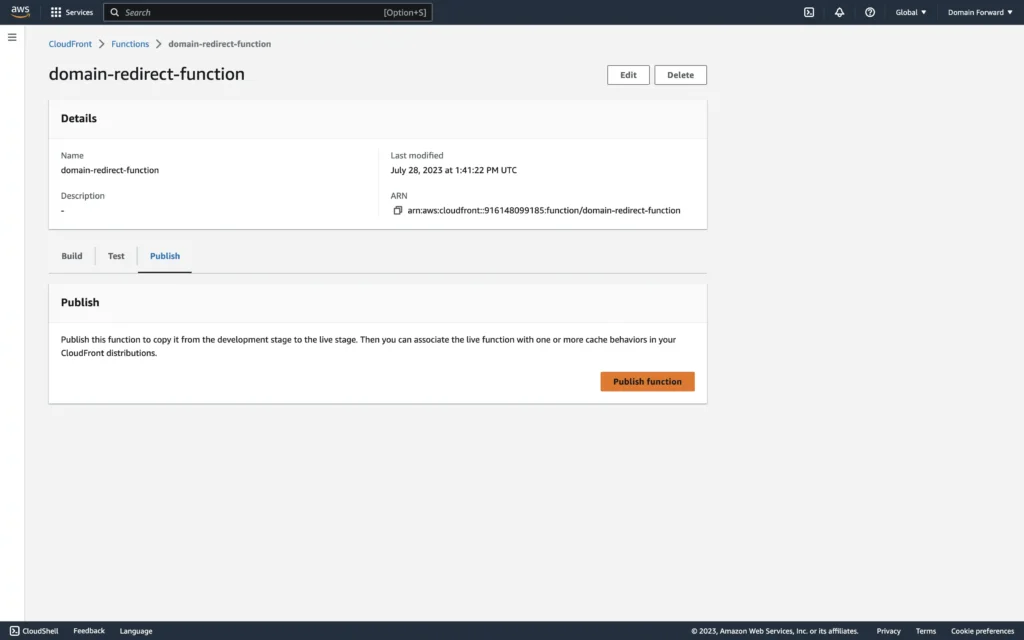
You then want to publish the function by clicking on Publish and then Publish function.
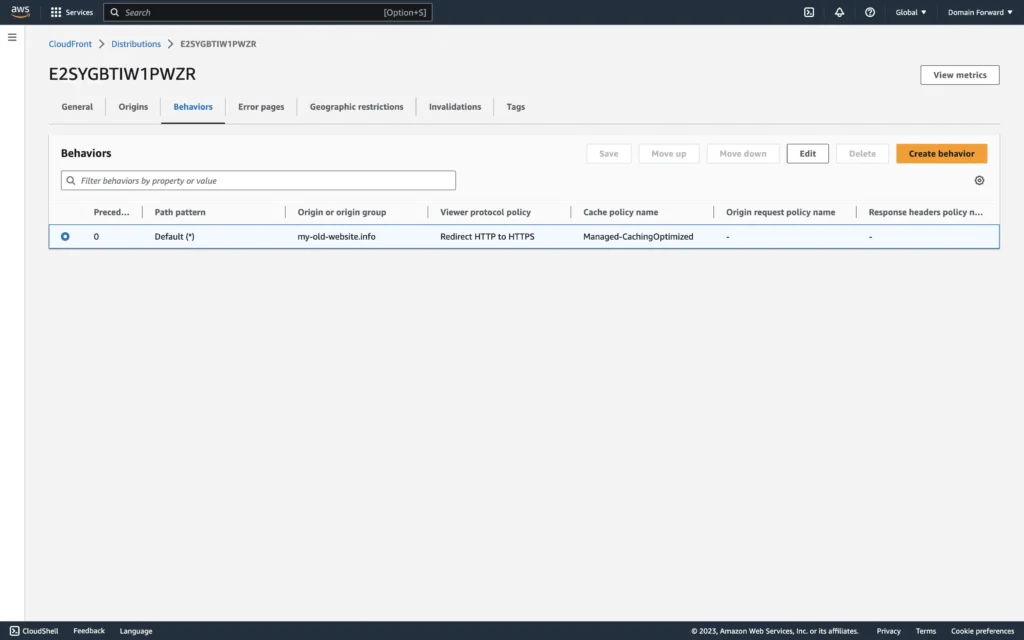
After that, you have to connect the function to the CloudFront distribution that we created in Step 1. You need to go back to the distribution and from the Behaviors, check the row, and click on Edit.
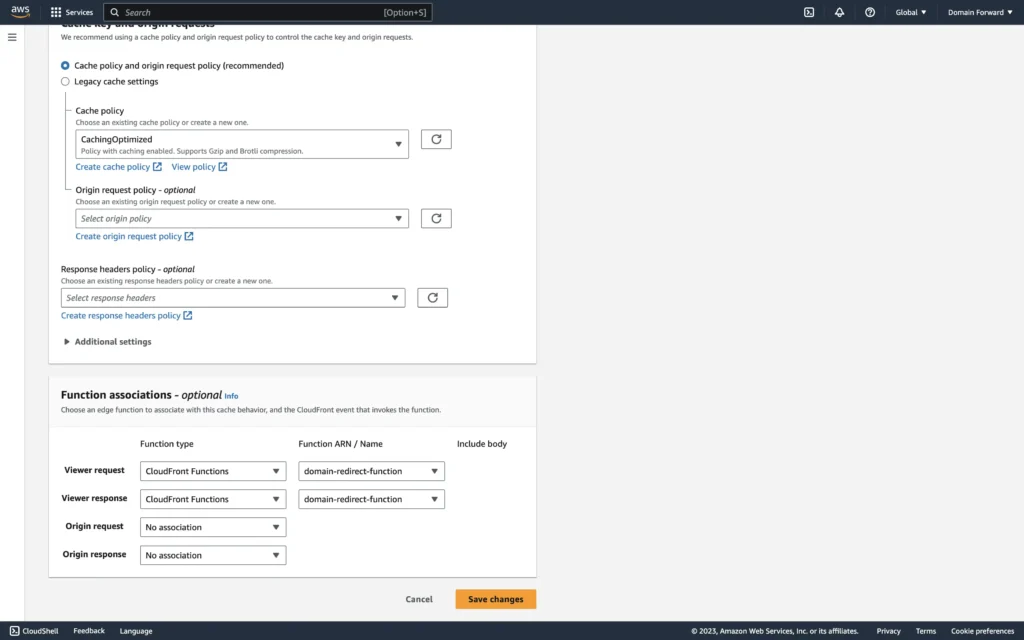
In the edit behavior view, scroll all the way down and configure the Viewer request and Viewer response as shown in the image above. You of course need to select your function which might have a different name.
If you don’t explicitly do this step then the function will not be used by the distribution and the users accessing the site receive a 404 error.
Step 4: Test the Setup
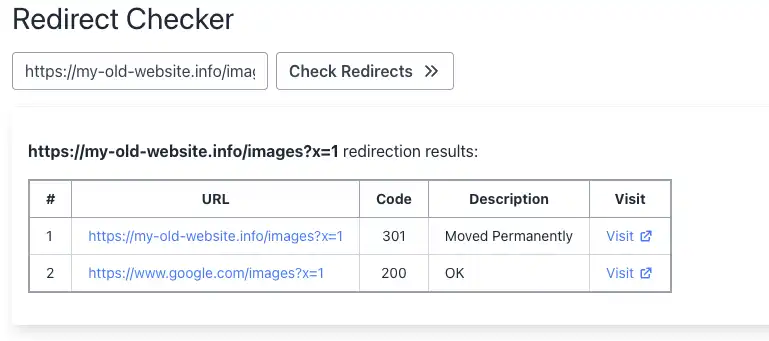
Once everything has been configured, then you can try to access them in the browser and see if the traffic is correctly forwarded. We can see from the image below that the traffic is forwarded and an HTTPS certificate is automatically assigned.
We can also see that the path (/images) and the query parameters (?x=1) are also forwarded.
Conclusion
That’s it for today’s tutorial. We hope you found it helpful. If you are using some other stack then feel free to check out our other posts to find a solution that fits for you.
Please note: AWS occasionally updates its interface, so the exact steps and descriptions may vary slightly. Always refer to the official AWS documentation for the most accurate information.
How can I do it without writing code?
If you are looking for an easy way to redirect a domain and not have to configure all of the technical infrastructure for it (including automatic HTTPS), then you should consider using the Domain Forward service.
When you use Domain Forward, then the whole process gets condensed to just Step 2. You can sign up using the link below and create your first redirect using the Getting Started guide.


