- ekkeuustalu
- 0 Comments
- 373 Views
A URL redirect is a temporary or permanent forwarding of one URL to another URL. It sends users or search engines from an old URL to a new one.
If you have a domain on Namecheap and want to know how to redirect your domain, this guide has everything you’re looking for and more.
But before we jump into the nitty-gritty of Namecheap redirect domain, here are some benefits of using URL redirects you should know:
- Improve SEO: Domain redirecting is a brilliant strategy for improving a website’s SEO. You can significantly improve your site ranking across different search engines by simply passing link juice from an old URL to a new one.
- Increase traffic: Sending users from an old to a new website increases your website traffic. It’s highly recommended for site owners who want to change their domain to a new URL structure without losing traffic.
- Improved user experience: Redirecting your visitors to the new domain helps to improve their overall experience, and here is why. By redirecting your old domain to a new URL, users don’t need to know your new URL to visit it.
Now that we have provided some background on URL redirects and listed a few benefits of domain redirects, let’s jump into the practical aspects of Namecheap domain redirects.
How to Redirect a Domain on Namecheap
Redirecting your domain on Namecheap might seem tricky, especially if you’re doing it for the first time. But don’t worry; we have compiled a detailed step-by-step tutorial to guide you.
Let’s cut to the chase and bring you all the exciting details.
Step 1: Sign into your Namecheap
If you aren’t logged in, you must do so immediately. If you’re logged in, you can continue to the second step.
Step 2: Navigate to the Domain List
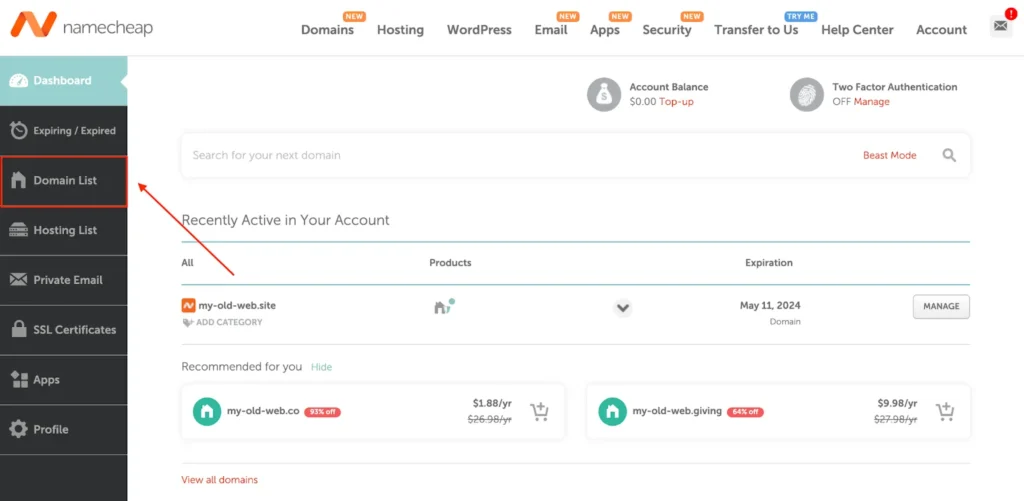
After gaining access to your dashboard, scroll down and select the option for Domain List. The image below shows you exactly how to go about that:
Step 3: Select the option for Manage
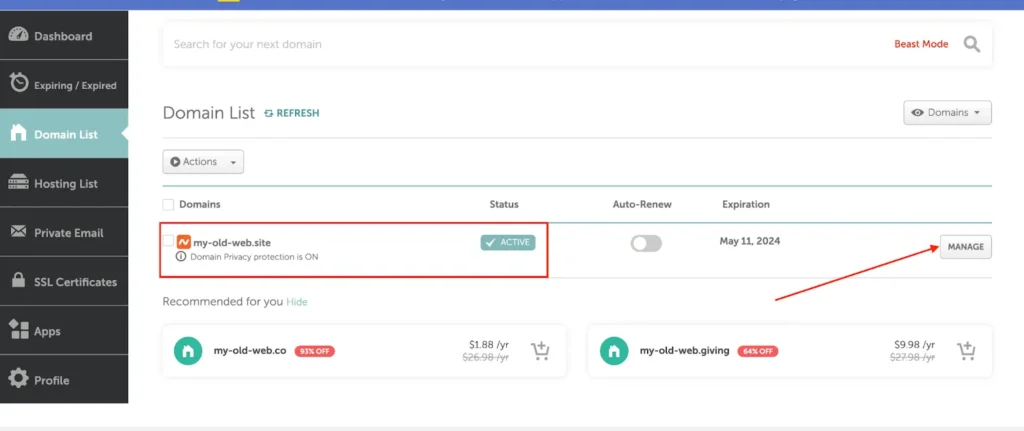
After clicking on the option for Domain List, a new page should launch. Scroll down to the domain you’d like to redirect and select the option for Manage.
Step 4: Redirect Domains > Add Redirects
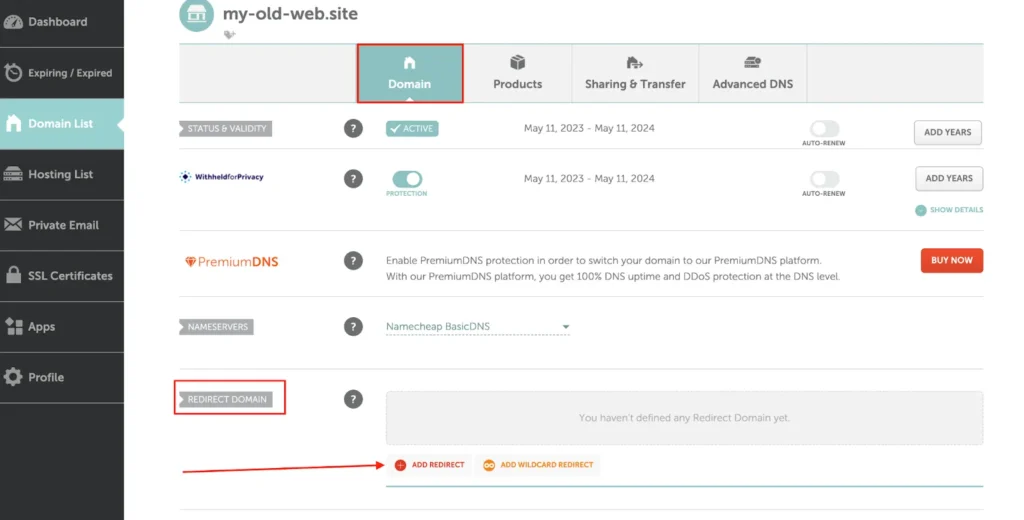
Here is where things get interesting, so be patient while we walk you through. After clicking the option for Manage, scroll all the way down to the Redirect Domain section and click on the option for Add Redirect.
Step 5: Add your domain redirect credentials
With the option for “Add Redirect” selected, you should notice a new field where you need to type in your domain source URL (my-old-web.site), and another field where you need to enter the Destination URL (https://destination.my-old-web.site)

Note: The Destination URL is where we are redirecting our domain to.
With your Source URL and Destination URL entered, simply click on the checkmarks to save the changes.
Step 6: Make Changes to Advanced DNS
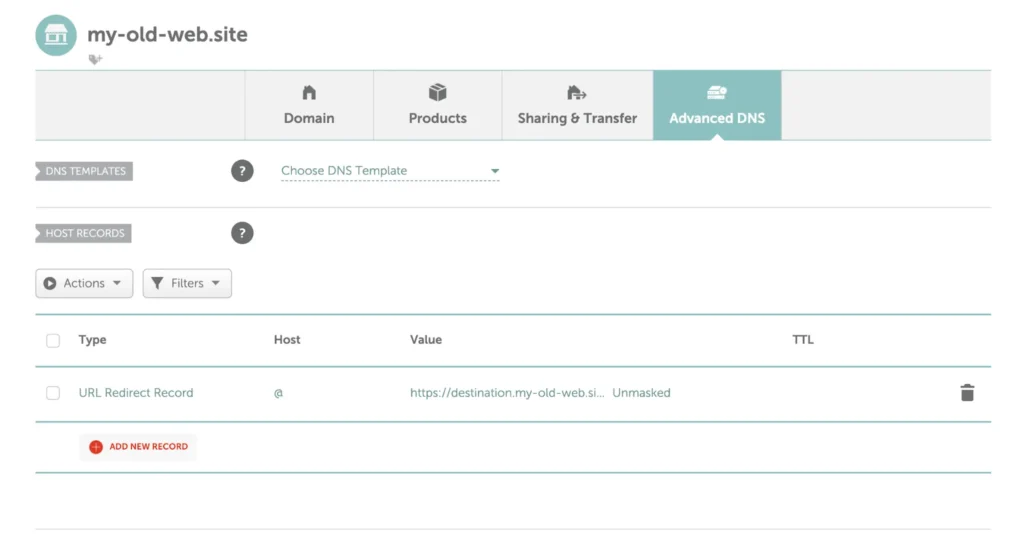
After saving the changes for the domain redirect, you might need to make some changes to Advanced DNS, so navigate to the Advanced DNS tab and check if there are any conflicting records, such as CNAME or URL redirect records with different values but set for the same hosts. If you find any conflicting records, you must delete those for the domain redirect to work correctly.
In our case, we don’t have any conflicting records, so we don’t need to make any changes. If you notice any conflicting changes, all you need to do is delete them. It’s as simple as that.
Namecheap Domain Redirect Shortcomings
While redirecting your domain on Namecheap isn’t as challenging as you imagined, it’s important you know that Namecheap domain redirect isn’t compatible with custom nameserver configurations. And that’s because the Namecheap domain redirect service is only available if you’re using BasicDNS, PremiumDNS, or FreeDNS nameservers.
What this means is that if you have recently tweaked the DNS settings of your domain to use a third-party name server, you’ll not be able to set domain redirects on Namecheap.
As if that isn’t already frustrating enough, HTTPS traffic redirection doesn’t work. Even if you somehow managed to get around it, you’ll discover that HTTPS traffic will show errors for most browsers.

The other not-so-cool aspect of Namecheap domain redirects is that it can take time to take effect. While Namecheap says domain redirects usually take effect in 30 minutes, users sometimes have to wait hours or even days for their domain redirects to go live. This can be an issue, especially if you need to redirect traffic to a new website quickly.
Domain-forward.com: The Ultimate Solution to All Domain Redirect Issues
We know how frustrating it can be not to be able to use your preferred third-party DNS service or HTTPS with Namecheap redirects, that’s why we have created a powerful solution that helps you bypass all of the roadblocks you’re having with your primary provider.
With Domain-foward.com, it takes only a few clicks to redirect your domain. And guess what, that’s not the most thrilling part.
Using Domain-forward.com, you enjoy access to built-in HTTPS support and analytics, so you’re able to get a first-hand experience of how the redirects are used.
When using Domain-forward.com to redirect your domain, you only need to create an account, set up your source and destination addresses, and configure your DNS provider. Trust us when we say it doesn’t get easier than this.
Ready to bypass all of the roadblocks you are facing with your primary provider? Let’s show you how to use this incredible platform to redirect your domain.
Step 1: Create an Account
First things first, you need to create an account, which is pretty straightforward.
Step 2: Add your domain to Domain-forward.com
After successfully creating an account, it’s time to add the domain you’d like to redirect. To do that, click on the option to Add Redirect.

Since we already have a domain with Namecheap, “my-old-web.site,” we will add the domain to the Source URL field. For a hassle-free experience, we recommend adding www and the apex (non-www).
Also, we need to set the Destination URL, i.e., where we want to forward to.
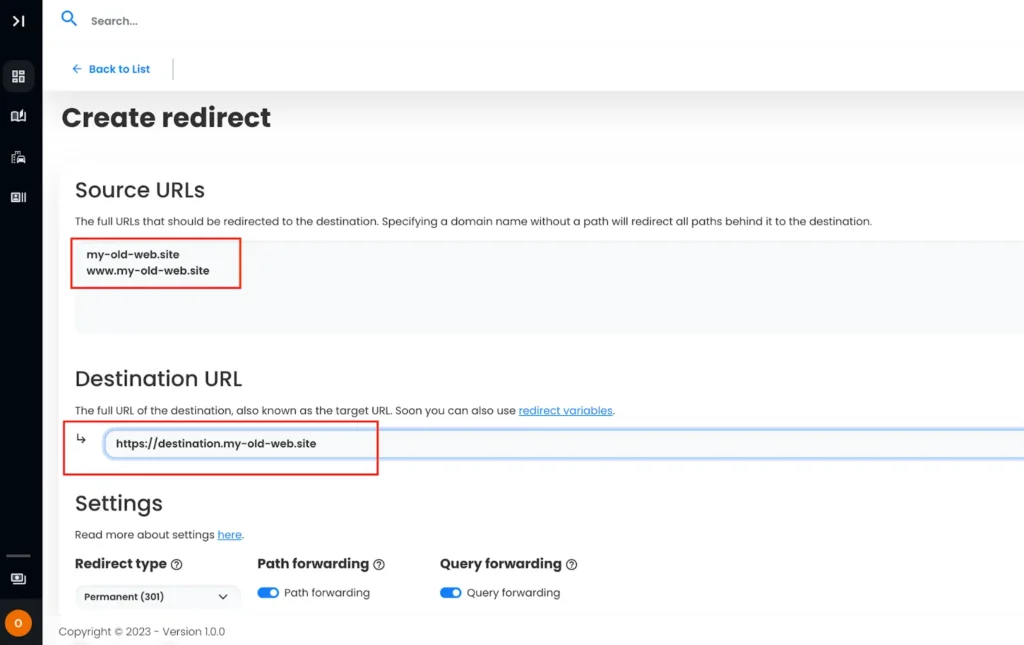
With all this information entered, we need to go ahead and create our redirect.
Note: After creating the redirect, you’ll notice the DNS checking as detected, and the required values are different. We need to tweak that.
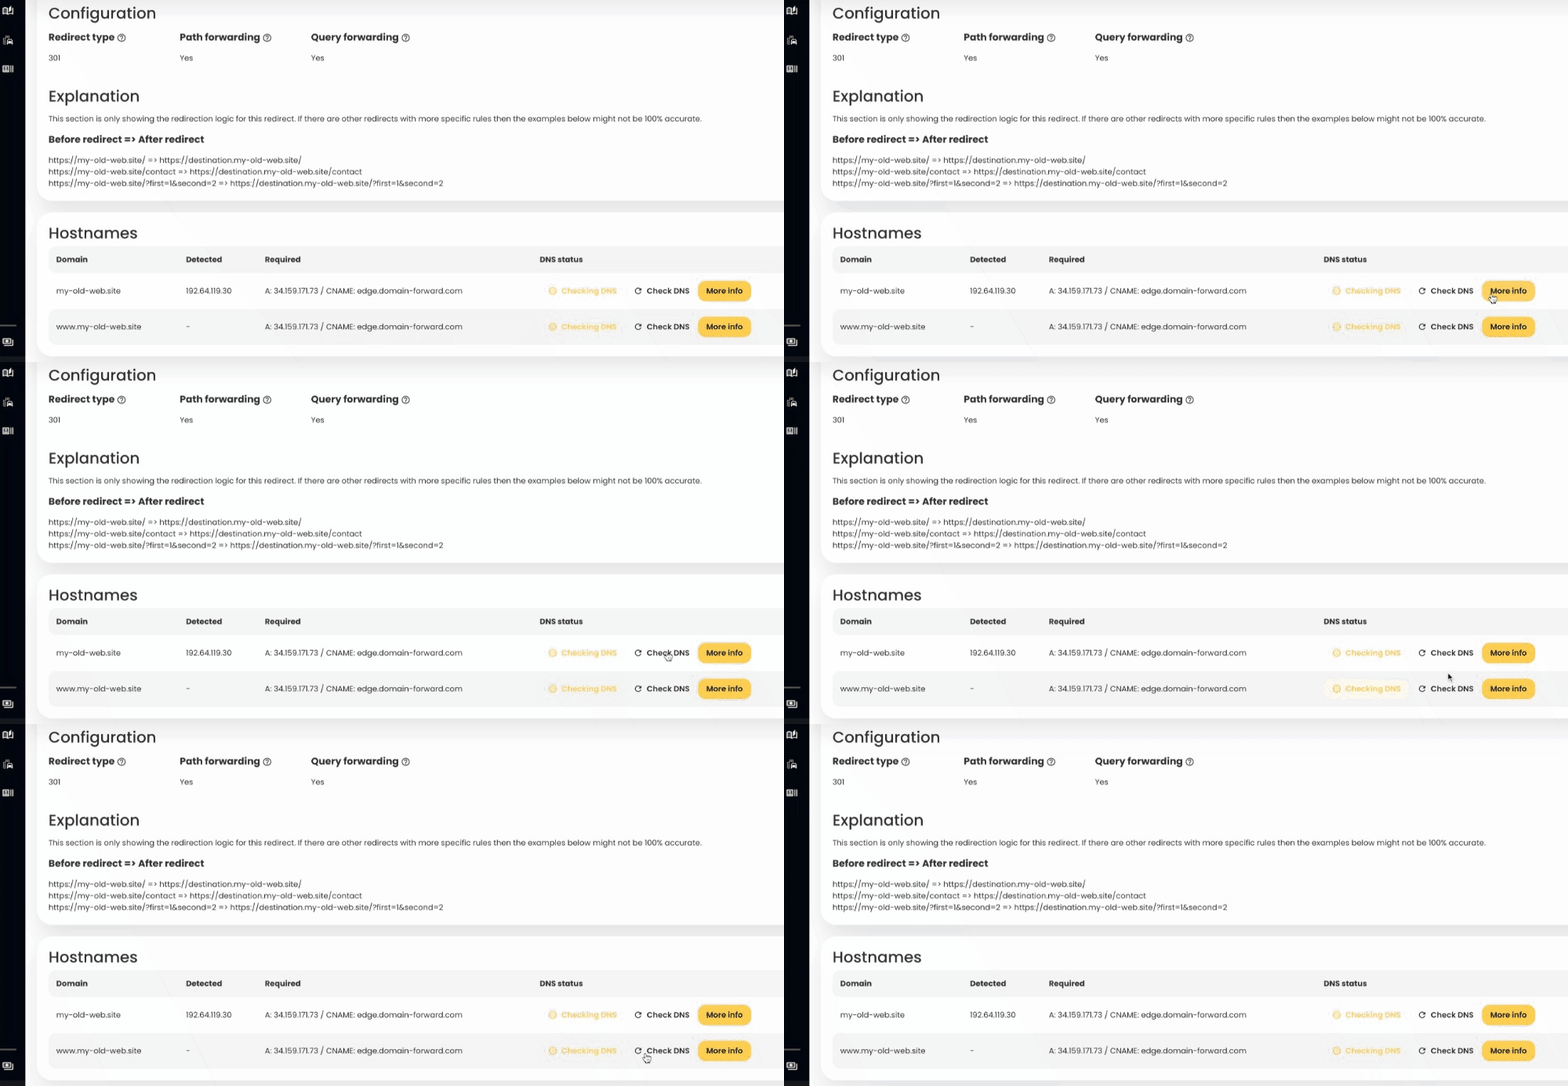
Step 5: Head over to Namecheap
To complete our domain redirect using Domain-Forward, we need to head to Namecheap to tweak the DNS changes.
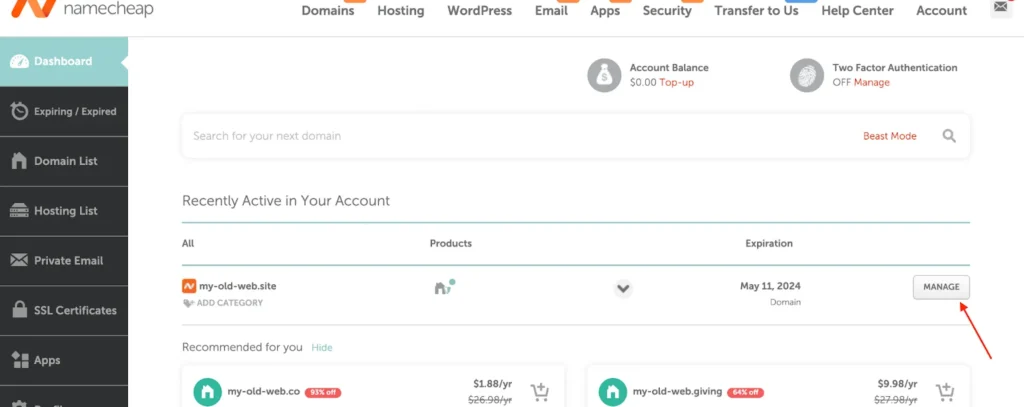
So log in to your Namecheap account, navigate to your Dashboard, and select the option for Manage for the domain you want to redirect.
When the new page loads, select the option for Advanced DNS
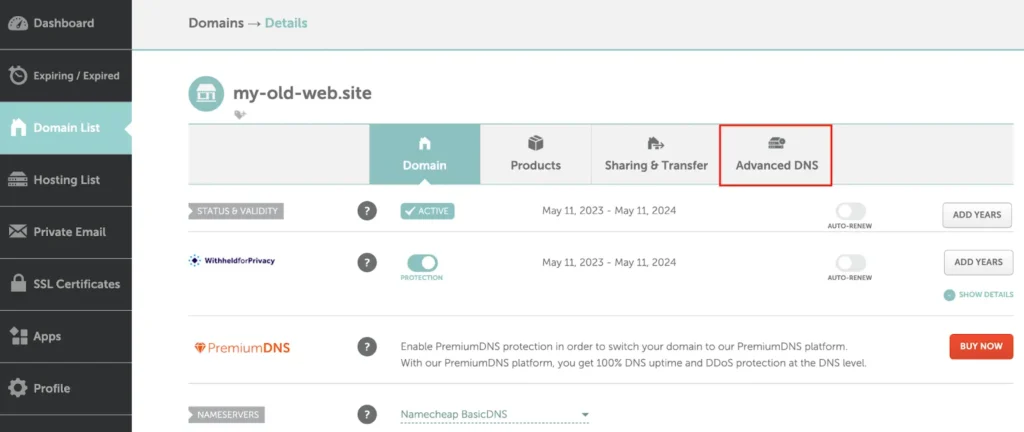
Step 6: Change DNS settings
Now, it’s time to tweak our DNS settings. If you have previously set up a URL redirect, you need to ensure you remove those records.
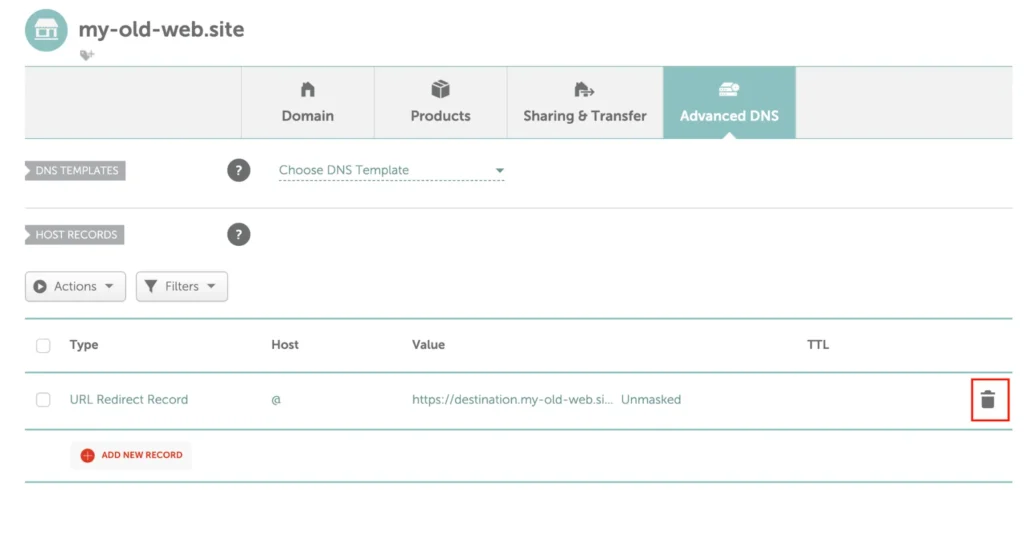
After deleting any previous redirects you have, click on the option for ADD NEW RECORD.
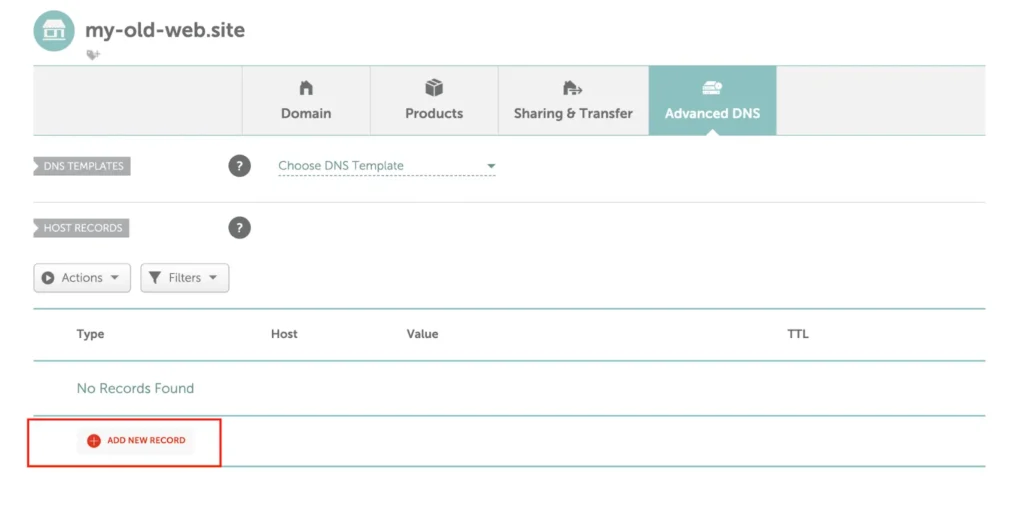
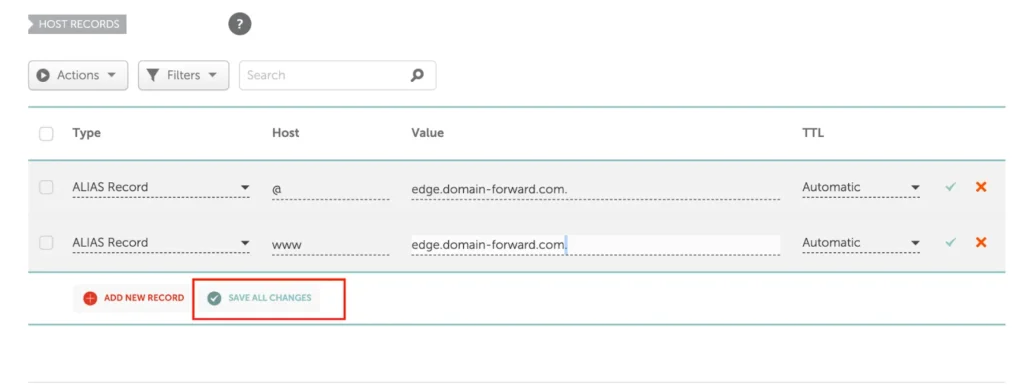
Select the Type ‘ALIAS Record and enter @ as Host with edge.domain-forward.com as Value. Please check that this is the value that is also provided for you in the Domain Forward app before you configure it like that. CNAME or IP entries work as well, but we have opted for ALIAS in this case.
With that done, we need to repeat the process. For the second option, select the ALIAS Record and enter www as Host with ‘edge.domain-forward.com’ as value. If you did everything right, you should have something like this:
After providing all the necessary information, click on “Save all changes.”
Step 7: Verify DNS At Domain-Forward.com
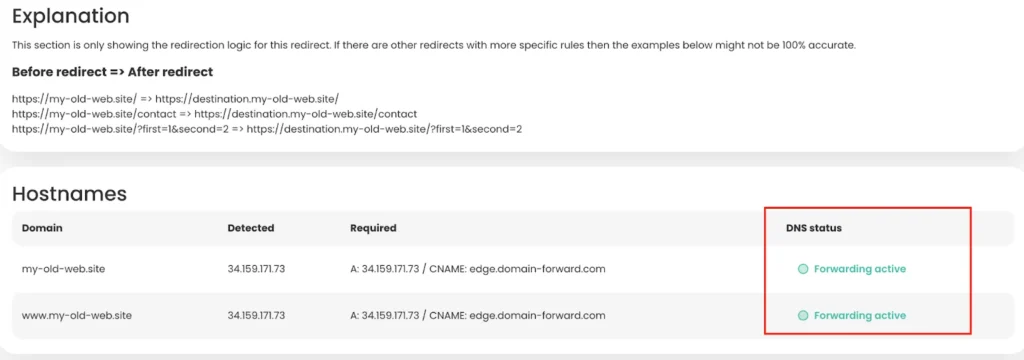
With our DNS changes now tweaked from the Namecheap backend, we only need to wait some time for the changes to be effected. Depending on the TTL set on those records, everything should be done in a few hours.
Here is what it should look like after the changes have been effected.
Step 8: Verify Redirect Using Online Tools
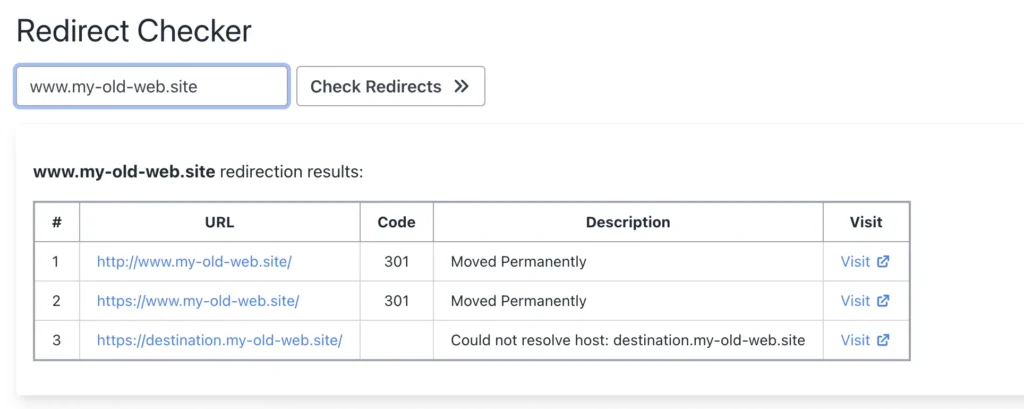
Now that we have configured the domain and the DNS entries as well, we can check if the redirection actually works. Below is an image that is taken from an online “redirect testing tool” and it does confirm that our redirection works correctly.
Conclusion
If you have read to this point, we are sure you’ll agree that the Domain-forward.com redirect option makes things much easier compared to when you use Namecheap. The cool part is that the Domain-forward.com option offers full HTTPS support, something you don’t get with Namecheap.
If you found this post helpful, you can support us by subscribing to our paid plans. It will go a long way to ensure we keep offering quality services.


